
![]()
The notification for upgrading to Windows 10 is still present on computers using Windows 7 and Windows 8/8.1 operating systems. That can be very annoying and is considered as nagware. Nagware – because it is constantly nagging you to install Windows 10. It is also known as Get Windows 10, or GWX for short. In this article you will learn how to remove the notification from your computer, so it doesn’t show again.

Windows 10 Upgrade Notification – Where Did It Come From?
The Windows 10 Upgrade Notification usually comes from the Windows Update feature. Installed manually or not, it most often comes from the update known as KB 3035583.
That goes both for Windows 7 and 8, although there are a few other updates known to install the annoying notification on the two operating systems, separately:
- KB 2976978 (Compatibility update for Windows 8.1)
- KB 2952664 (Compatibility update for Windows 7)
If you are tired of seeing the Get Windows 10 icon in the system tray, then it is important to make sure Updates are not installed automatically. The best way to do so, is to go to Windows Update, select Change Settings and leave the option Check for updates but let me choose whether to download and install them.
Select that option both for Important and Recommended Updates. This way, before an update is downloaded you will see what is going to be installed.
You can also find the above-mentioned updates by name and select the option Hide. Supposedly, this will make them stop from appearing again. Sadly, people report that this is not the case as they have seen the updates pop-up again. Read further to find out how to tackle this problem.

Windows 10 Upgrade Notification – More Information
Many people consider the Windows 10 Upgrade Notification as nagware and they have the full right. The notification also has other names such as Get Windows 10 or GWX for short. With constantly appearing in the system tray and being so hard to get rid of, GWX is an application that users want to remove.
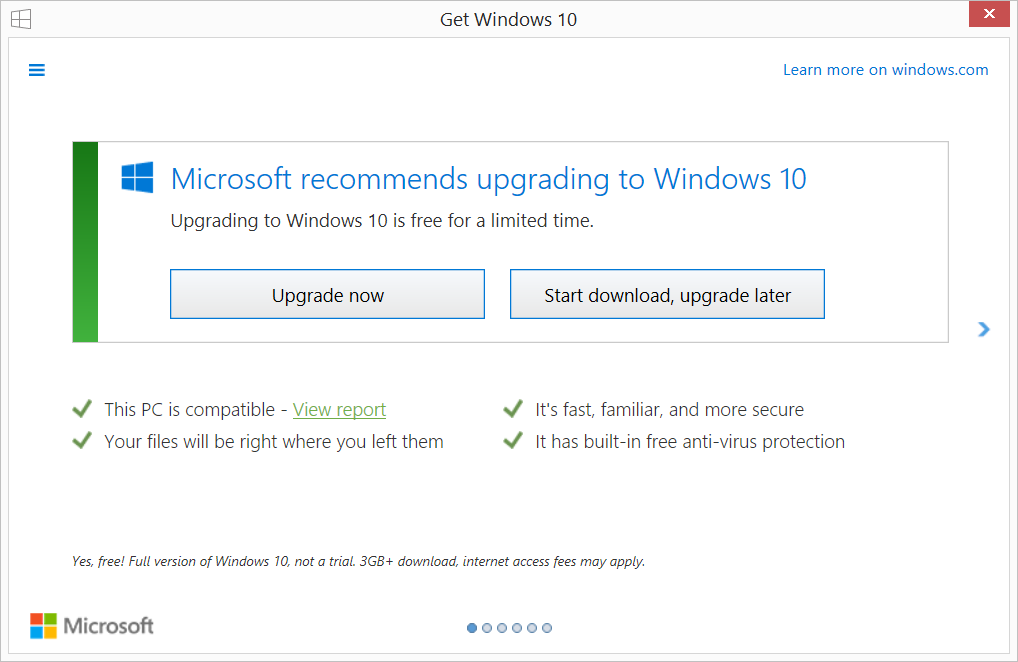
If you click on the icon itself it will load a window with the upgrade option if your PC setup is compatible:
If you don’t see the notification, the application might be still running. An easy way to find out is to do a simple check. Head over to the Task Manager (can be started by pressing CTRL+ALT+DEL button combination and selecting Task Manager from the screen). Under the tab Processes start looking for the GWX process and you will probably find that it is there:
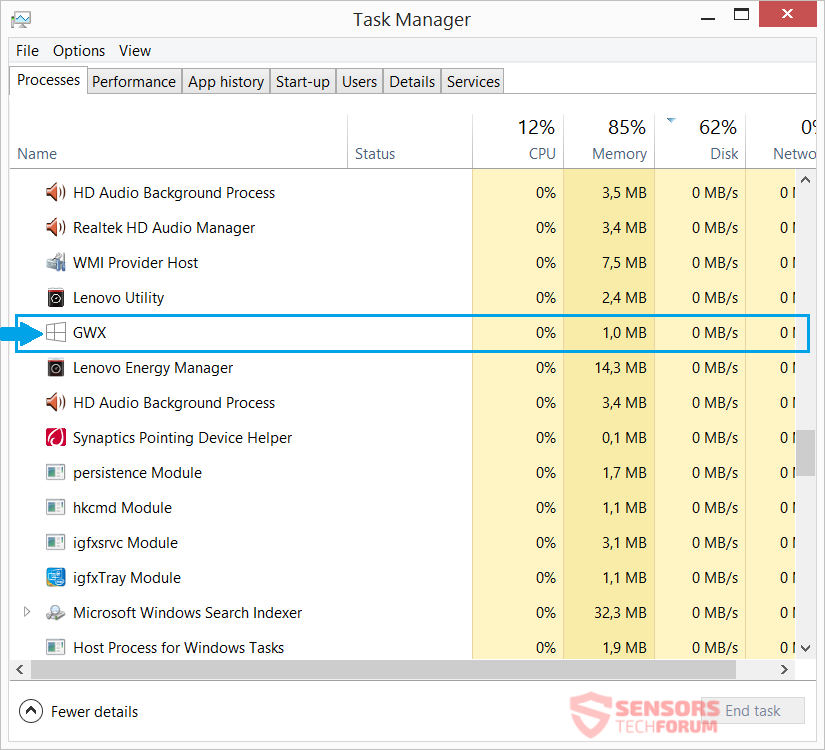
You can kill the process from there, but that will last only for the current session. Next time that Windows starts, it will re-launch the process with it.

Windows 10 Upgrade Notification – How to Remove It?
So far we know that hiding updates and killing the GWX process are both not a permanent solution. The known methods to remove the annoying Get Windows 10 application are going to be portrayed below.
Method 1 – Disable GWX From Windows Registry Editor
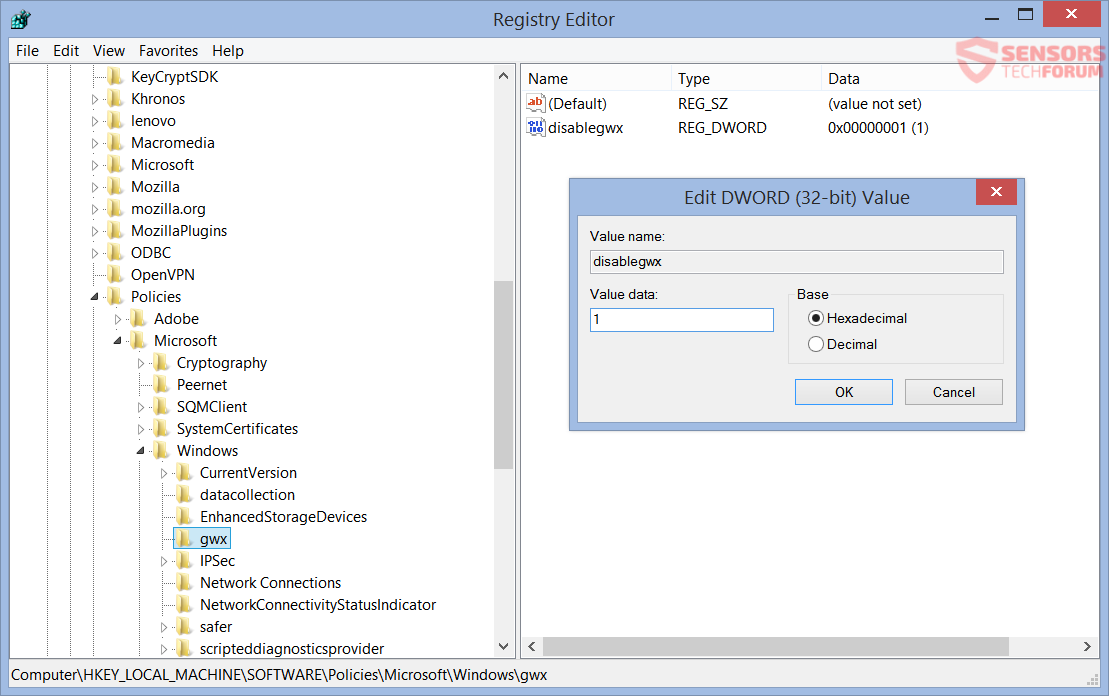
In the Start menu, go to Search and type regedit. Hit Enter and the Registry Editor should load. once loaded, navigate to the following directory:
→ HKEY_LOCAL_MACHINE\SOFTWARE\Policies\Microsoft\Windows\gwx
If the gwx entry doesn’t exist, create it. (Right-click on Windows and select New Key – rename to “gwx”.)
Inside that key, if you don’t see a DWORD value named “disableGwx” – create one, by right-clicking on the empty field inside the “gwx” Key and select New> DWORD 32-bit Value (name it accordingly with the name “disableGwx”). Right-click on it, select Modify and set the Value to “1”.
This is how the end result looks like:
If prompted, restart your computer to complete the changes.
Method 2 – Delete the Windows.~BT Folder
A folder named Windows.~BT might be located on your C: drive partition. Its file size can vary from a few MB to around 12 GB, or even more in rare cases. The Windows 10 upgrade or parts of it along with files for displaying the notification for getting the operating system are inside the folder. You might be unable to click the folder if you don’t have the right privileges, but you can delete it another way.
For Windows 8/8.1, right-click on the Start menu and select Command Prompt (Admin).
For Windows 7, left-click on the Start menu, type in Command Prompt and when it appears as a search result, right-click the Command Prompt icon and select Run as administrator.
Next, you just have to copy and paste the following lines (you can select them all at once too), and then hit the Enter button to confirm:
→takeown /F C:\$Windows.~BT\* /R /A
icacls C:\$Windows.~BT\*.* /T /grant administrators:F
rmdir /S /Q C:\$Windows.~BT\
If everything is done right you will see the message Successfully processed.
Method 3 – Run a Script to Disable Updates and Telemetry
If all else fails, don’t worry. There is a script that can do everything for you. Not only will it disable the Windows 10 upgrade notification, but it will hinder Microsoft from spying on you. It might take a bit longer than the other methods, but it works. You can learn more about it from the article on how to Stop Windows Telemetry. This should eradicate the Windows 10 upgrade notification once and for all.