
Protections Fix Best Virus
Protections Fix Best or Protections-fix.best is a questionable website that shows fake alert messages on iPhone/Mac/iPad devices’ Calendar app. In case that you see Protections Fix Best virus notifications in your Calendar you should refrain from clicking them. All the messages by Protections-fix.best are related to sponsored content and sites with misleading information. In fact, these scam messages often serve for the spread of rogue/malicious applications and nasty online scams that aim to harvest sensitive data.
Follow the removal instructions in this article and get rid of Protections Fix Best virus.

Threat Summary
| Name | Protections Fix Best / Protections-fix.best |
| Type | Scam/Malware for iOS and macOS |
| Short Description | Aims to modify operating system settings to display scam notificaitons in the calendar app. |
| Symptoms | The affected device begins to display various types of notifications, especially in the Calendar. This issue causes slowdowns and exposes the system at risk of malware infections. |
| Distribution Method | Software Packages, Freeware, Shady Websites |
| Detection Tool |
See If Your System Has Been Affected by malware
Download
Malware Removal Tool
|
User Experience | Join Our Forum to Discuss Protections Fix Best. |
Protections-fix.best Calendar Virus
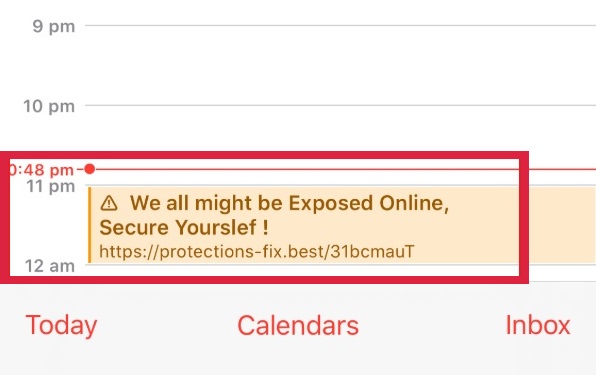
Protections-fix.best is a website that generates various fake alert messages by affecting the Calendar app on iPhone, Mac and iPad devices. This infection is also referred to Protections Fix Best. Once Protections Fix Best virus gains access to the target system and app, it starts displaying all those intrusive scam messages without your permission.
The reason why you receive Protections-fix.best alert messages on your iPhone or Mac is most likely an unwanted value added to the calendar app by some kind of an unwanted program or suspicious extension. Such apps are designed to apply changes without users’ knowledge. That’s why we recommend a deep scan of the affected system. A scan with a reliable anti-malware tool will detect harmful files if such are running on the system and let you remove them with a few clicks.
Notifications by Protections Fix Best push various deceptive messages in the Calendar app. Beware with the messages by Protections-fix.best are very likely to be related to promotions of deceptive offers, scam messages and download pages for potentially unwanted programs.
Typically, new messages by Protections Fix Best appear in the calendar every few hours. This behavior of the virus can be extremely annoying. As regards the messages, they aim to convince you that you should download a system cleaner that will remove detected viruses or enter the site to learn how to receive a special gift, and so on.
The end purpose of such a scam message may be to trick you into visiting sponsored content, downloading rogue/malicious software, entering sensitive credentials, or calling a fake tech support number. Whatever the case may be, beware and don’t click on these messages.

How to Remove Protections Fix Best Virus
In order to remove Protections Fix Best virus along with all undesired files that support its activities, you should complete several removal steps. The guide below reveals all essential removal steps in their precise order. In order to fully get rid of files installed by undesired programs and strengthen PC security, we recommend that you combine the steps.
A bonus tip: After you finish with the guide below make sure to set your default calendar.
Instructions for iPhone, iPad, or iPod touch:
-
1. Go to Settings > Select Calendar.
2.Tap Default Calendar.
3.Choose the calendar that you want to use as your default.
For your Mac:
-
1.Open Calendar (or iCal).
2.Click Calendar in the menu bar and choose Preferences.
3.In the General tab, choose the calendar that you want to use from the Default Calendar menu.
On iCloud.com:
-
1.Go to Calendar > Click the gear icon > Preferences.
2.Choose the calendar that you want to use from the Defaults menu.
3.Click Save.
In case you have further questions or need additional help with the removal process, don’t hesitate to leave us a comment.
Gergana Ivanova
Highly motivated writer with 5+ years of experience writing for ransomware, malware, adware, PUPs, and other cybersecurity-related issues. As a writer, I strive to create content that is based on thorough technical research. I find joy in the process of creating articles that are easy to understand, informative, and useful. Follow me on Twitter (@IRGergana) for the latest in the field of computer, mobile, and online security.
Follow Me:
Preparation before removal of Protections Fix Best.
Before starting the actual removal process, we recommend that you do the following preparation steps.
- Turn off your phone until you know how bad is the virus infection.
- Open these steps on another, safe device.
- Make sure to take out your SIM card, as the virus could corrupt it in some rare cases.
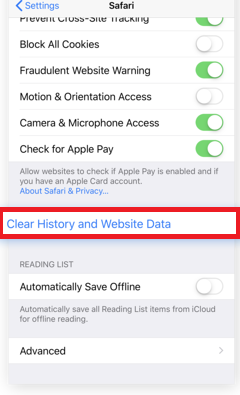
Step 1: Clear iPhone or iPad History and Data to remove settings changed byProtections Fix Best
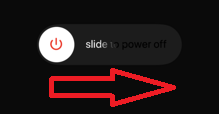
Step 2: Reset your iPhone to see if the suspicious behaviour is fixed and Protections Fix Best stops infecting.
Step 3: Restore or Reset Your iPhone or iPad to removeProtections Fix Best
If you have set up a backup on your iPhone or iPad, a good idea is to restore your device to an earlier time, when the virus was not present and the usage of your device was smooth and fast. Here is how to do it: