A new Facebook spam of a malicious link connected with request.blob.core.windows.net has been spreading vigorously via users. Security researchers believe that the scam itself is redistributed by malicious software affecting primarily android devices, because after clicking on the questionable spam link, the user receives redirect to a web page prompting to ‘update’ Android. Security researchres strongly advise users to back up their phone contacts and other information on external devices after which use the manuals below to factory reset their android devices. It is also advisable to change all of your passwords, especially the Facebook password.

Threat Summary
| Name | My Secret Video Facebook Spam |
| Type | Malicious Redirect/Malicious script/Spam Bot |
| Short Description | Redirect to a fake upgrade of Android, flash player or java. |
| Symptoms | After installing the malicious application the user may see posts on his Facebook profile without his consent. |
| Distribution Method | Clicking on malicious links distributed via spam in the friend list of the user under the title ‘Check my secret video |
| Detection Tool |
See If Your System Has Been Affected by malware
Download
Malware Removal Tool
|
User Experience | Join Our Forum to Discuss My Secret Video Facebook Spam. |
| Data Recovery Tool | Windows Data Recovery by Stellar Phoenix Notice! This product scans your drive sectors to recover lost files and it may not recover 100% of the encrypted files, but only few of them, depending on the situation and whether or not you have reformatted your drive. |
My Secret Video Facebook Spam – How Did I Get It?
One way you may have started seeing posts that you haven’t made featuring the hxxps://request(.)blob.core(.)windows(.)net/h172/1se
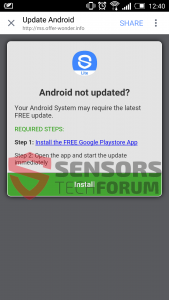
web link embedded in them is by clicking on the link itself. By default if you click on the link it may react differently for every OS. We have visited it from an android device and after 5 redirects we were redirected to the following page:
The web page displays a fake android upgrade prompt which some users may install. In reality, virus researchers are convinced that this is a malicious application which obtains permissions to many different key processes that manage the applications, the phone itself and the information in its memory. Once installed, the ‘upgrade’ may initiate scripts that give it permission to automatically post on your behalf.
My Secret Video Facebook Spam – More about It
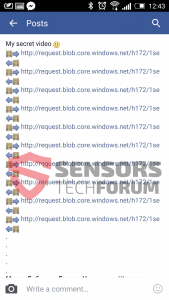
Once installed on your device the Android ‘Upgrade’ may request and obtain read and write permissions as well as permissions to manage the installed applications of the device. The software then displays the following post:
The post itself tags the maximum number of no more than 50 users in the friend list of the profile it posts from. This is done along with the web link being repeated several times. When opened the web link starts bouncing from URL to URL and after 5 redirects it transfers the user to ms.offer-wonder.info – the site offering the ‘upgrade’.
Even though it is not confirmed, this particular phone malware may also interact with the device`s SIM card, in a malicious way. It may charge the user a lot of money for automatic messaging service without the user`s consent.
My Secret Video Facebook Spam – What to do If I Am Infected
In case you have install this application a simple uninstall from your app manager wont cut it. You should extract all your important data from your phone on a memory stick, upload it in the cloud, back it up or copy it to your computer. Copying the data to your computer by connecting to it is not advisable since the malware may download malicious files that infect PCs and influence it in this way. The truth is it really depends but you shouldn`t risk connecting your phone to the computer before securing it. In case you do not have any other option, we recommend to install external firewall on your PC such as ZoneAlarm. If you are with a mobile device, it is best to follow the instructions here.
- Windows
- Mac OS X
- Google Chrome
- Mozilla Firefox
- Microsoft Edge
- Safari
- Internet Explorer
- Stop Push Pop-ups
How to Remove My Secret Video Facebook Spam from Windows.
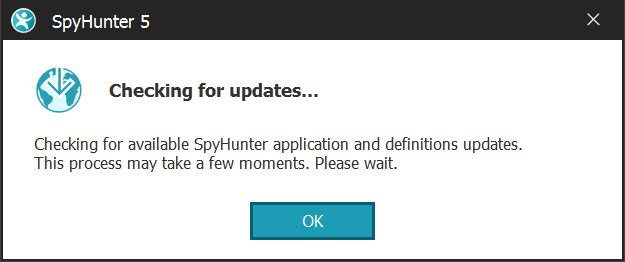
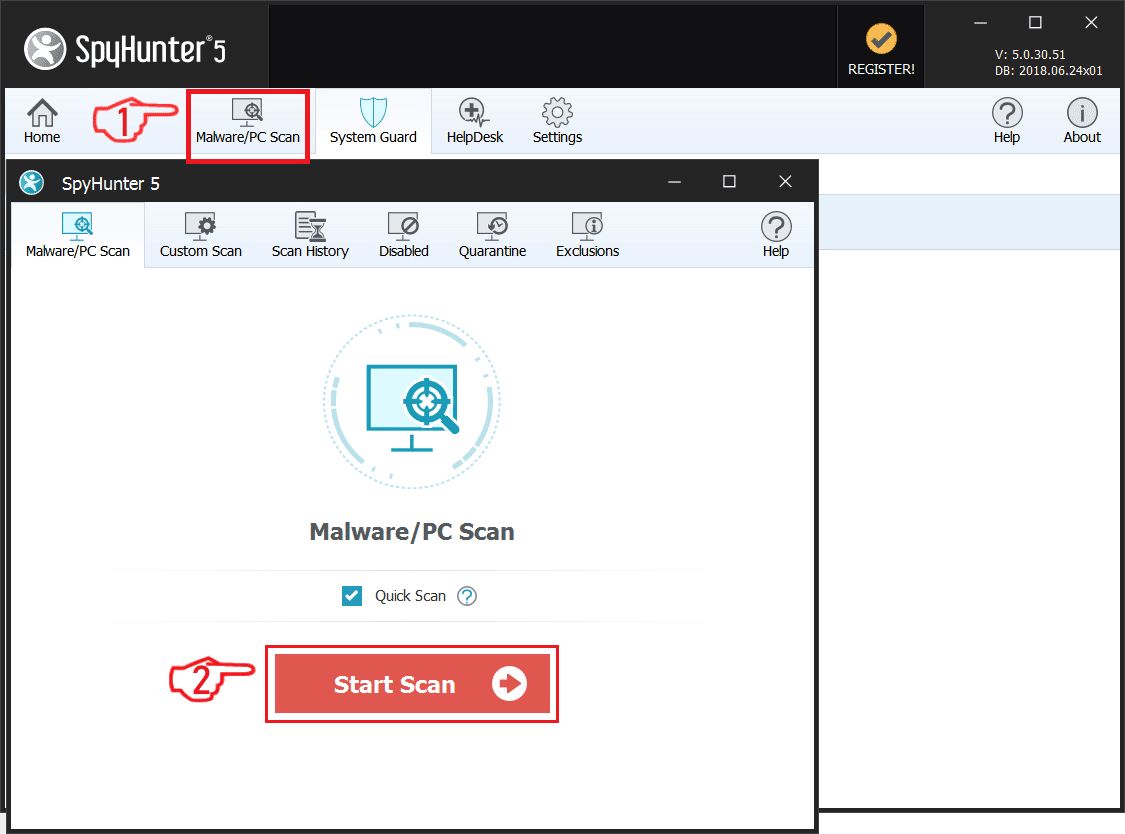
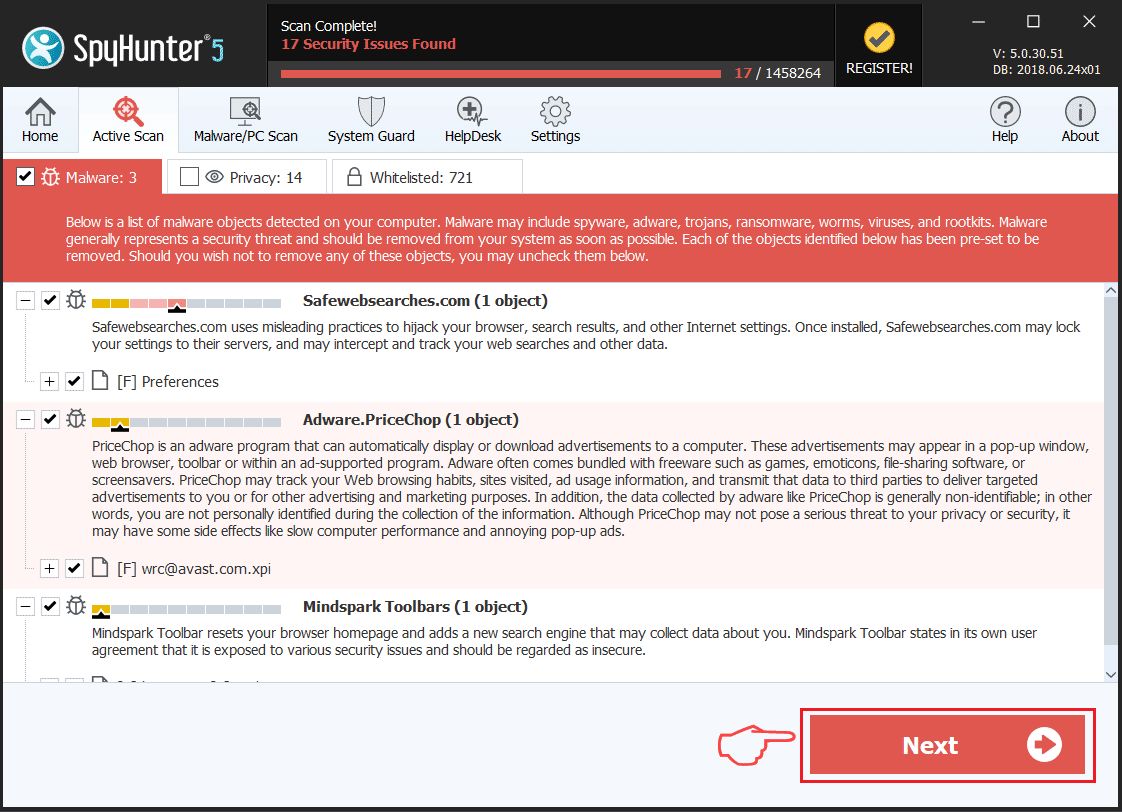
Step 1: Scan for My Secret Video Facebook Spam with SpyHunter Anti-Malware Tool
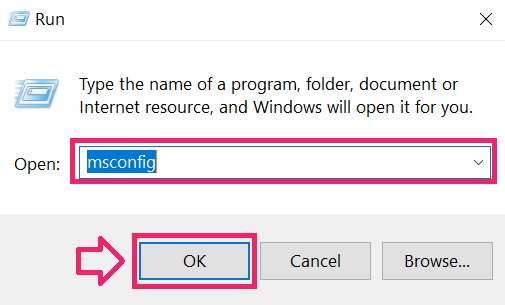
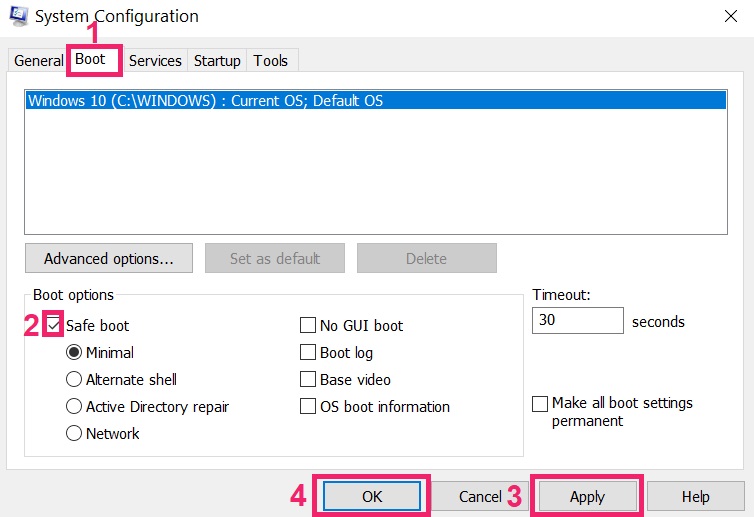
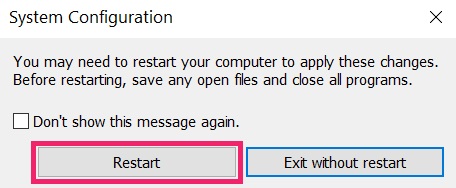
Step 2: Boot Your PC In Safe Mode

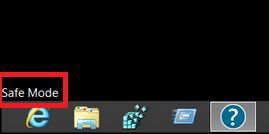
Step 3: Uninstall My Secret Video Facebook Spam and related software from Windows
Uninstall Steps for Windows 11
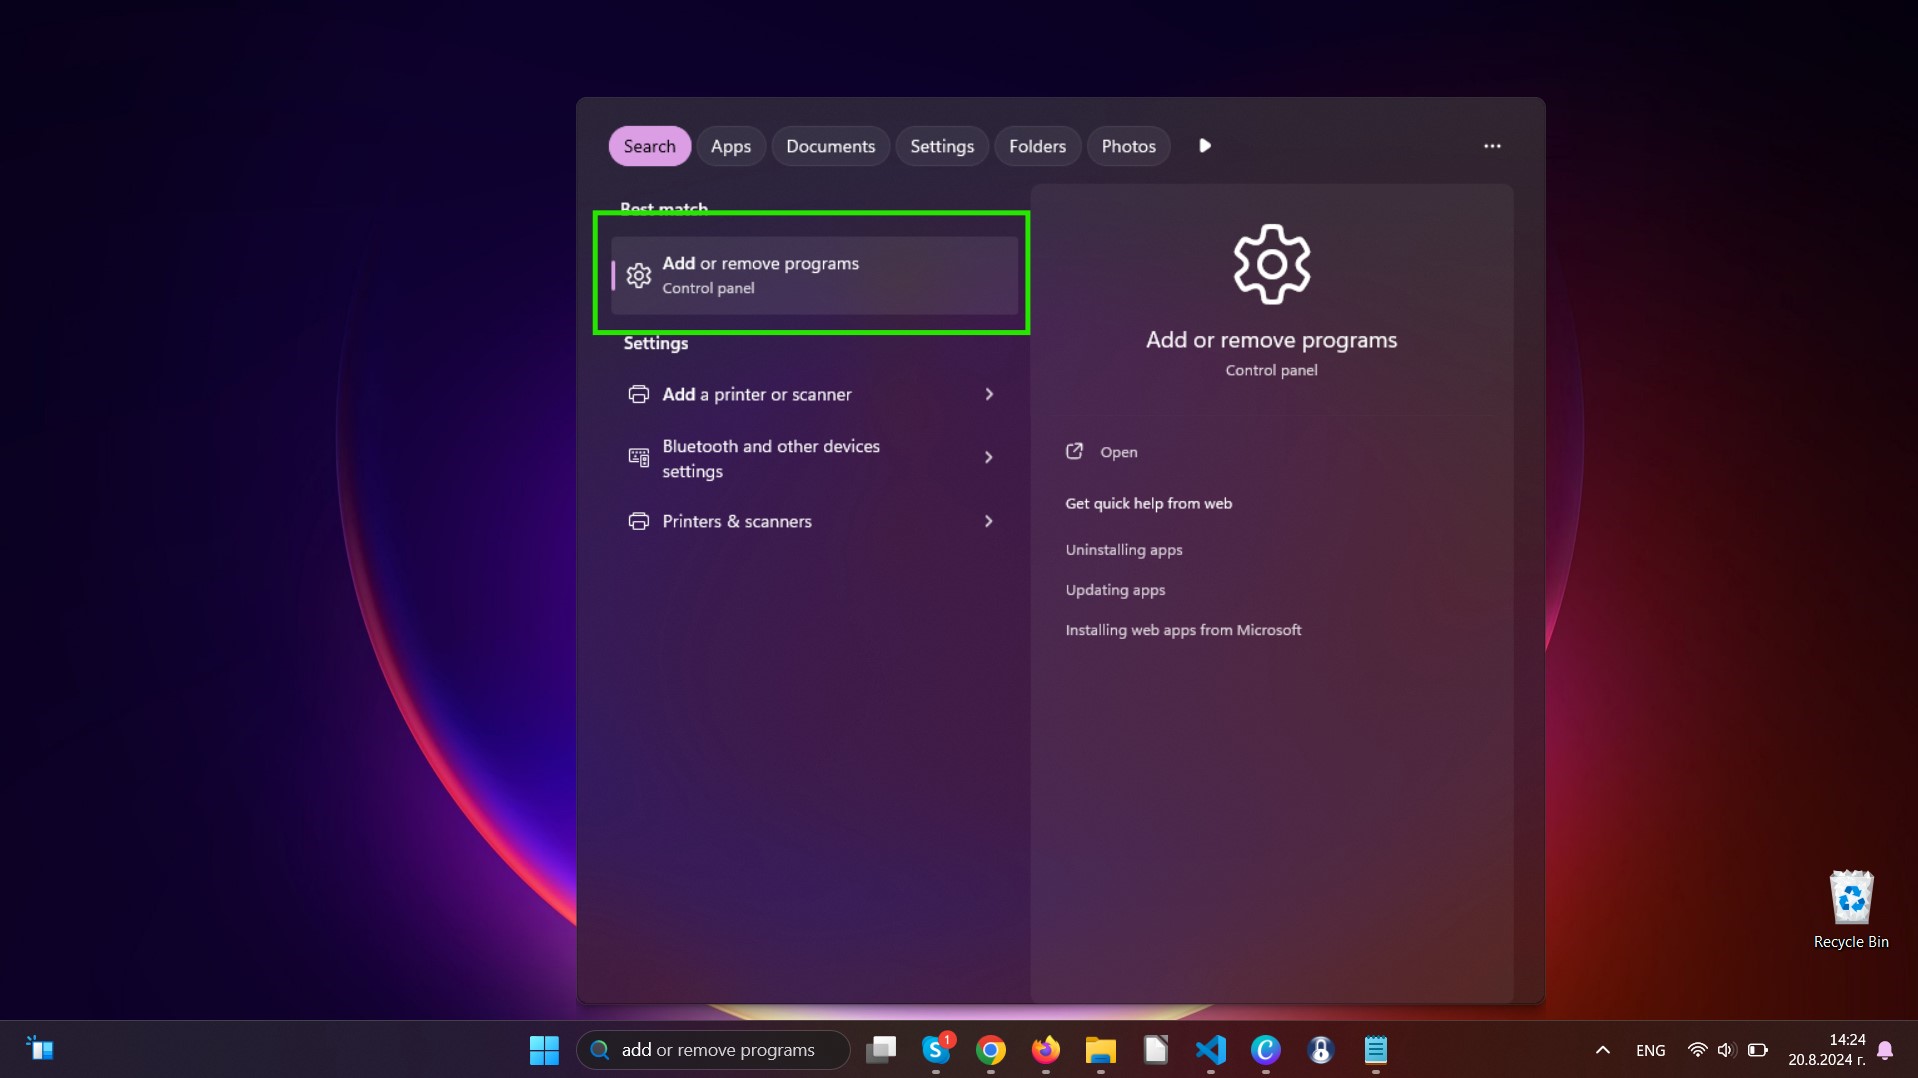
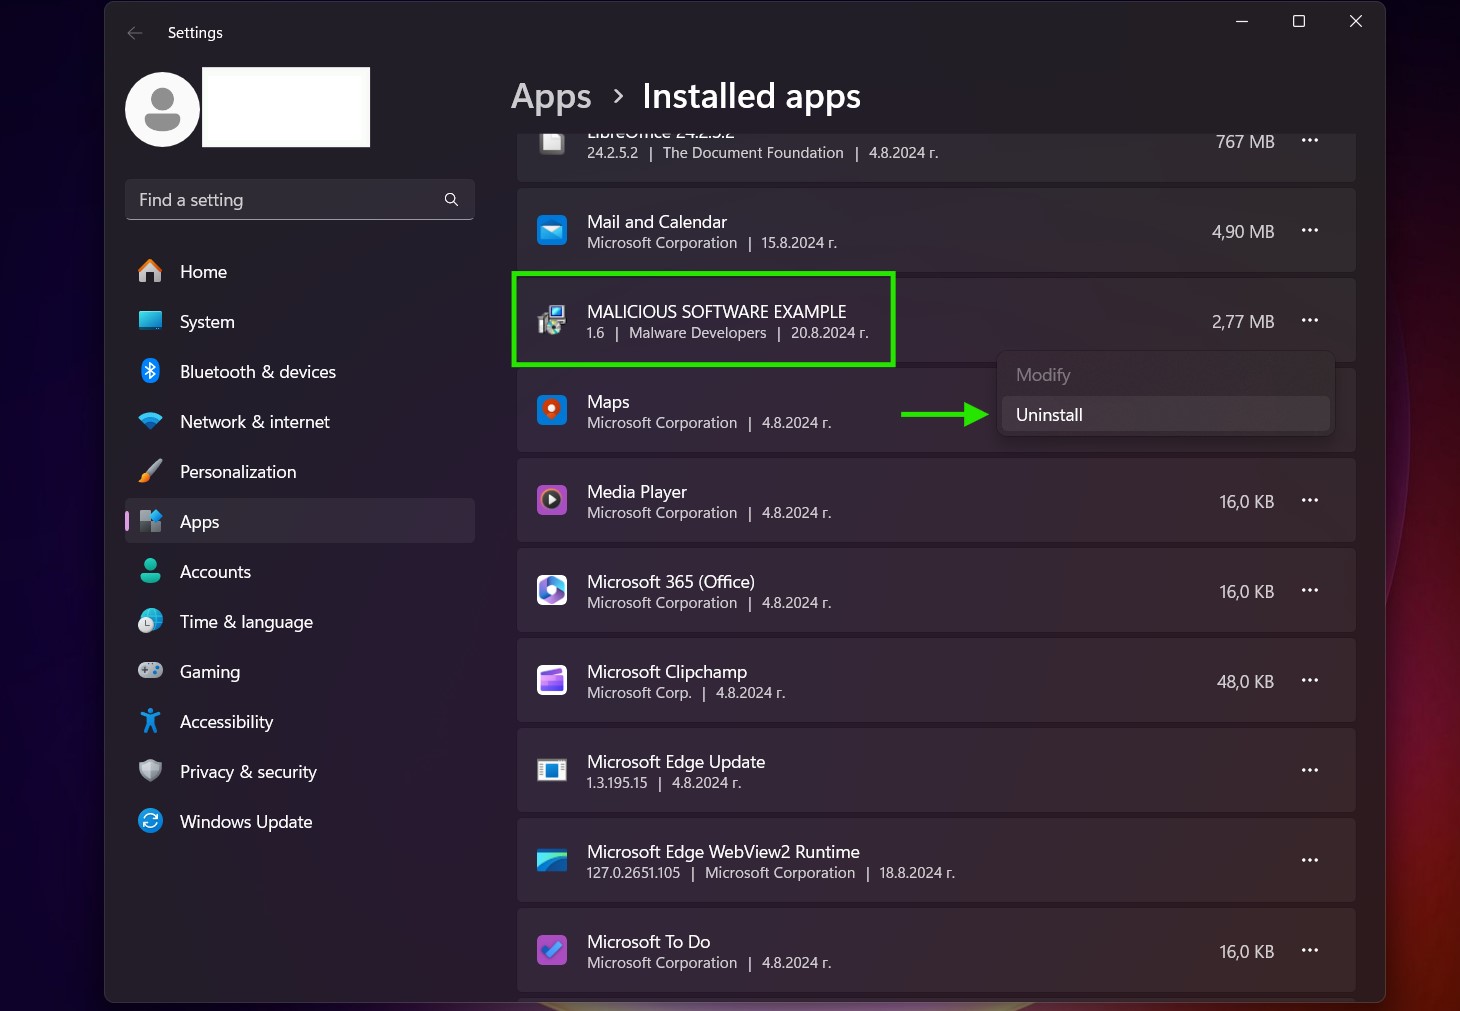
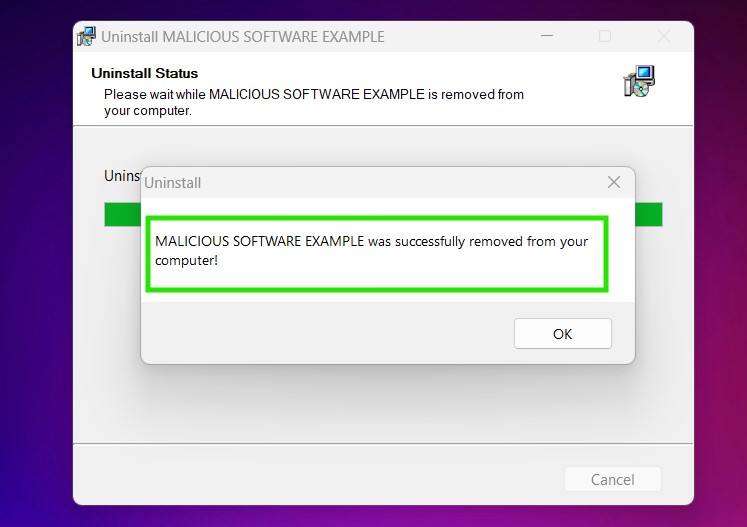
Uninstall Steps for Windows 10 and Older Versions
Here is a method in few easy steps that should be able to uninstall most programs. No matter if you are using Windows 10, 8, 7, Vista or XP, those steps will get the job done. Dragging the program or its folder to the recycle bin can be a very bad decision. If you do that, bits and pieces of the program are left behind, and that can lead to unstable work of your PC, errors with the file type associations and other unpleasant activities. The proper way to get a program off your computer is to Uninstall it. To do that:

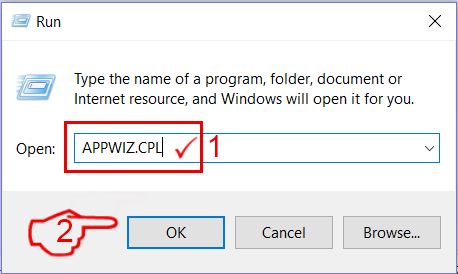
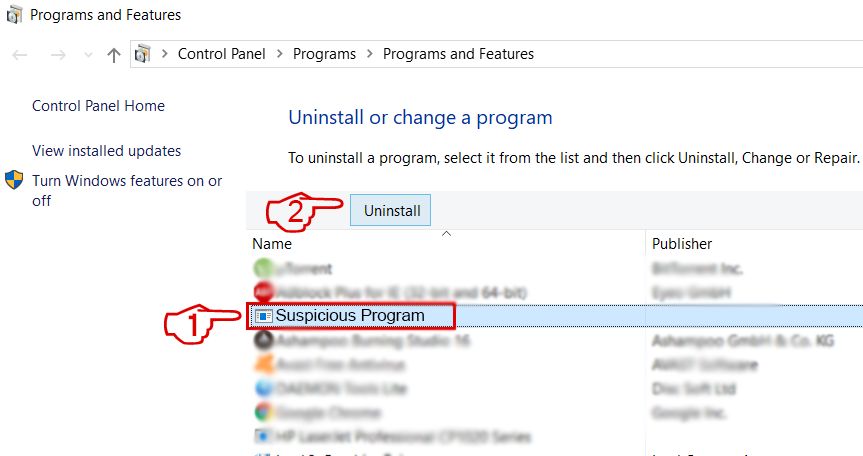 Follow the instructions above and you will successfully uninstall most programs.
Step 4: Clean Any registries, Created by My Secret Video Facebook Spam on Your PC.
The usually targeted registries of Windows machines are the following:
- HKEY_LOCAL_MACHINE\Software\Microsoft\Windows\CurrentVersion\Run
- HKEY_CURRENT_USER\Software\Microsoft\Windows\CurrentVersion\Run
- HKEY_LOCAL_MACHINE\Software\Microsoft\Windows\CurrentVersion\RunOnce
- HKEY_CURRENT_USER\Software\Microsoft\Windows\CurrentVersion\RunOnce
You can access them by opening the Windows registry editor and deleting any values, created by My Secret Video Facebook Spam there. This can happen by following the steps underneath:
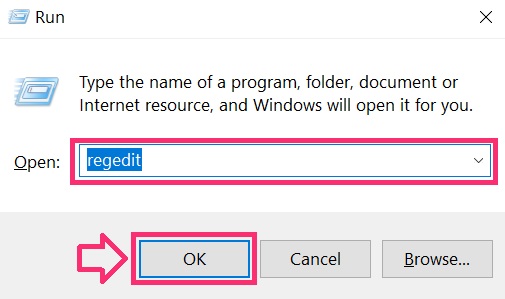

 Tip: To find a virus-created value, you can right-click on it and click "Modify" to see which file it is set to run. If this is the virus file location, remove the value.
Video Removal Guide for My Secret Video Facebook Spam (Windows).
Get rid of My Secret Video Facebook Spam from Mac OS X.
Step 1: Uninstall My Secret Video Facebook Spam and remove related files and objects
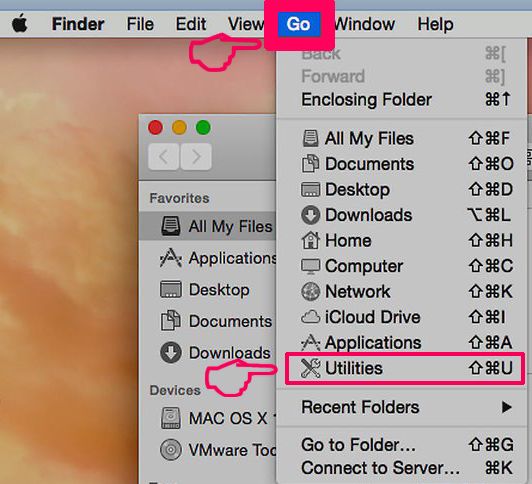
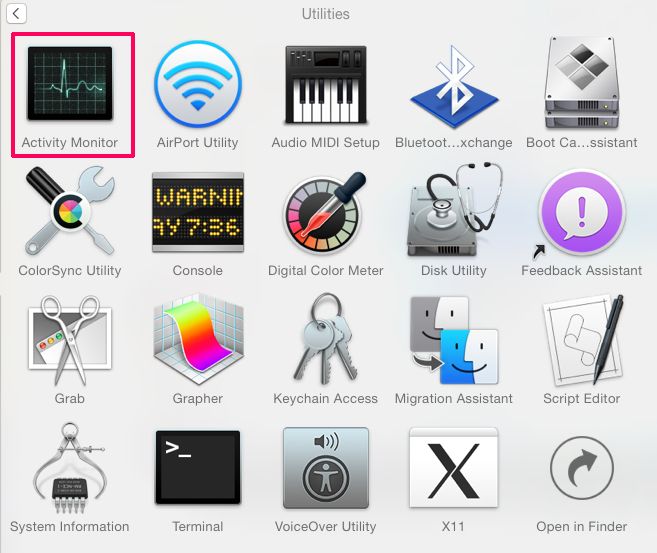
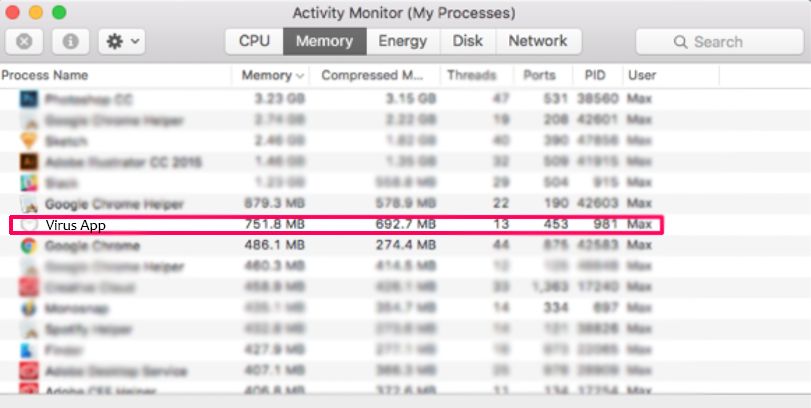
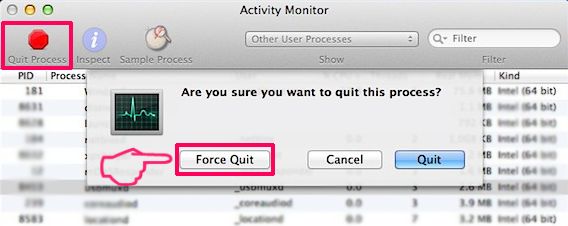
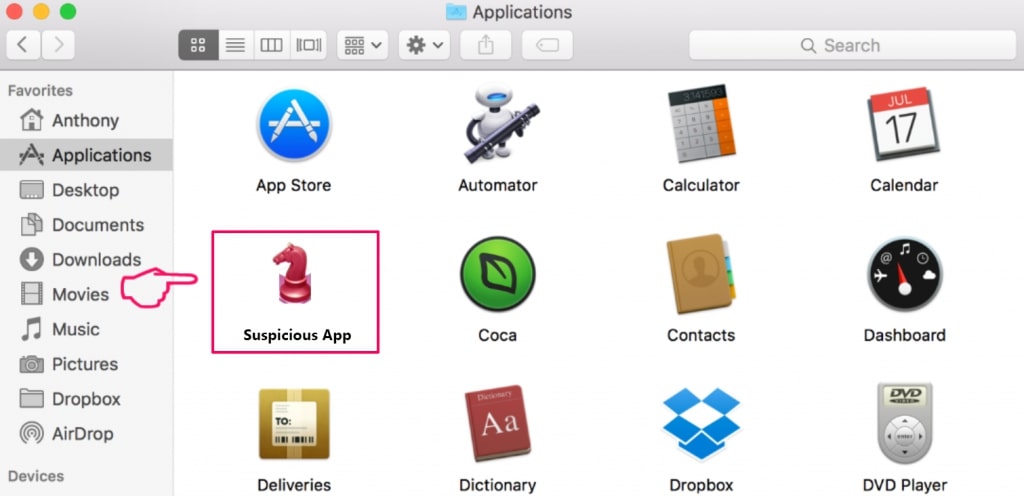
Your Mac will then show you a list of items that start automatically when you log in. Look for any suspicious apps identical or similar to My Secret Video Facebook Spam. Check the app you want to stop from running automatically and then select on the Minus (“-“) icon to hide it.
- Go to Finder.
- In the search bar type the name of the app that you want to remove.
- Above the search bar change the two drop down menus to “System Files” and “Are Included” so that you can see all of the files associated with the application you want to remove. Bear in mind that some of the files may not be related to the app so be very careful which files you delete.
- If all of the files are related, hold the ⌘+A buttons to select them and then drive them to “Trash”.
In case you cannot remove My Secret Video Facebook Spam via Step 1 above:
In case you cannot find the virus files and objects in your Applications or other places we have shown above, you can manually look for them in the Libraries of your Mac. But before doing this, please read the disclaimer below:
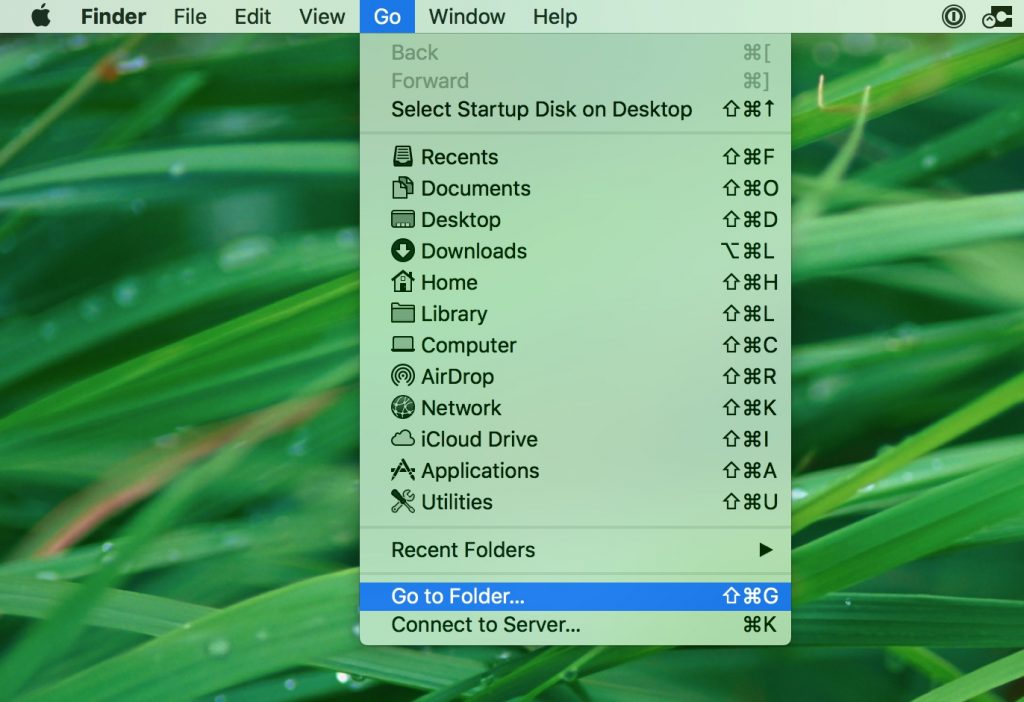
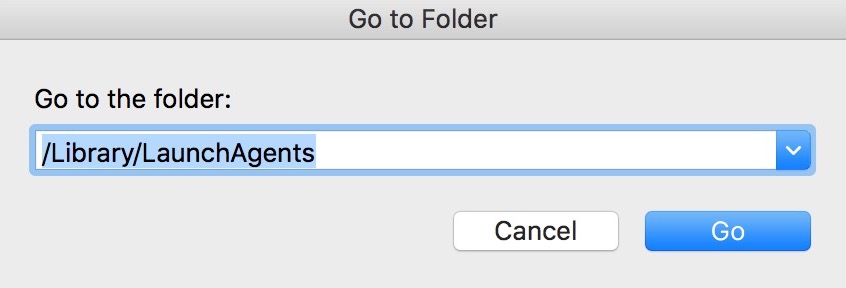
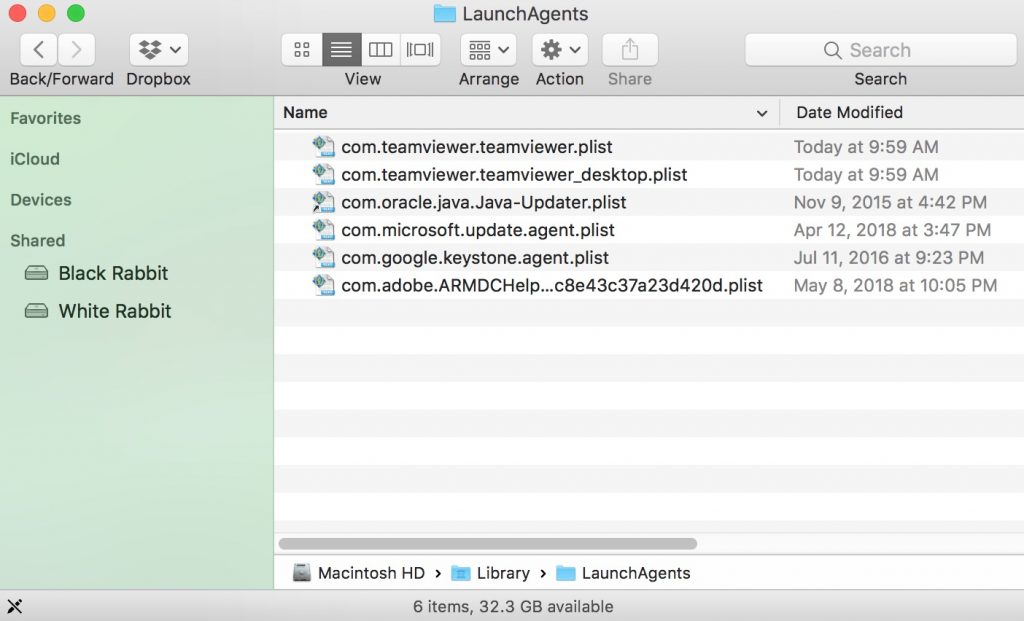
You can repeat the same procedure with the following other Library directories:
→ ~/Library/LaunchAgents
/Library/LaunchDaemons
Tip: ~ is there on purpose, because it leads to more LaunchAgents.
Step 2: Scan for and remove My Secret Video Facebook Spam files from your Mac
When you are facing problems on your Mac as a result of unwanted scripts and programs such as My Secret Video Facebook Spam, the recommended way of eliminating the threat is by using an anti-malware program. SpyHunter for Mac offers advanced security features along with other modules that will improve your Mac’s security and protect it in the future.
Video Removal Guide for My Secret Video Facebook Spam (Mac)
Remove My Secret Video Facebook Spam from Google Chrome.
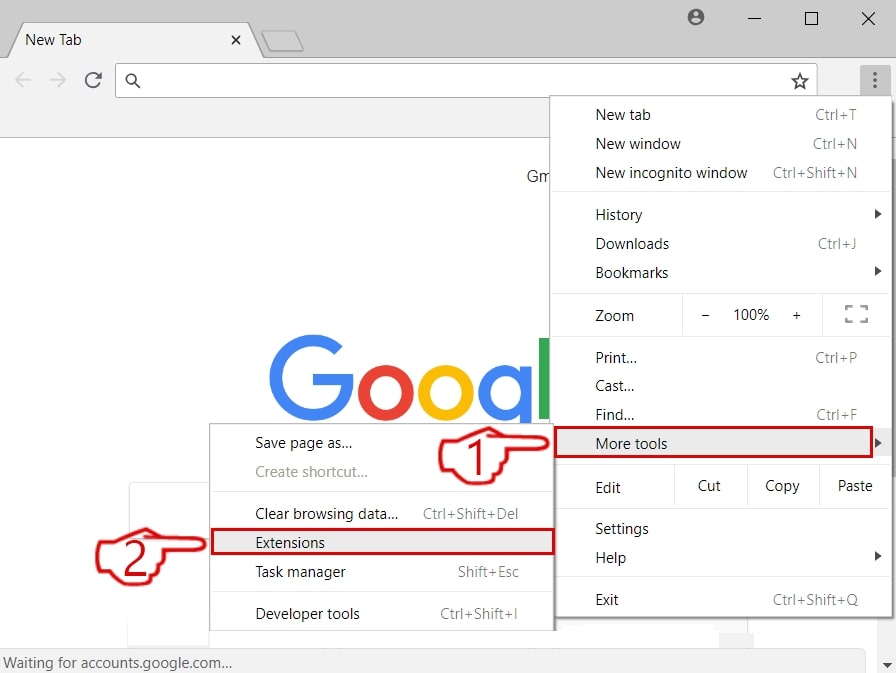
Step 1: Start Google Chrome and open the drop menu
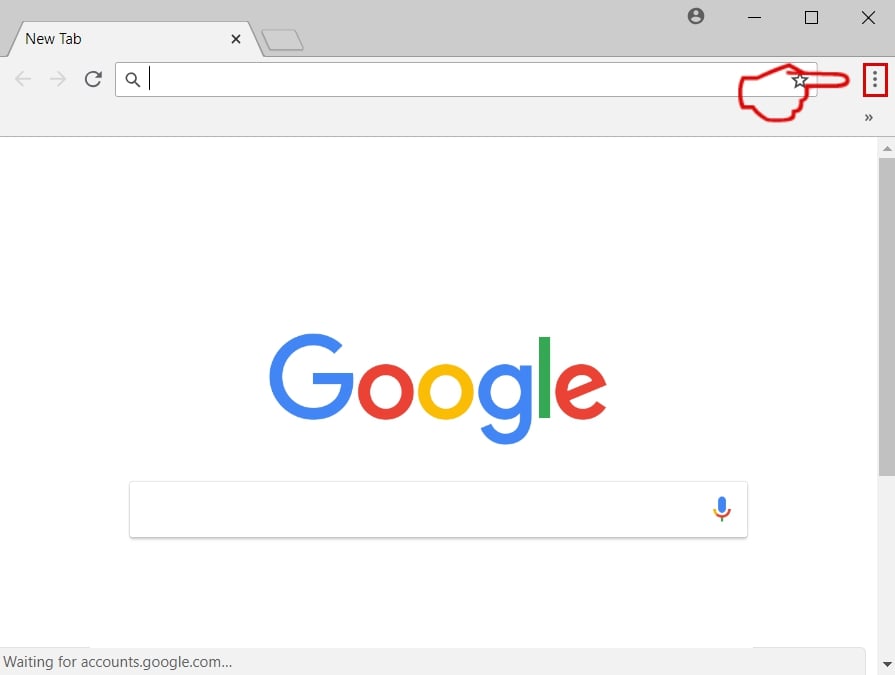
Step 2: Move the cursor over "Tools" and then from the extended menu choose "Extensions"
Step 3: From the opened "Extensions" menu locate the unwanted extension and click on its "Remove" button.
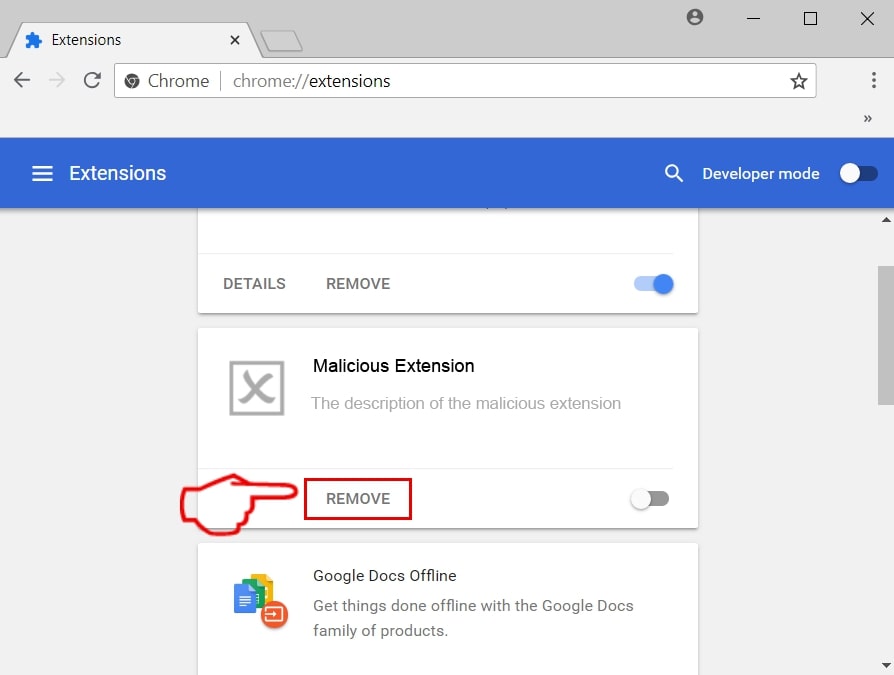
Step 4: After the extension is removed, restart Google Chrome by closing it from the red "X" button at the top right corner and start it again.
Erase My Secret Video Facebook Spam from Mozilla Firefox.
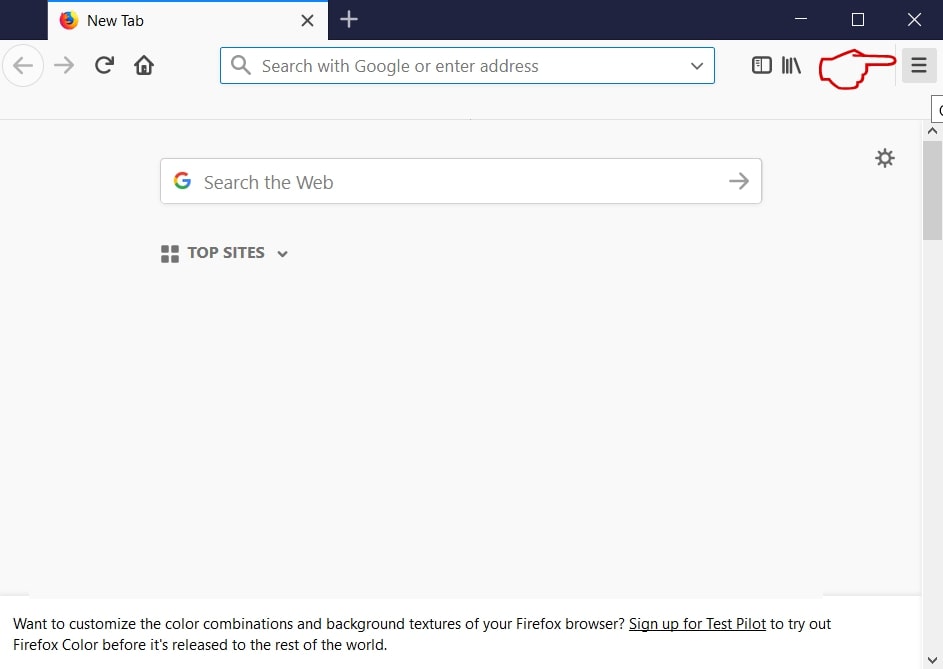
Step 1: Start Mozilla Firefox. Open the menu window:
Step 2: Select the "Add-ons" icon from the menu.
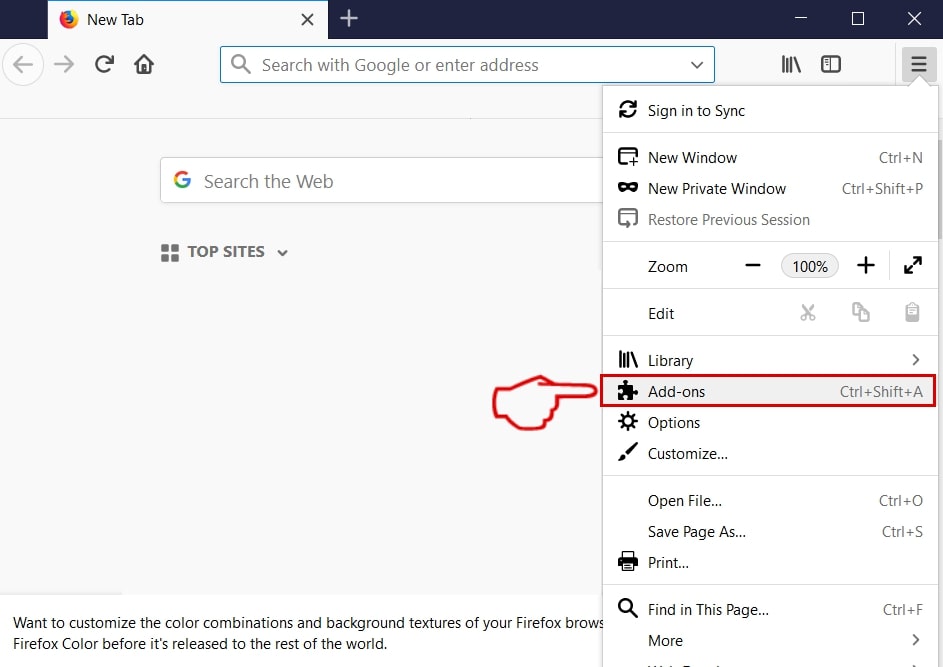
Step 3: Select the unwanted extension and click "Remove"

Step 4: After the extension is removed, restart Mozilla Firefox by closing it from the red "X" button at the top right corner and start it again.
Uninstall My Secret Video Facebook Spam from Microsoft Edge.
Step 1: Start Edge browser.
Step 2: Open the drop menu by clicking on the icon at the top right corner.
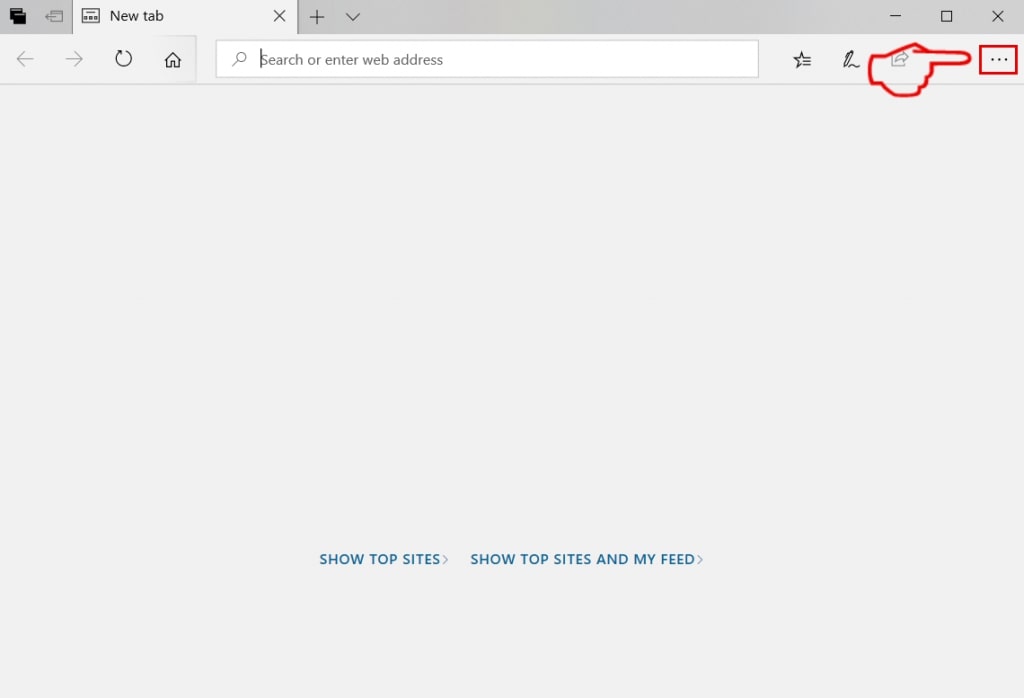
Step 3: From the drop menu select "Extensions".
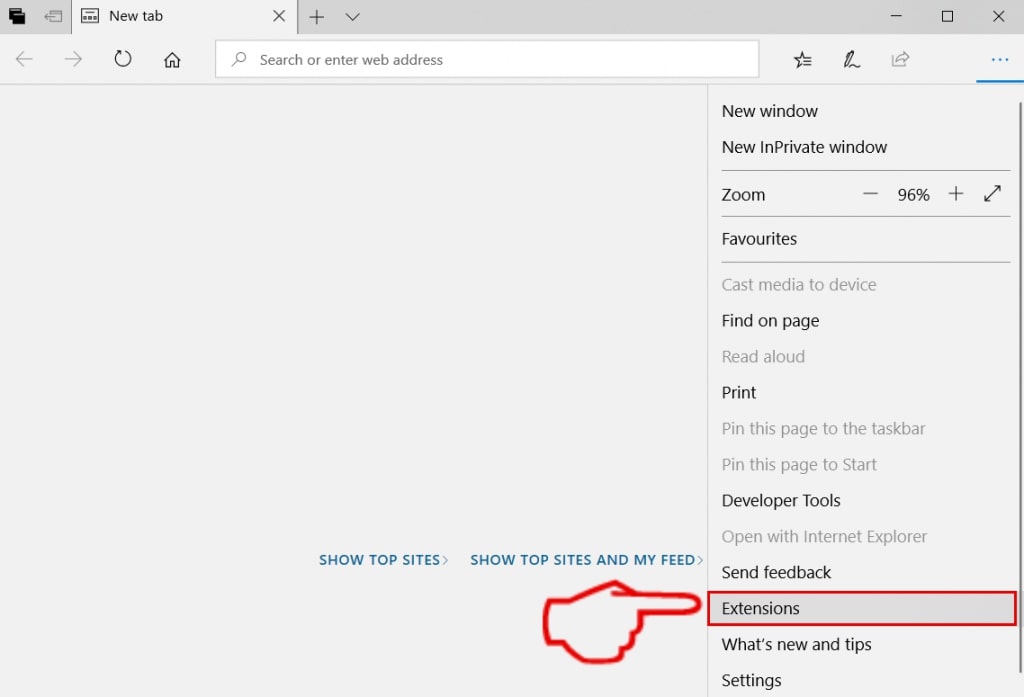
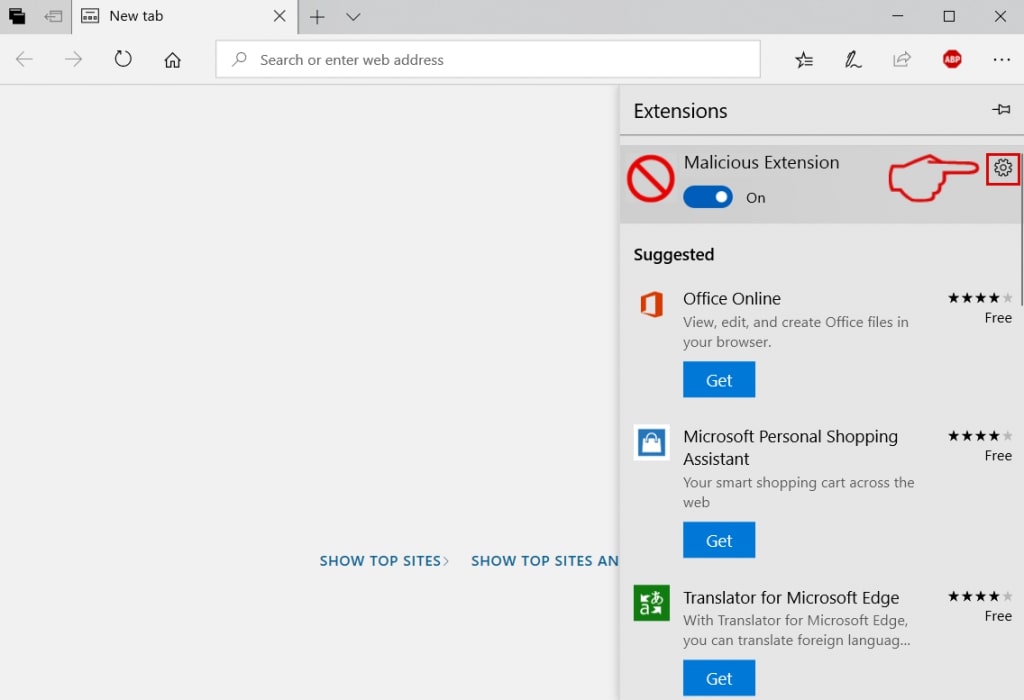
Step 4: Choose the suspected malicious extension you want to remove and then click on the gear icon.
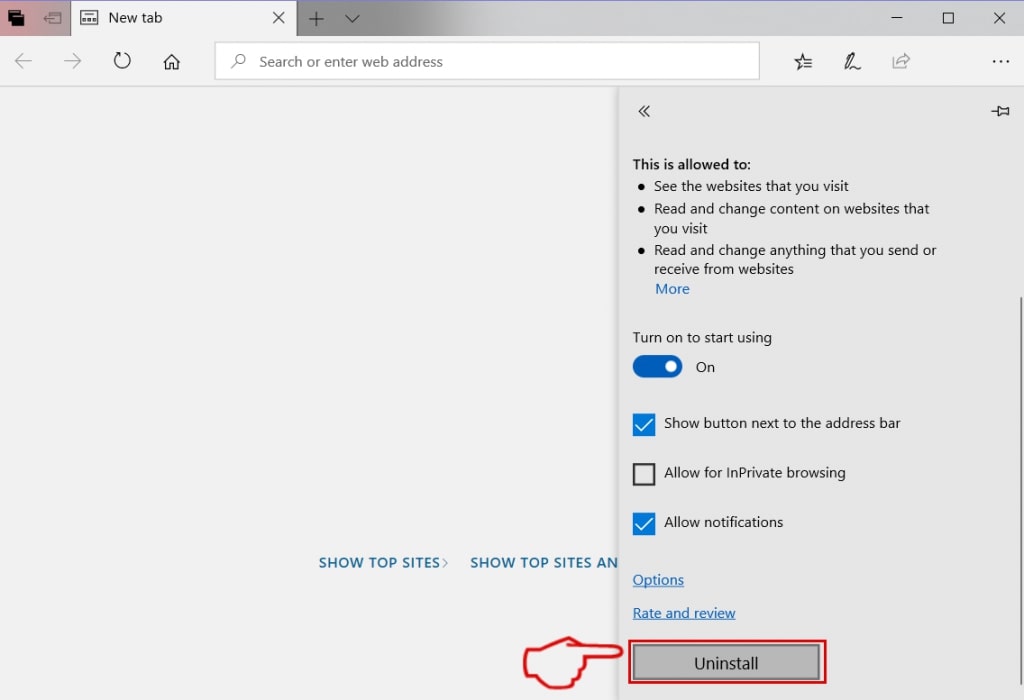
Step 5: Remove the malicious extension by scrolling down and then clicking on Uninstall.
Remove My Secret Video Facebook Spam from Safari
Step 1: Start the Safari app.
Step 2: After hovering your mouse cursor to the top of the screen, click on the Safari text to open its drop down menu.
Step 3: From the menu, click on "Preferences".
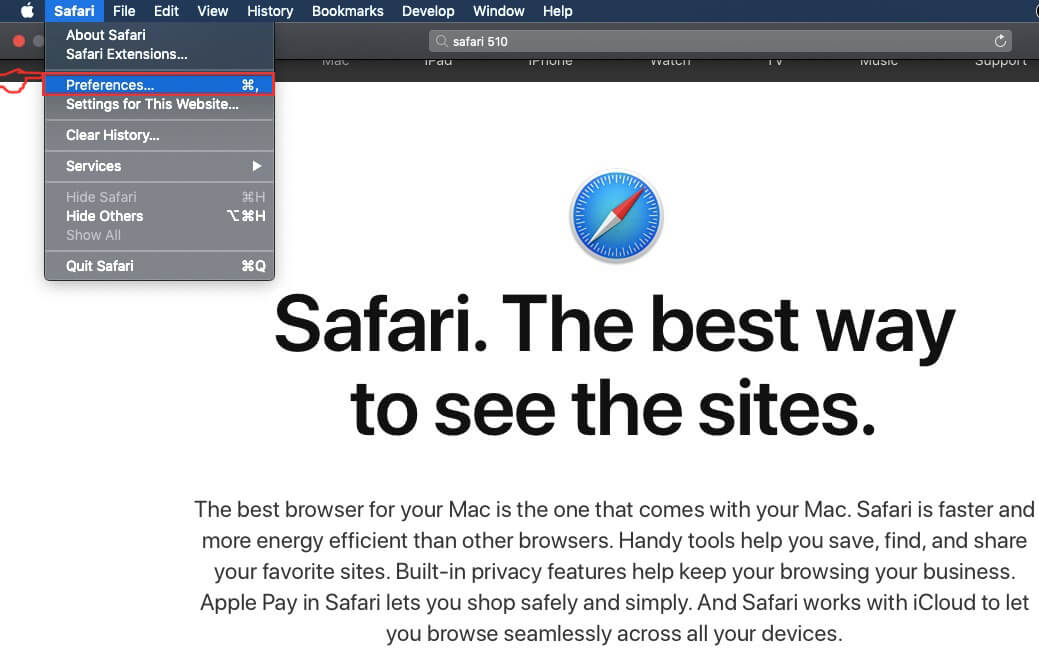
Step 4: After that, select the 'Extensions' Tab.

Step 5: Click once on the extension you want to remove.
Step 6: Click 'Uninstall'.
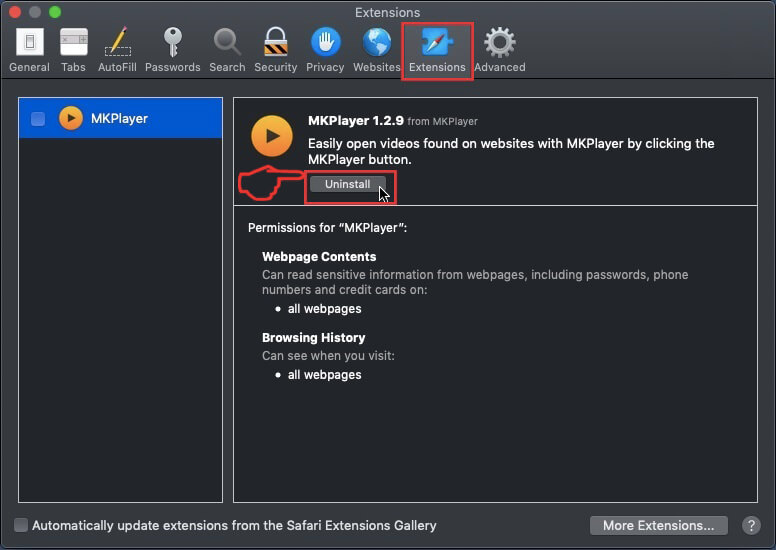
A pop-up window will appear asking for confirmation to uninstall the extension. Select 'Uninstall' again, and the My Secret Video Facebook Spam will be removed.
Eliminate My Secret Video Facebook Spam from Internet Explorer.
Step 1: Start Internet Explorer.
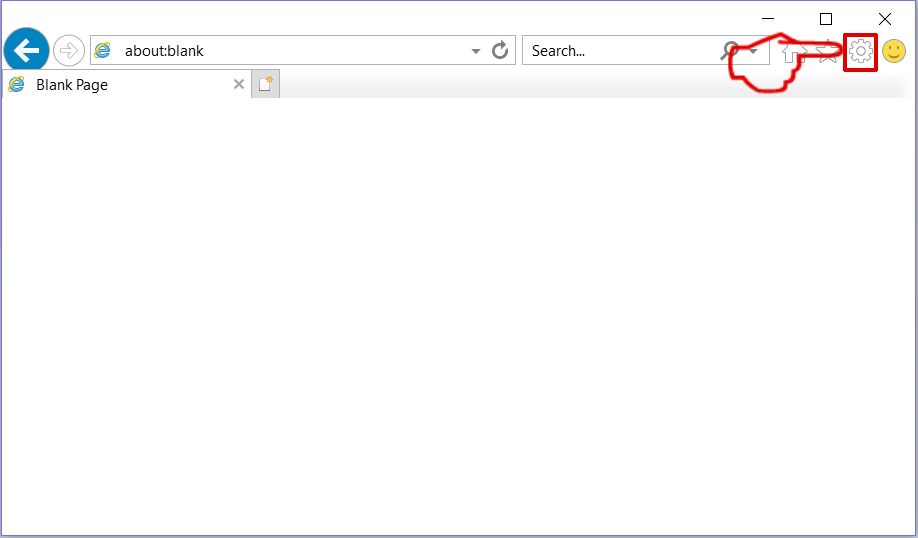
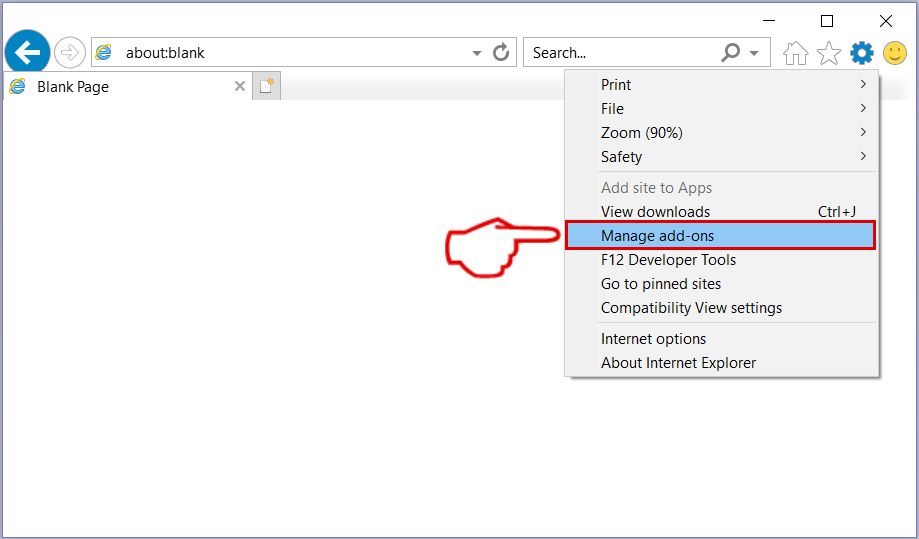
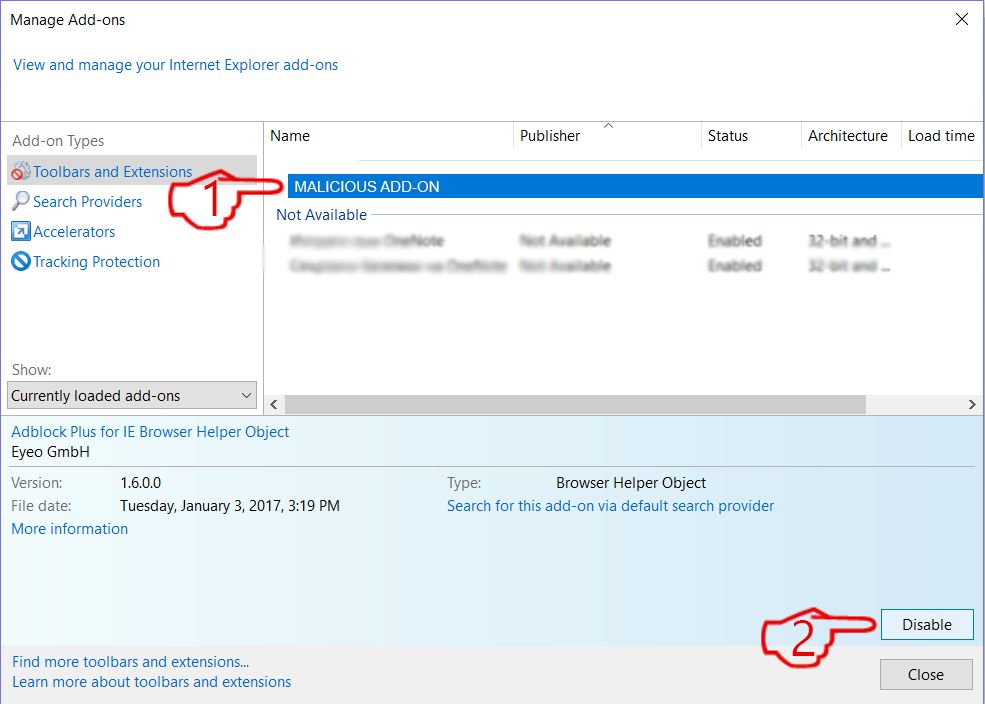
Step 2: Click on the gear icon labeled 'Tools' to open the drop menu and select 'Manage Add-ons'
Step 3: In the 'Manage Add-ons' window.
Step 4: Select the extension you want to remove and then click 'Disable'. A pop-up window will appear to inform you that you are about to disable the selected extension, and some more add-ons might be disabled as well. Leave all the boxes checked, and click 'Disable'.
Step 5: After the unwanted extension has been removed, restart Internet Explorer by closing it from the red 'X' button located at the top right corner and start it again.
Remove Push Notifications from Your Browsers
Turn Off Push Notifications from Google Chrome
To disable any Push Notices from Google Chrome browser, please follow the steps below:
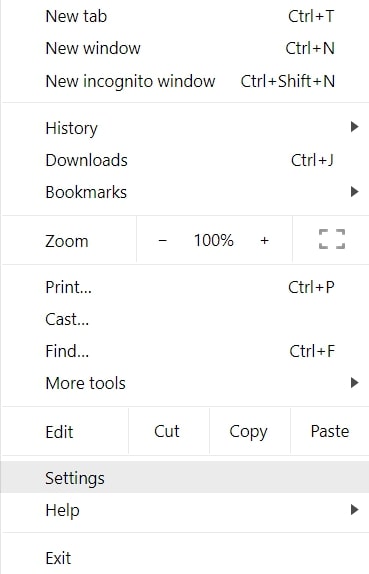
Step 1: Go to Settings in Chrome.
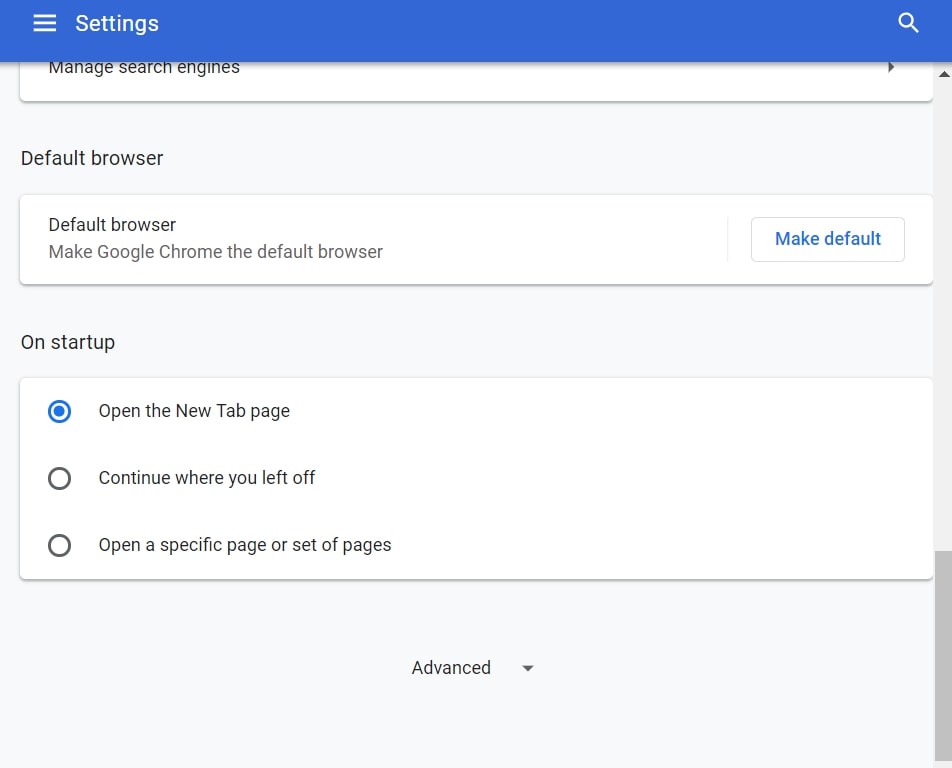
Step 2: In Settings, select “Advanced Settings”:
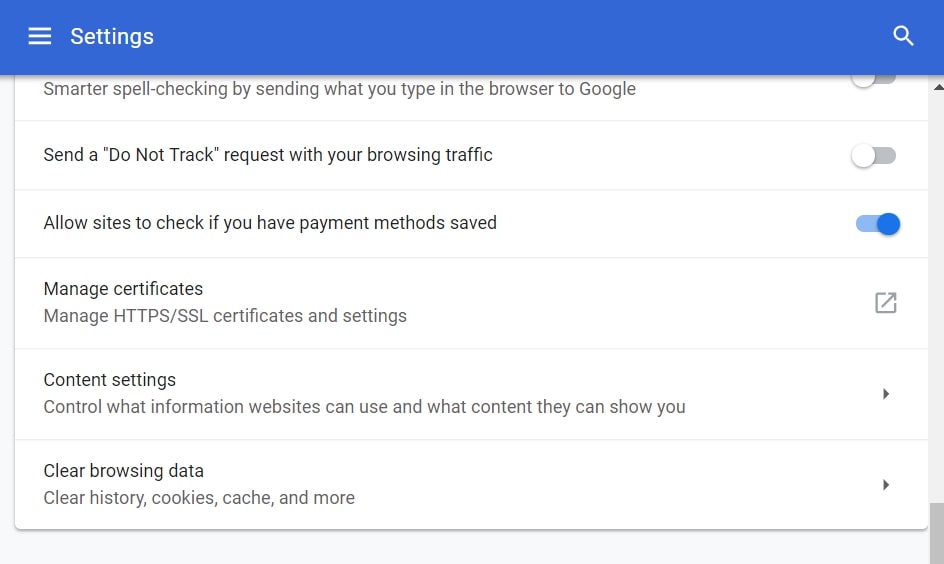
Step 3: Click “Content Settings”:
Step 4: Open “Notifications”:
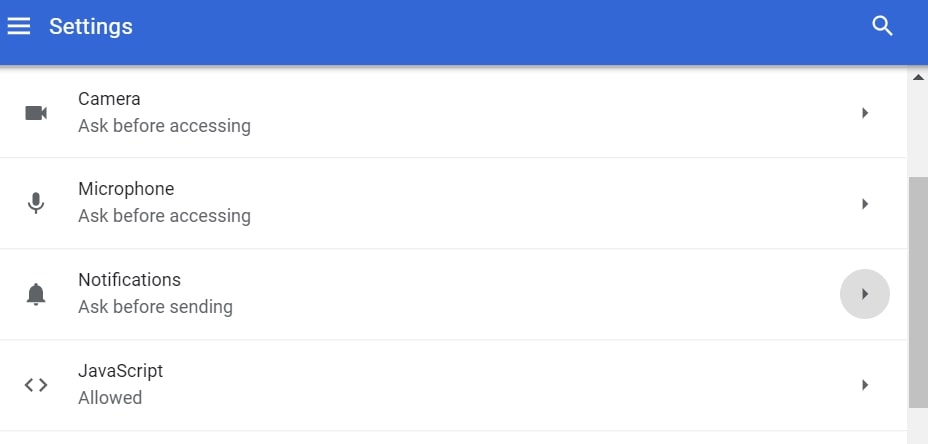
Step 5: Click the three dots and choose Block, Edit or Remove options:

Remove Push Notifications on Firefox
Step 1: Go to Firefox Options.
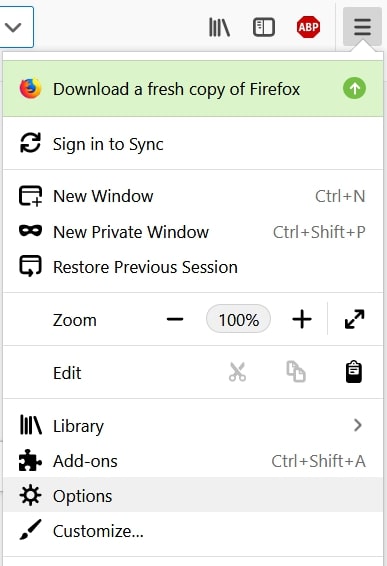
Step 2: Go to “Settings”, type “notifications” in the search bar and click "Settings":
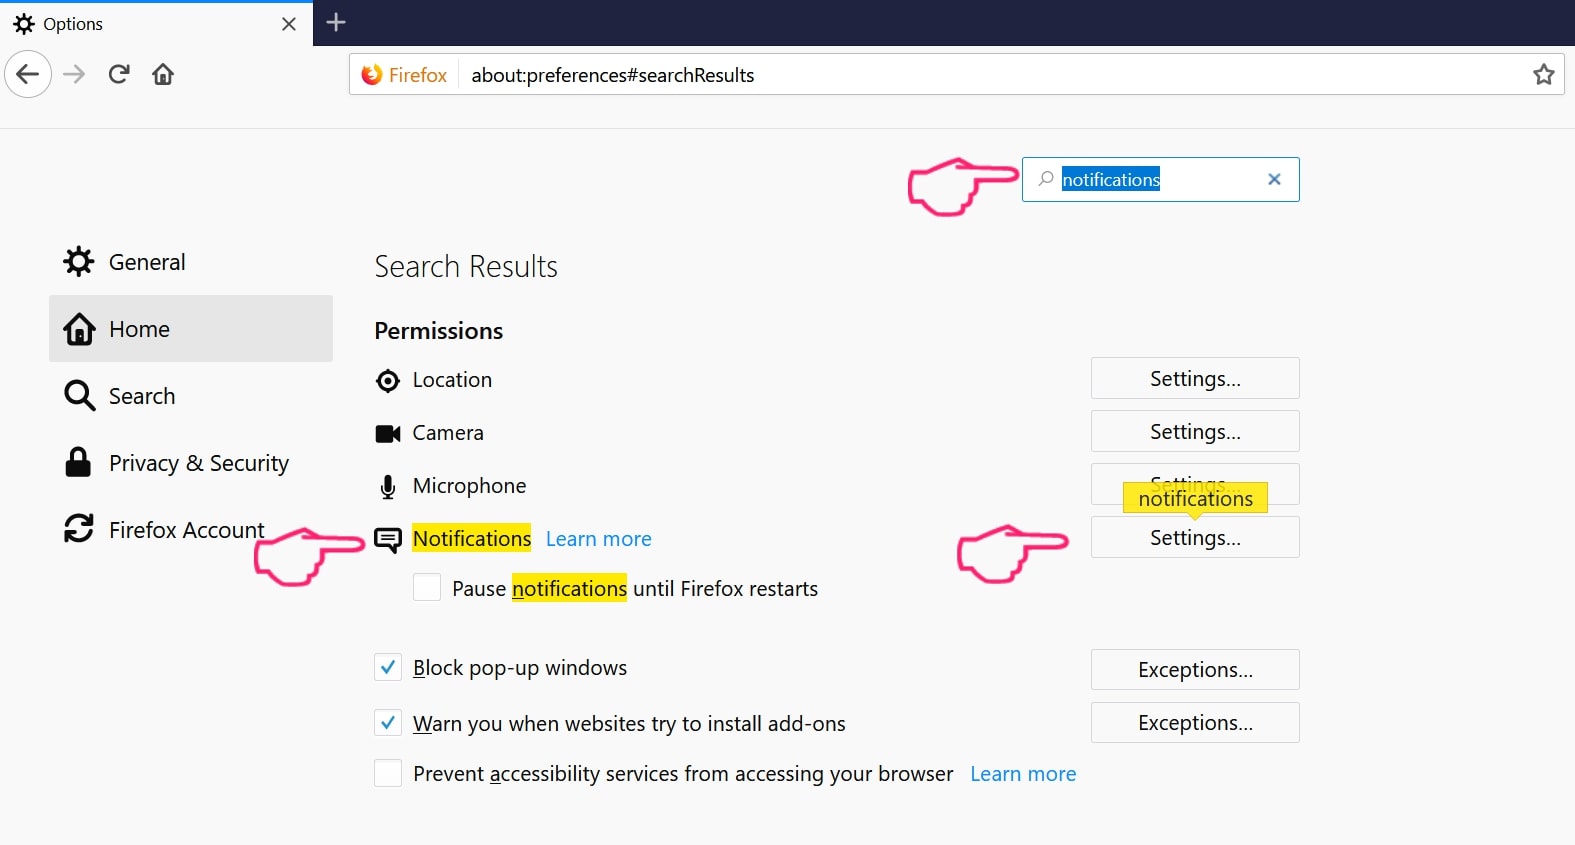
Step 3: Click “Remove” on any site you wish notifications gone and click “Save Changes”
Stop Push Notifications on Opera
Step 1: In Opera, press ALT+P to go to Settings.

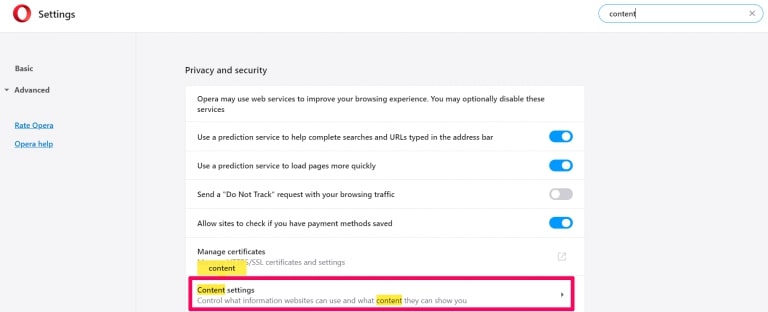
Step 2: In Setting search, type “Content” to go to Content Settings.
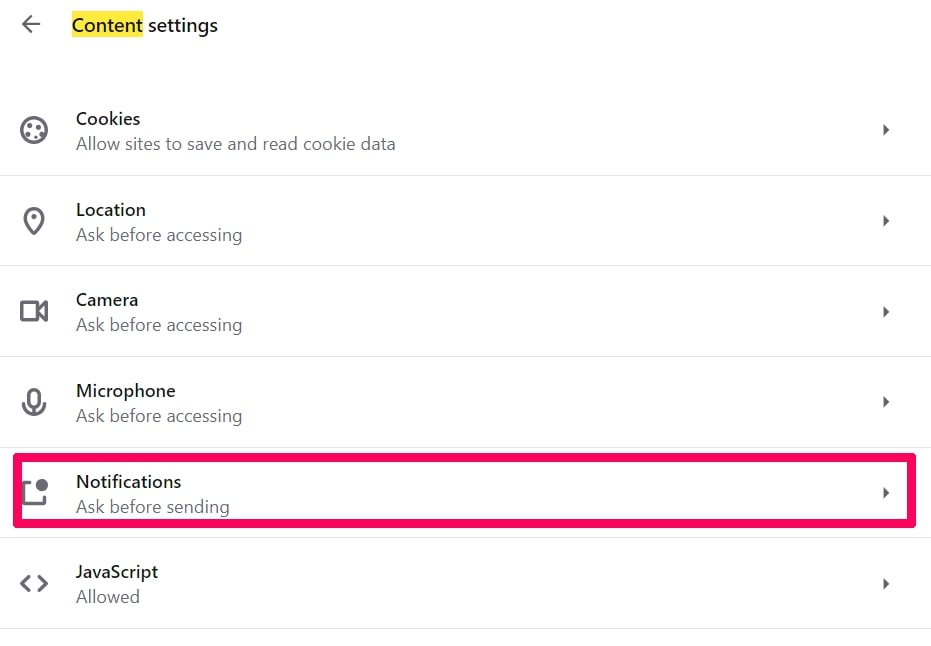
Step 3: Open Notifications:
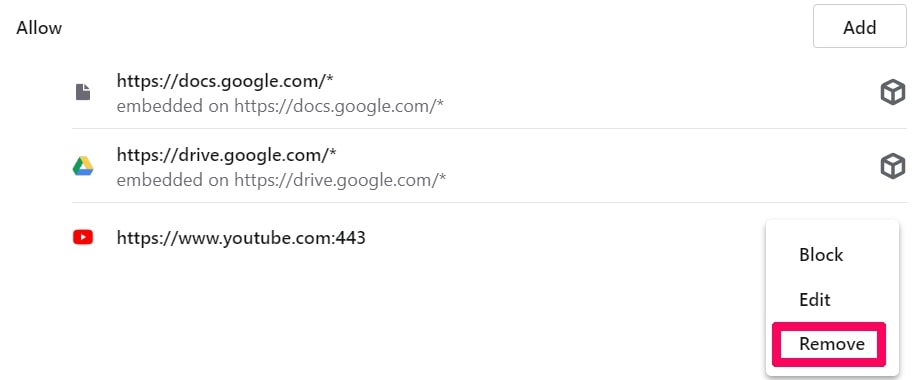
Step 4: Do the same as you did with Google Chrome (explained below):
Eliminate Push Notifications on Safari
Step 1: Open Safari Preferences.
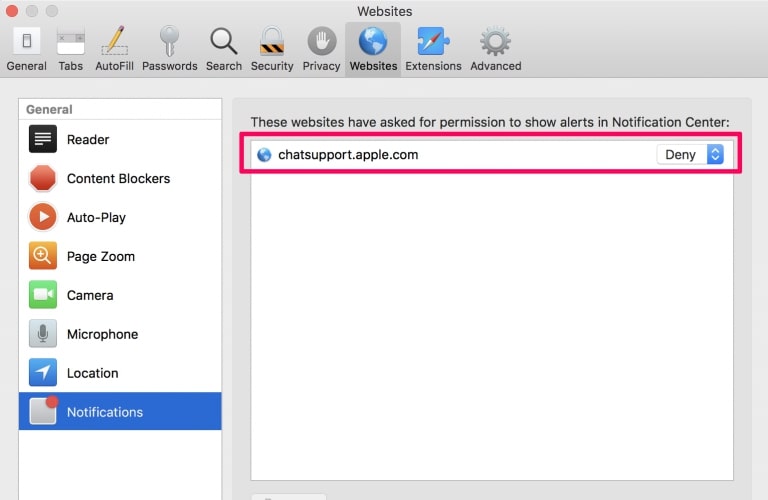
Step 2: Choose the domain from where you like push pop-ups gone and change to "Deny" from "Allow".
My Secret Video Facebook Spam-FAQ
What Is My Secret Video Facebook Spam?
The My Secret Video Facebook Spam threat is adware or browser redirect virus.
It may slow your computer down significantly and display advertisements. The main idea is for your information to likely get stolen or more ads to appear on your device.
The creators of such unwanted apps work with pay-per-click schemes to get your computer to visit risky or different types of websites that may generate them funds. This is why they do not even care what types of websites show up on the ads. This makes their unwanted software indirectly risky for your OS.
What Are the Symptoms of My Secret Video Facebook Spam?
There are several symptoms to look for when this particular threat and also unwanted apps in general are active:
Symptom #1: Your computer may become slow and have poor performance in general.
Symptom #2: You have toolbars, add-ons or extensions on your web browsers that you don't remember adding.
Symptom #3: You see all types of ads, like ad-supported search results, pop-ups and redirects to randomly appear.
Symptom #4: You see installed apps on your Mac running automatically and you do not remember installing them.
Symptom #5: You see suspicious processes running in your Task Manager.
If you see one or more of those symptoms, then security experts recommend that you check your computer for viruses.
What Types of Unwanted Programs Are There?
According to most malware researchers and cyber-security experts, the threats that can currently affect your device can be rogue antivirus software, adware, browser hijackers, clickers, fake optimizers and any forms of PUPs.
What to Do If I Have a "virus" like My Secret Video Facebook Spam?
With few simple actions. First and foremost, it is imperative that you follow these steps:
Step 1: Find a safe computer and connect it to another network, not the one that your Mac was infected in.
Step 2: Change all of your passwords, starting from your email passwords.
Step 3: Enable two-factor authentication for protection of your important accounts.
Step 4: Call your bank to change your credit card details (secret code, etc.) if you have saved your credit card for online shopping or have done online activities with your card.
Step 5: Make sure to call your ISP (Internet provider or carrier) and ask them to change your IP address.
Step 6: Change your Wi-Fi password.
Step 7: (Optional): Make sure to scan all of the devices connected to your network for viruses and repeat these steps for them if they are affected.
Step 8: Install anti-malware software with real-time protection on every device you have.
Step 9: Try not to download software from sites you know nothing about and stay away from low-reputation websites in general.
If you follow these recommendations, your network and all devices will become significantly more secure against any threats or information invasive software and be virus free and protected in the future too.
How Does My Secret Video Facebook Spam Work?
Once installed, My Secret Video Facebook Spam can collect data using trackers. This data is about your web browsing habits, such as the websites you visit and the search terms you use. It is then used to target you with ads or to sell your information to third parties.
My Secret Video Facebook Spam can also download other malicious software onto your computer, such as viruses and spyware, which can be used to steal your personal information and show risky ads, that may redirect to virus sites or scams.
Is My Secret Video Facebook Spam Malware?
The truth is that PUPs (adware, browser hijackers) are not viruses, but may be just as dangerous since they may show you and redirect you to malware websites and scam pages.
Many security experts classify potentially unwanted programs as malware. This is because of the unwanted effects that PUPs can cause, such as displaying intrusive ads and collecting user data without the user’s knowledge or consent.
About the My Secret Video Facebook Spam Research
The content we publish on SensorsTechForum.com, this My Secret Video Facebook Spam how-to removal guide included, is the outcome of extensive research, hard work and our team’s devotion to help you remove the specific, adware-related problem, and restore your browser and computer system.
How did we conduct the research on My Secret Video Facebook Spam?
Please note that our research is based on independent investigation. We are in contact with independent security researchers, thanks to which we receive daily updates on the latest malware, adware, and browser hijacker definitions.
Furthermore, the research behind the My Secret Video Facebook Spam threat is backed with VirusTotal.
To better understand this online threat, please refer to the following articles which provide knowledgeable details.


