
When the message “You are vulnerable to online threats” keeps appearing time and again on your Mac, you need to check your os for any kind of existing hazardous files. This persistent message has actually been reported to bother Mac users that have actually inadvertently set up a possibly unwanted application on their computer systems.
Notice iPhone Club Virus
The essence behind Notice iPhone Club is the creation of multiple various types of files as well as items on computers. Then these malicious entries may be used for the collection of different info and also the setup of harmful software.

Threat Summary
| Name | Notice iPhone Club |
| Type | iPhone Virus |
| Short Description | May enter your Mac and begin to show a mistake message, declaring that a file is dangerous and should be relocated to Bin. |
| Symptoms | A warning message declaring it obstructed Notice iPhone Club to help your iPhone with a virus. |
| Distribution Method | Via software downloads or virus URLs. |
| Detection Tool |
See If Your System Has Been Affected by malware
Download
Combo Cleaner
|
User Experience | Join Our Forum to Discuss Notice iPhone Club. |

Notice iPhone Club Infection – More About It
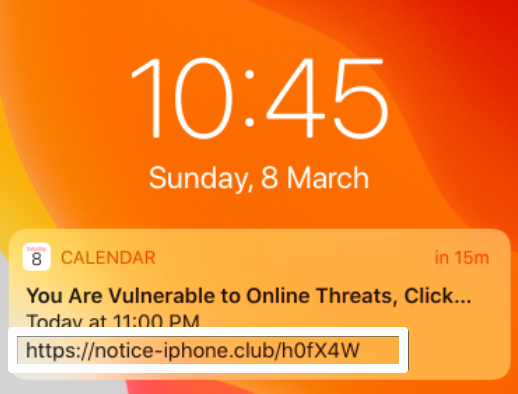
Our team found that Notice iPhone Club error message along with navlibx and a number of various other messages belong to the so-called Notice iPhone Club collection of mistakes. These messages feature a data name or an application name in brackets, as an example Notice iPhone Club followed by the message “You are vulnerable to online threats”. Here is a picture of the frustrating “You are vulnerable to online threats” pop-up message that is presently an advancing danger.
All Notice iPhone Club error message reads is:
“You are vulnerable to online threats
Today at {The Time}
notice-iphone.club”
The message is so consistent that each time you click Move to Container button it just comes back. The main idea of this mistake discovery is to indicate for a data that may subject your MacOS in danger of malware infection. Apparently, it is created to appear like the main notification home window generated by the integrated innovation Gatekeeper. Gatekeeper is a macOS innovation developed to prevent you from accidentally installing waste software program.
Below is what pop-up will be produced by the Gatekeeper when it discovers an app with withdrawed designer trademark or particular specific malware that is present in Apple’s malware warnings.
The abrupt look of Notice iPhone Club infection message on prevails on Mac tools that are running the most up to date upgrade of the os referred to as Catalina. However what is creating Notice iPhone Club message to pop-up on screen?
Notice iPhone Club may be an app went down silently by another possibly undesirable program like Advanced Mac Cleanser, Mac Cleanup Pro, etc. It may not have any noticeable system for being introduced but only data attributes. Some documents connected with this danger might be discovered and also erased from the complying with folder places:
Running software application that hasn’t been licensed by a trustworthy designer might reveal your computer as well as personal information to malware that can damage your Mac or compromise your personal privacy. So it is best to take into consideration the immediate removal of Notice iPhone Club infection and also linked files from the impacted Mac.

Get Rid Of Notice iPhone Club Infection from Your Mac.
Regrettably, hlpradc and also associated documents can not be uninstalled by simply shutting the browser as well as dragging the undesired application to the Trash. If you intend to eliminate the hlpradc infection from your Mac OS completely we advise that you make use of a certain anti-malware for Mac. The major goal of such a program is to scan your operating system and also end the files with malicious habits. It will certainly likewise tidy up any harmful code in your repositories. With a certain anti-malware program, youр Mac will be shielded much better in the future.
Ventsislav Krastev
Ventsislav is a cybersecurity expert at SensorsTechForum since 2015. He has been researching, covering, helping victims with the latest malware infections plus testing and reviewing software and the newest tech developments. Having graduated Marketing as well, Ventsislav also has passion for learning new shifts and innovations in cybersecurity that become game changers. After studying Value Chain Management, Network Administration and Computer Administration of System Applications, he found his true calling within the cybersecrurity industry and is a strong believer in the education of every user towards online safety and security.
Follow Me:
Preparation before removal of Notice iPhone Club.
Before starting the actual removal process, we recommend that you do the following preparation steps.
- Turn off your phone until you know how bad is the virus infection.
- Open these steps on another, safe device.
- Make sure to take out your SIM card, as the virus could corrupt it in some rare cases.
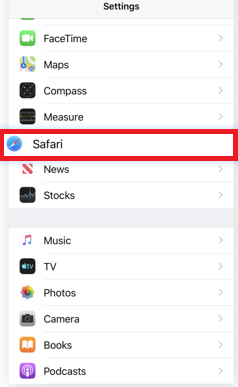
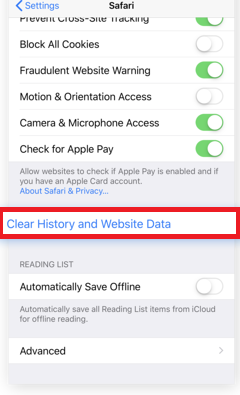
Step 1: Clear iPhone or iPad History and Data to remove settings changed byNotice iPhone Club
Step 2: Reset your iPhone to see if the suspicious behaviour is fixed and Notice iPhone Club stops infecting.
Step 3: Restore or Reset Your iPhone or iPad to removeNotice iPhone Club
If you have set up a backup on your iPhone or iPad, a good idea is to restore your device to an earlier time, when the virus was not present and the usage of your device was smooth and fast. Here is how to do it: