
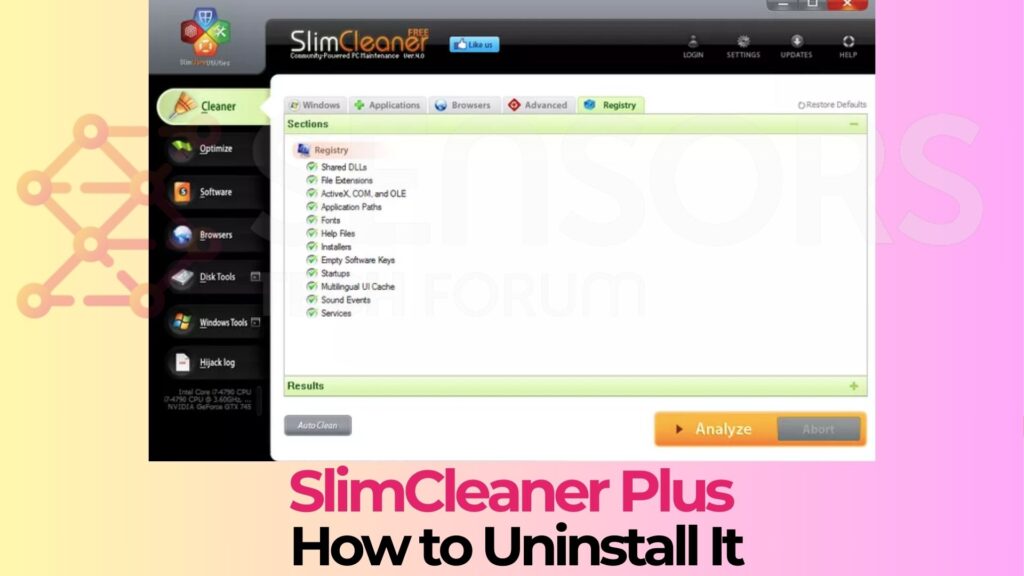
Does your computer seem to be running slower than usual, or are you noticing an uptick in unwanted ads and pop-ups? Chances are, you might have SlimCleaner Plus installed on your system. Marketed as a tool to boost your PC’s performance, SlimCleaner Plus ironically acts more like a potentially unwanted program (PUP), bogging down your system rather than optimizing it.
This article delves into what SlimCleaner Plus really is, its hidden risks and behaviors, and why removing it could be crucial for your computer’s health and your privacy. We will guide you through the necessary steps to uninstall SlimCleaner Plus safely and discuss how tools like SpyHunter can assist in not only its removal but also in protecting your PC from similar intrusions in the future.
Slimcleaner Plus Summary
| Type | Potentially Unwanted Program/Rogue Antivirus Software |
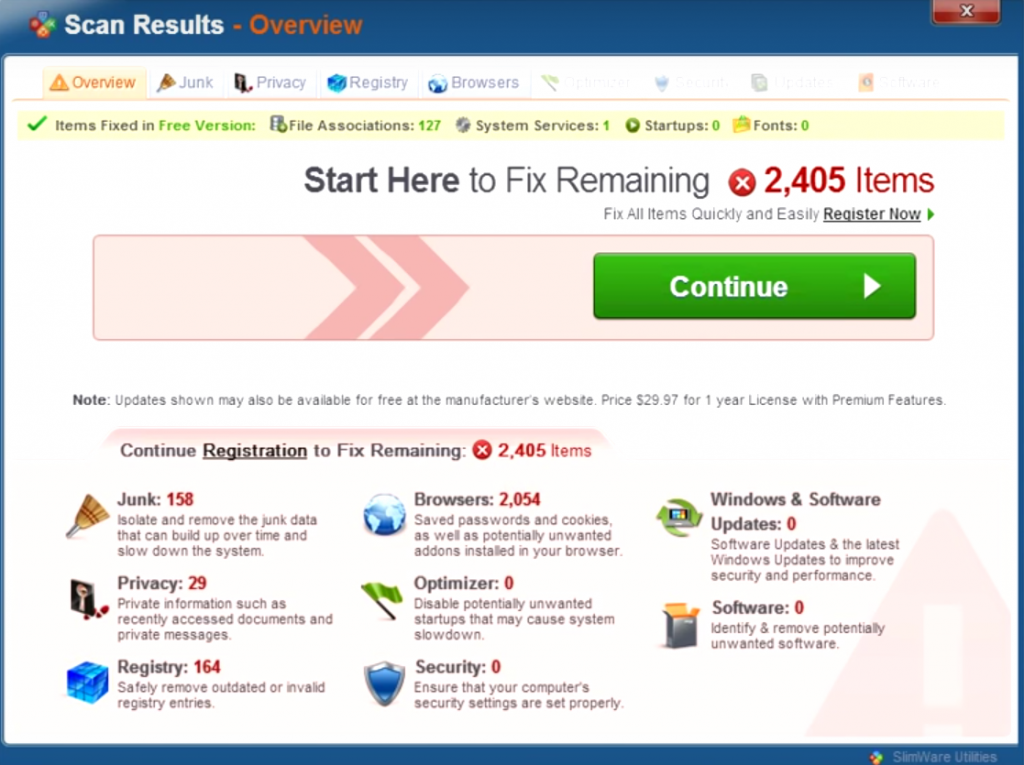
| Short Description | Slimcleaner Plus may pretend to scan your computer for malware, but instead display a fake detection of viruses and system errors and ask you for purchasing it’s licensed version in order to remove them. |
| Detection Tool |
See If Your System Has Been Affected by malware
Download
Malware Removal Tool
|
What Exactly is SlimCleaner Plus and Why Remove It?
SlimCleaner Plus markets itself as a tool designed to boost your computer’s performance by optimizing system settings, removing unwanted files, and improving overall speed. However, beneath its polished exterior lies a potentially unwanted program (PUP) that offers little value and may indeed compromise your system’s effectiveness.
The primary concern with SlimCleaner Plus is not just its underwhelming performance improvements but also the intrusive behaviors it exhibits, such as displaying persistent pop-ups and gathering user data without clear consent. This revelation has led many to question the utility’s legitimacy and the benefits it claims to offer.
The Hidden Risks Associated with Keeping SlimCleaner Plus
Retaining SlimCleaner Plus on your computer introduces several risks that might not be immediately apparent. Firstly, it can significantly hinder your system’s performance by utilizing unnecessary resources. Additionally, its data collection practices raise privacy concerns, as there is ambiguity regarding what information is gathered and how it is used.
These aspects, combined with the annoying pop-up ads and misleading optimization prompts, create a disruptive user experience. The program’s propensity to bundle with other potentially unwanted programs increases the likelihood of additional unwanted software infiltrating your system, compounding these issues further.
Is SlimCleaner Plus Harmful to Your Computer?
While SlimCleaner Plus does not fit the classic definition of malware—that is, software specifically designed to damage or disable computers—it exhibits behaviors associated with potentially unwanted programs (PUPs). Its operations can indirectly lead to system instability and reduced performance.
The most telling harm stems from the clutter it introduces, alongside the potential for privacy breaches through its data collection activities.
Moreover, its predilection for displaying exaggerated system warnings to coerce users into purchasing a premium version can be misleading, exploiting users’ concerns for their system’s health for financial gain. In light of these facts, although SlimCleaner Plus may not directly damage your hardware, its presence is indeed detrimental to the overall health and performance of your computer.
In cases where a comprehensive cleanup and security assessment are required, employing a robust anti-malware solution like SpyHunter is prudent.
SpyHunter not only aids in removing invasive programs like SlimCleaner Plus but also offers real-time protection against a wide array of malware, ensuring your system remains secure and operates at its peak performance.
Initial Steps Before Uninstalling SlimCleaner Plus
Uninstalling SlimCleaner Plus from your PC begins with a few crucial preliminary steps. These are designed to safeguard your data and ensure a smooth removal process. Before diving into the uninstallation process, it’s important to prepare your system to avoid any possible complications.
Why a Complete Backup is Essential Before Starting
Backing up your system is a critical first step in the uninstallation process. This action protects your data against any unforeseen problems that might arise during the uninstallation of SlimCleaner Plus.
A complete backup ensures that, in the event something goes wrong, you can restore your system to its previous state without the loss of important files or data. In essence, it’s like having a safety net that catches you in case of a fall, keeping your digital life secure.
How to Securely Back Up Your Windows 10 Data
Backing up your Windows 10 data is straightforward and can save you from potential headaches later on. Here’s how to do it effectively:
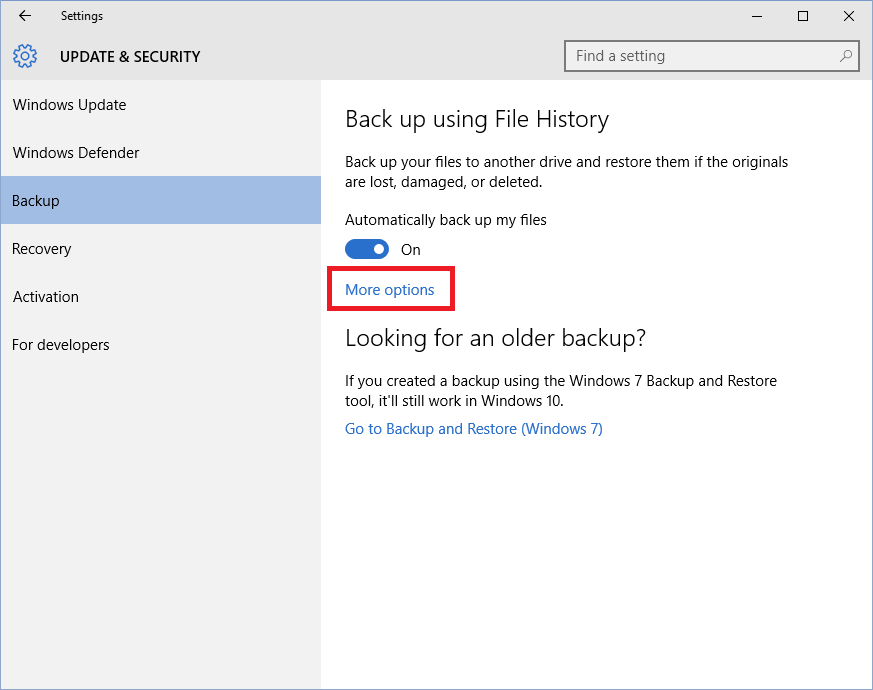
- Use File History: Windows 10 has a built-in tool called File History, which allows you to make regular backups of your files. To activate it, connect an external hard drive or a network location to your computer. Then, go to ‘Settings’ > ‘Update & Security’ > ‘Backup‘ and choose ‘Add a drive‘ to select your external hard drive. You can now click on ‘More options’ to customize how often and what files you want to backup.
- Create a System Image: For a more comprehensive backup, consider creating a system image. This is a snapshot of everything on your computer at a given point in time, including the operating system, applications, and files. To create a system image, type ‘Control Panel‘ in the search box, then go to ‘System and Security’ > ‘Backup and Restore (Windows 7)‘. Click on ‘Create a system image’ and follow the instructions to back up your entire system.
- Cloud Storage: Utilizing cloud storage is another way to back up your data. Services like OneDrive, Google Drive, and Dropbox offer easy ways to store your files online. This method provides an additional layer of security by keeping your data offsite, safeguarding it against physical damage to your hardware.
These steps to securely back up your data are critical in ensuring that your information remains safe throughout the uninstallation process of SlimCleaner Plus. With your data backed up, you’re now ready to proceed with the removal of SlimCleaner Plus from your PC.
Manual Removal Process for SlimCleaner Plus on Windows 10
Step 1: Shutting Down SlimCleaner Plus Processes
Before you can uninstall SlimCleaner Plus, it’s essential to make sure the app and any of its processes are not running in the background.
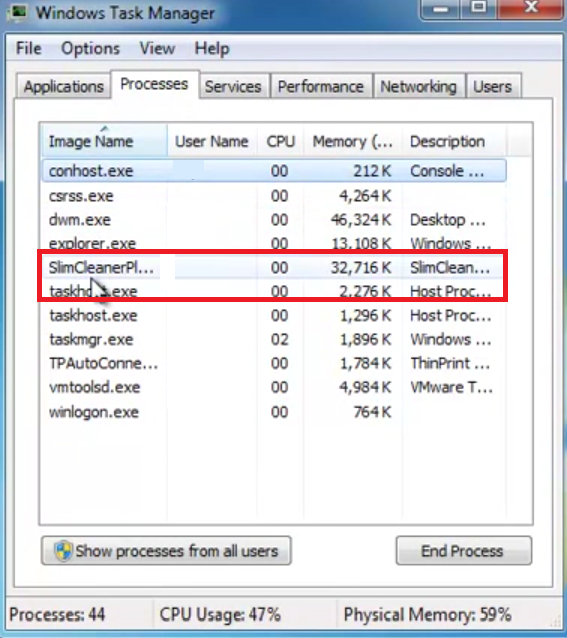
To do this, simply right-click on the SlimCleaner Plus icon in the system tray (located at the bottom right corner of your screen) and choose “Exit.” Further, you might need to check for any lingering processes in the Task Manager.
Press “Ctrl + Shift + Esc” to open Task Manager, look for any processes related to SlimCleaner Plus, click on them, and then select “End Task.” This ensures that the program is completely shut down and ready for removal.
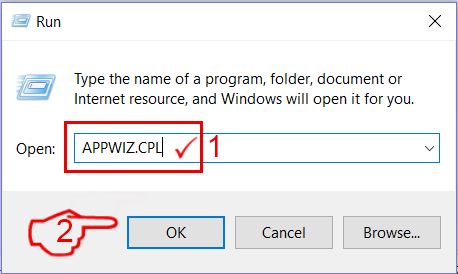
Step 2: Navigating Through the Control Panel to Uninstall
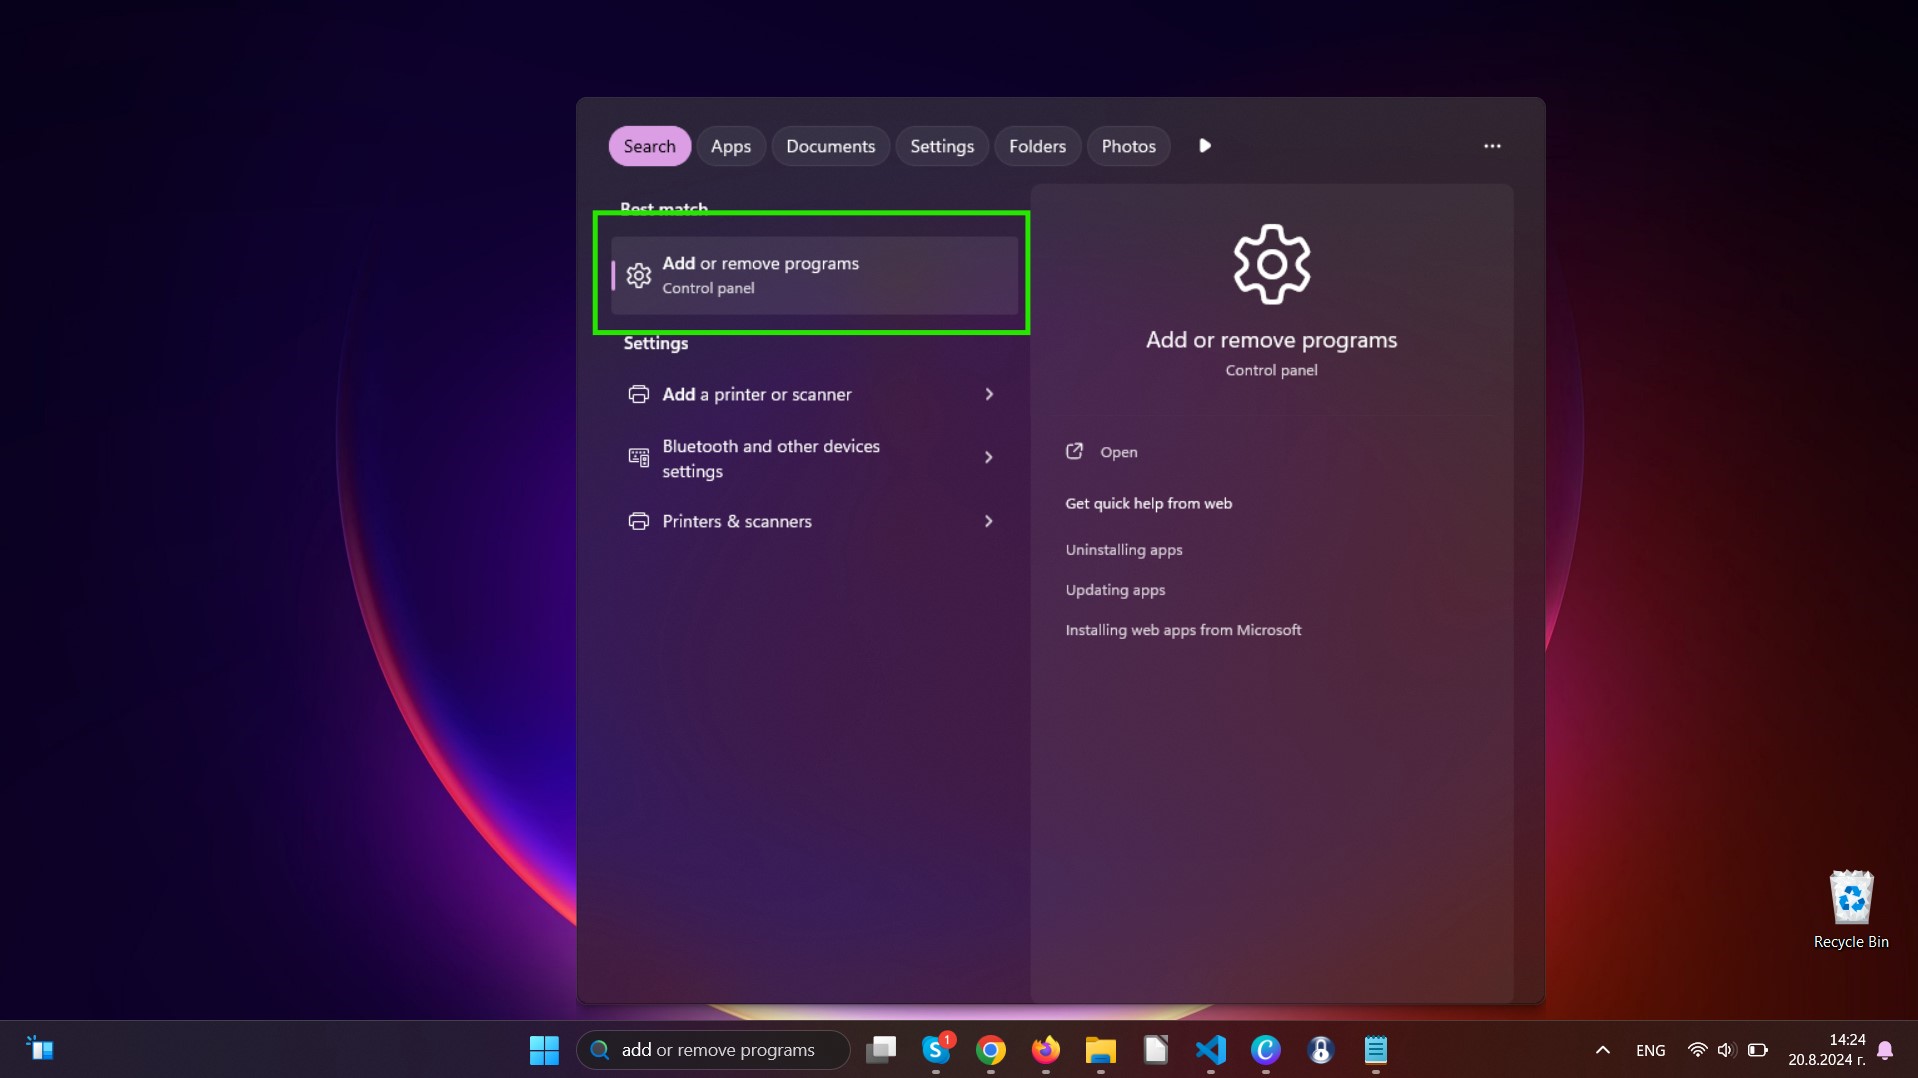
With SlimCleaner Plus fully shut down, the next step involves navigating to the Control Panel to uninstall the program.
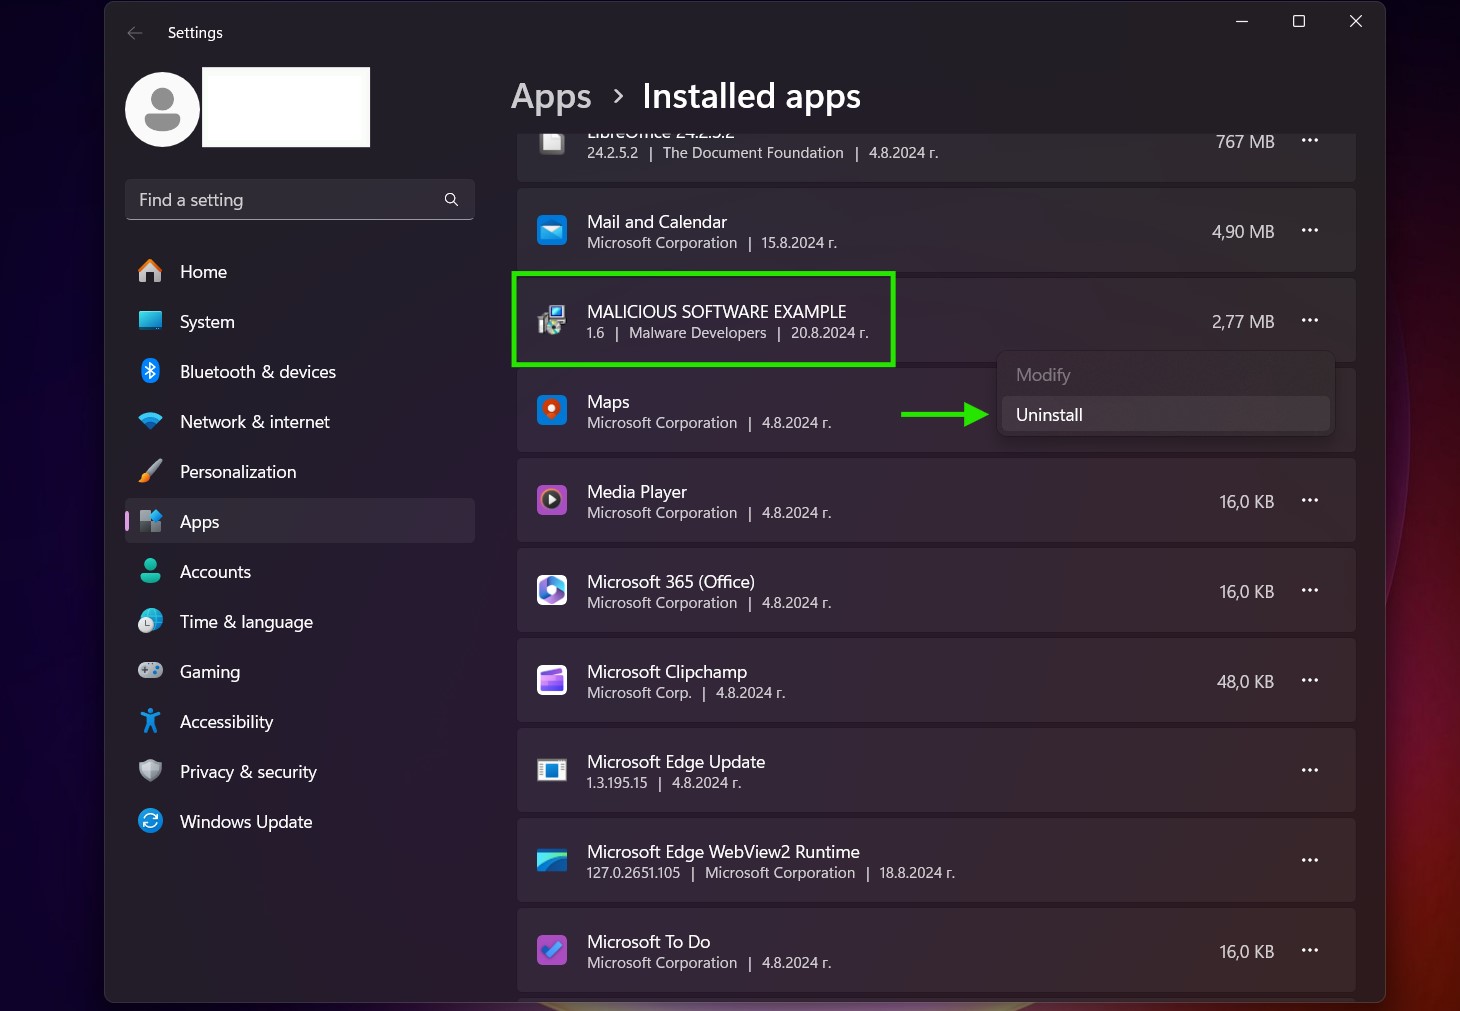
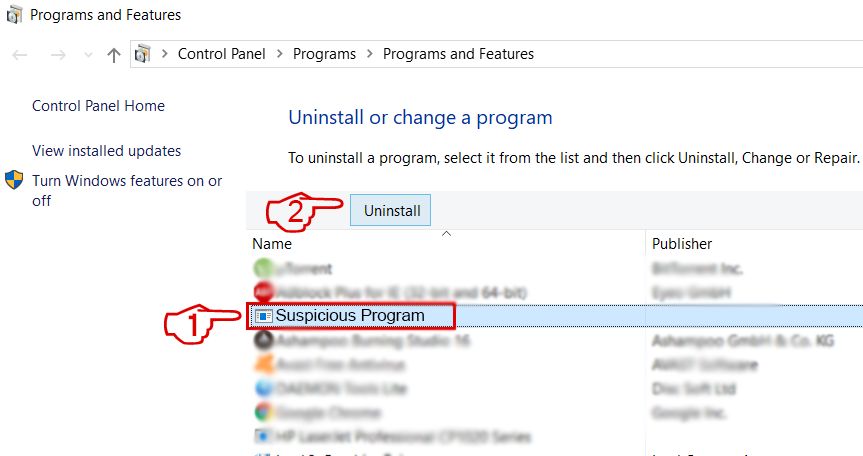
Click on the Windows icon in your taskbar and type “Control Panel,” then press Enter. In the Control Panel, select “Programs and Features” or “Uninstall a Program” depending on your view mode. Scroll through the list of installed programs until you find SlimCleaner Plus.
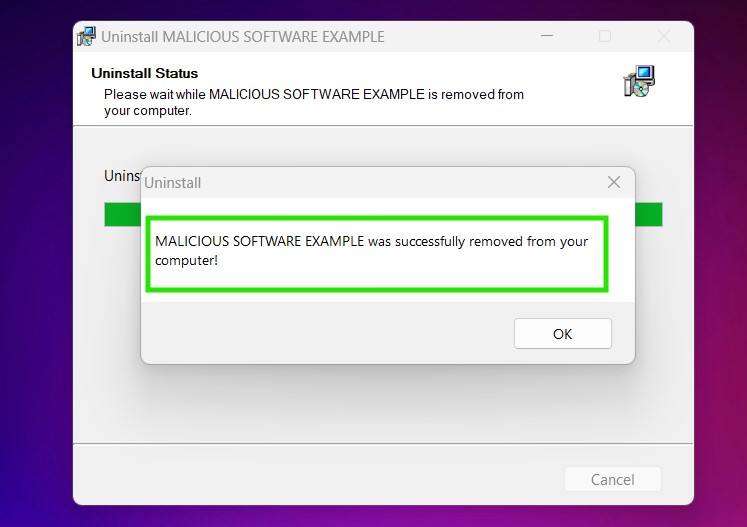
Click on it, and then press the “Uninstall” button. Follow the on-screen instructions to complete the uninstallation process. This method works for removing most programs on Windows 10, ensuring a clean and complete removal.
Step 3: Erasing SlimCleaner Plus Leftovers from Your System
Even after uninstalling SlimCleaner Plus through the Control Panel, some residual files might remain on your system. These leftover files can take up space and potentially cause conflicts with other software. To clean these up, you can use the built-in Disk Cleanup tool in Windows.
Press the Windows key and type “Disk Cleanup,” then select the tool from the results. Choose the drive where SlimCleaner Plus was installed, and check the boxes next to “Temporary Files” and any other locations where leftovers might reside. Click “OK” to remove these files, freeing up space and ensuring your system runs smoothly.
For those who prefer a more thorough cleanup, or if you encounter issues during the manual uninstallation process, security and utility software such as SpyHunter can help.
SpyHunter is designed to scan for and remove leftover files and registry entries from uninstalled programs, helping to maintain the health and performance of your computer. It’s a simple, effective solution for keeping your system clean and optimized after uninstalling software like SlimCleaner Plus.
Utilizing Automated Tools to Ensure a Clean Uninstall
Removing unwanted software like SlimCleaner Plus from your computer can seem like a daunting task, especially if you’re not particularly tech-savvy.
However, the process can be significantly simplified by utilizing automated tools designed for this purpose.
Automated uninstall tools are created to provide an efficient solution for thoroughly removing programs, including all associated files and registry entries that could be left behind when using the standard uninstallation process.
These tools are developed to help users of all skill levels ensure a clean, complete uninstall without having to manually search for and delete leftover files. By choosing an automated approach, you can avoid potential errors and save considerable time and energy.
How SpyHunter Can Simplify the Uninstallation of SlimCleaner Plus
SpyHunter is a powerful tool that simplifies the uninstallation process of potentially unwanted programs like SlimCleaner Plus. When faced with a program that may offer more harm than help, relying on a dedicated tool like SpyHunter can make all the difference.
SpyHunter is specifically designed to detect and remove threats, including programs that may be difficult to uninstall through conventional means. The process involves scanning your system for SlimCleaner Plus and any related files, and then effectively removing them with minimal user intervention required.
This not only ensures that SlimCleaner Plus is completely uninstalled but also helps maintain your computer’s health and performance by removing potentially harmful software.
Benefits of Using SpyHunter for Malware Detection and Removal
Choosing SpyHunter for malware detection and removal comes with several key benefits.
Firstly, its user-friendly interface makes it accessible for users with varying levels of technical proficiency.
Additionally, it provides comprehensive detection capabilities, identifying and removing malware, adware, spyware, and other security threats that might otherwise remain hidden. SpyHunter also offers regular updates, ensuring protection against the latest malware strains. Beyond just removal, SpyHunter can prevent future infections, offering real-time protection that guards your system against emerging threats.
Utilizing SpyHunter not only cleans your system of existing issues but also fortifies it against potential future threats, ensuring a safer computing experience.
Verifying the Removal and Cleaning Your System
After taking the steps to uninstall SlimCleaner Plus from your Windows 10 and 11 computer, it’s crucial to ensure that the software has been completely removed and your system is clean.
This part of the process involves a couple of steps that can help verify the uninstallation and optimize your PC for better performance moving forward.
How to Check for Any SlimCleaner Plus Traces Left Behind
Even after uninstalling, programs like SlimCleaner Plus can leave behind traces in the system. These remnants can include registry entries, temporary files, or even startup commands. To ensure these traces aren’t lingering:
- Utilize the search function in Windows to look for any remaining files or folders associated with SlimCleaner Plus. Any found items should be removed.
- Run a registry scan using a trusted utility tool to identify and delete any leftover registry entries related to SlimCleaner Plus. This step is crucial, as registry leftovers can clutter your system.
- Consider installing and running a specialized utility software like SpyHunter, which can efficiently identify and clean up any remnants of uninstalled programs, including SlimCleaner Plus. Such tools are equipped to detect deeper traces left behind by uninstalled software.
It’s always better to be safe and perform these checks, as leaving unwanted traces can slow down your system or cause unexpected behaviors.
Optimizing Your Windows 10 System Post-Uninstallation
With SlimCleaner Plus fully removed and all traces wiped clean, taking the opportunity to optimize your Windows 10 and 11 system can lead to better performance and a more secure computing experience. Here are steps to optimize your system:
- Perform a disk cleanup to remove temporary files and other unnecessary system files that may consume valuable space and potentially slow down your computer.
- Check for Windows Updates to ensure your system is running the latest version, which can include important security patches and performance improvements.
- Defragment your hard drive (if you’re using a traditional HDD) to improve efficiency. Windows 10 automatically performs this action, but it’s good practice to manually check its regularity.
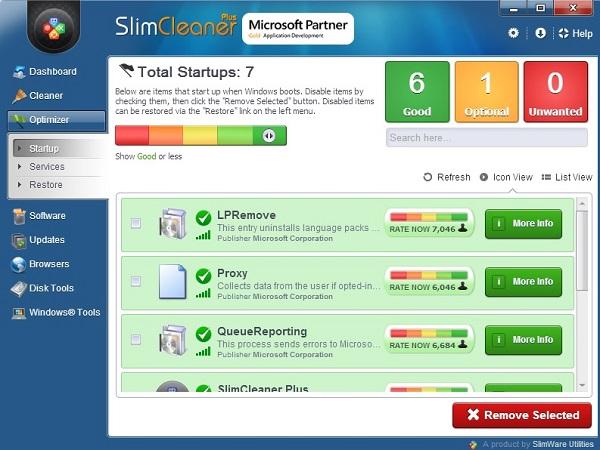
- Adjust your startup programs. Some programs automatically set themselves to start with Windows, which can slow down your boot time. You can manage these in the Task Manager under the Startup tab.
- Regularly scan your system for malware and viruses to keep your PC clean and efficient. Using software like SpyHunter can provide comprehensive protection against various types of malware, ensuring your system stays optimized.
By following these steps, you can not only ensure that SlimCleaner Plus and its traces are completely ousted from your system but also improve the overall performance and security of your Windows 10 and Windows 11 PC.
Regular maintenance and careful monitoring of installed software and system health can contribute immensely to a streamlined and efficient computing experience.
Preventing Future Unwanted Installations
To safeguard your device from unwanted software and maintain your digital security, adopting proactive measures is essential. Unwanted programs not only disrupt your device’s performance but can also pose significant security risks. The following strategies can help prevent such installations and keep your device secure.
Adjusting Your Installation Settings for Better Security
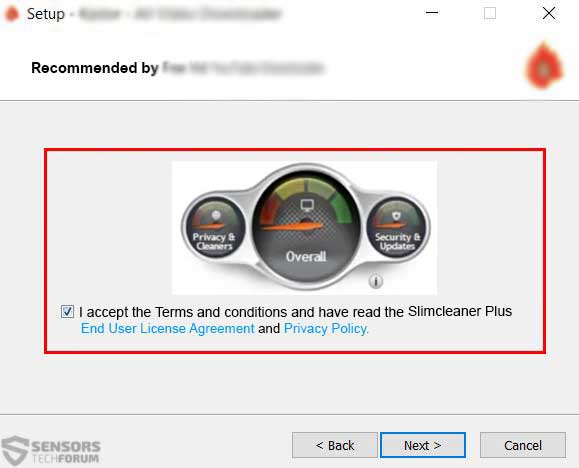
When installing new software, choosing the custom or advanced installation options can make a big difference.
These options often reveal additional programs that are bundled with the main software. By selecting these settings, you have the opportunity to decline the installation of these potentially unwanted programs (PUPs).
Paying close attention during this process is a simple yet effective way to enhance your device’s security.
Why Regular Software and System Updates Matter
Keeping your operating system, software, and drivers up to date is not just about accessing new features; it’s a critical component of your device’s security strategy. Software updates frequently include patches for security vulnerabilities that have been discovered since the last update.
Hackers and malware creators exploit these vulnerabilities to gain unauthorized access to systems. By ensuring your software is current, you significantly reduce the risk of these exploit attacks. Enabling automatic updates where available can help streamline this process, ensuring your system always benefits from the latest security measures without requiring constant manual oversight.
- Regularly check for updates to your operating system, software, and drivers.
- Enable automatic updates whenever possible to ensure timely application of security patches.
- Be cautious of software prompting for manual updates through pop-up ads or notifications, as these could be disguised malware.
In summary, the key to maintaining a secure device post-PUP removal involves careful consideration during software installation, regular system updates, and adopting a proactive security strategy.
Integrating these practices into your digital routine can significantly enhance your protection against unwanted software and the security risks they pose.
For comprehensive and reliable protection against malware, including PUPs, consider using SpyHunter. It offers real-time defense mechanisms and features specifically designed to identify and remove a wide range of threats, ensuring your device remains secure against the latest malware innovations.
Common Questions About SlimCleaner Plus and Its Removal
Can SlimCleaner Plus Impact My Computer’s Performance?
Yes, SlimCleaner Plus can significantly impact your computer’s performance, often negatively. Although it advertises itself as a tool designed to enhance your system’s efficiency, the reality often differs. SlimCleaner Plus operates by running unnecessary background processes, which can slow down your computer. It also tends to display a high number of pop-up ads and alerts, further detracting from your user experience by consuming valuable system resources. These pop-ups not only disrupt your workflow but can lead to slower response times and increased system boot times.
Moreover, by modifying your search results and tracking your browsing activity, SlimCleaner Plus can cause your browser to perform sluggishly, adding another layer of frustration. Removing SlimCleaner Plus from your computer can help restore its performance to its optimal level, leading to a smoother and more efficient user experience.
Is SlimCleaner Plus Considered Malware or Simply Unwanted Software?
SlimCleaner Plus falls into the category of potentially unwanted programs (PUPs), rather than being classified strictly as malware.
While it does not directly harm your computer in the way traditional malware might, by damaging files or stealing sensitive information, it still poses significant concerns.
PUPs like SlimCleaner Plus often enter your system bundled with other software, sometimes without clear consent. Once installed, they engage in behaviors such as displaying excessive advertisements, altering search results, and tracking user activity without transparent disclosure—practices that can compromise your privacy and security.
Despite its presentation as a useful optimization tool, SlimCleaner Plus typically offers exaggerated or misleading scan results to convince users to purchase a subscription. Therefore, while not malware in the strictest sense, the intrusive nature of SlimCleaner Plus and its impact on system performance and user experience make it software you’d likely want to remove from your PC.
In situations where addressing security or performance issues on your PC becomes a priority, especially when dealing with potentially unwanted programs like SlimCleaner Plus, SpyHunter offers a dependable solution. SpyHunter is designed to identify and eliminate malware, PUPs, and other security threats, ensuring that your system remains protected and runs smoothly.
Its user-friendly interface and powerful scan tools make it a suitable choice for both tech-savvy users and those less familiar with computer security, simplifying the process of keeping your computer in top condition.
The Final Word on Removing SlimCleaner Plus from Windows 10
Removing unwanted software like SlimCleaner Plus from your Windows 10 computer can be crucial for maintaining optimal system performance and safeguarding your privacy. Despite its promises of cleaning and optimizing your PC, you might find that SlimCleaner Plus does not meet your expectations or that it was installed without your full consent. Fortunately, uninstalling it is a process that can be tackled with a bit of guidance.
Firstly, it’s important to attempt the standard uninstall process via the Windows ‘Add or remove programs’ feature. This is a straightforward method that allows most users to remove unwanted applications without much hassle. However, SlimCleaner Plus, like some other software, may leave behind remnants that continue to occupy space or interfere with your system’s efficiency. These remnants can include registry entries and junk files that were not removed during the uninstallation process.
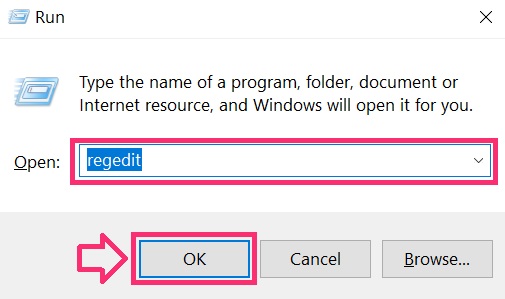
To fully remove SlimCleaner Plus from your system, you may need to delete these leftovers manually. This involves navigating the Registry Editor to delete invalid keys and values associated with SlimCleaner Plus.
However, it’s key to proceed with caution as incorrect modifications in the Registry can lead to system instability. For those less comfortable with these technical steps, using a reputable uninstaller tool can be a safer and more efficient alternative. Uninstaller software automates the removal process, ensuring that the program and its associated files are fully eradicated from your system without leaving any residues.
In situations where manual or automated uninstallation attempts don’t resolve the issue, security software like SpyHunter could be beneficial. SpyHunter can help identify and remove potentially unwanted programs (PUPs) and malware, offering an additional layer of security and peace of mind. Its use becomes particularly relevant if SlimCleaner Plus was installed through deceptive bundling or if it’s exhibiting malicious behavior.
To sum up, uninstalling SlimCleaner Plus from Windows 10 requires a methodical approach, starting with the standard uninstallation procedure and, if necessary, followed by manual or automated removal of leftovers.
For users seeking complete system cleanup and security, integrating reliable security software like SpyHunter into your PC maintenance routine can offer comprehensive protection against unwanted applications and other security threats.
Ventsislav Krastev
Ventsislav is a cybersecurity expert at SensorsTechForum since 2015. He has been researching, covering, helping victims with the latest malware infections plus testing and reviewing software and the newest tech developments. Having graduated Marketing as well, Ventsislav also has passion for learning new shifts and innovations in cybersecurity that become game changers. After studying Value Chain Management, Network Administration and Computer Administration of System Applications, he found his true calling within the cybersecrurity industry and is a strong believer in the education of every user towards online safety and security.
Follow Me:
- Windows
- Mac OS X
- Google Chrome
- Mozilla Firefox
- Microsoft Edge
- Safari
- Internet Explorer
- Stop Push Pop-ups
How to Remove Slimcleaner Plus from Windows.
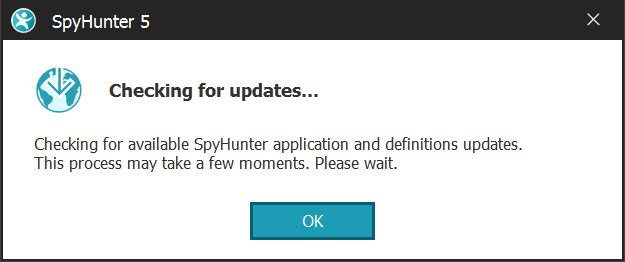
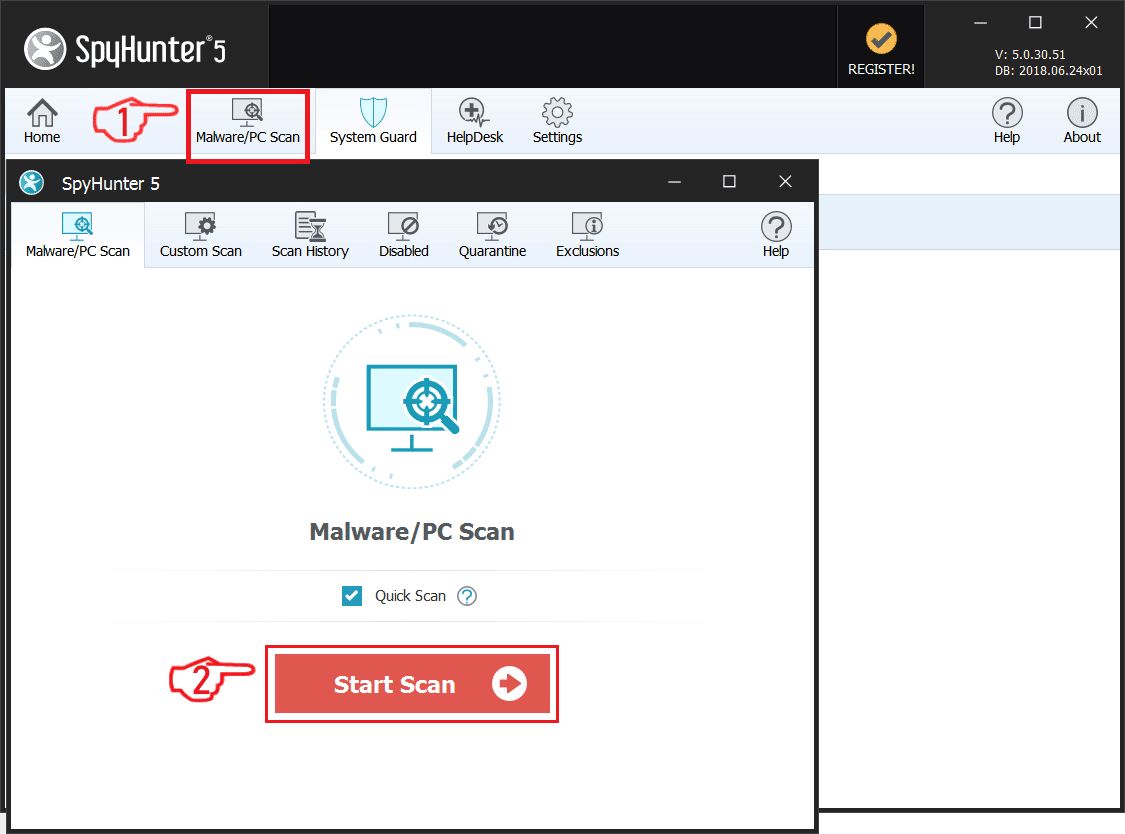
Step 1: Scan for Slimcleaner Plus with SpyHunter Anti-Malware Tool
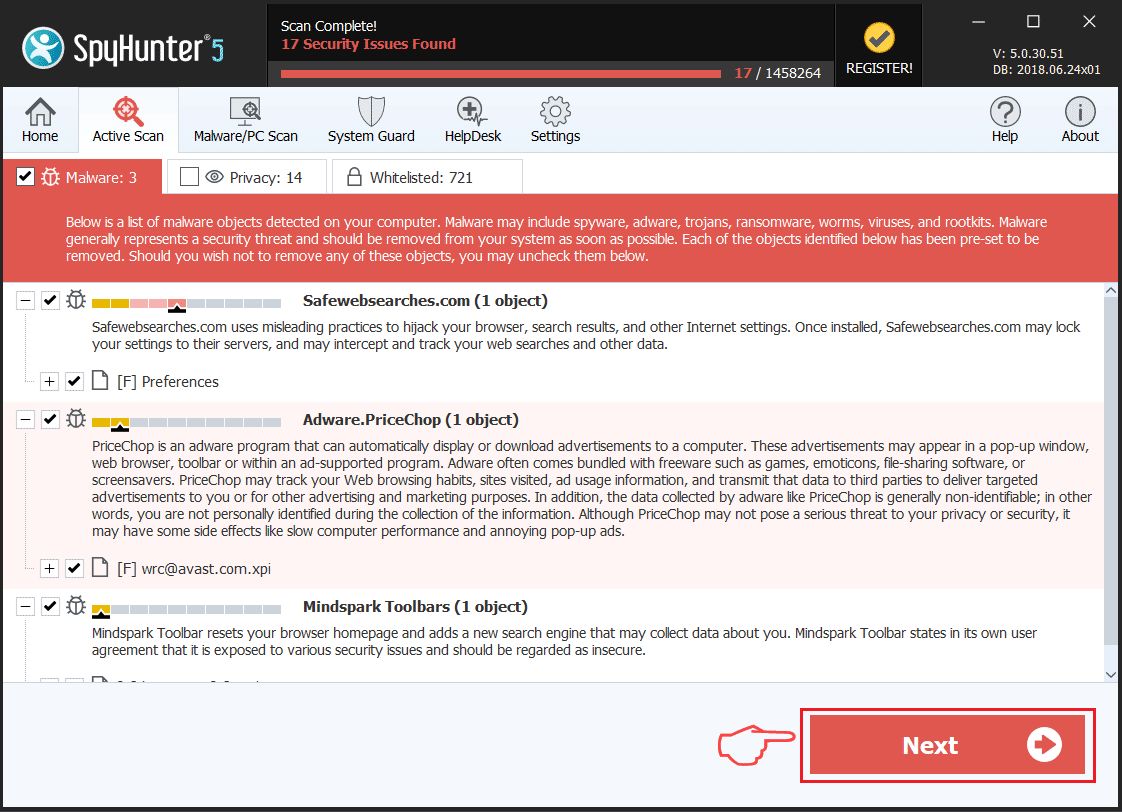
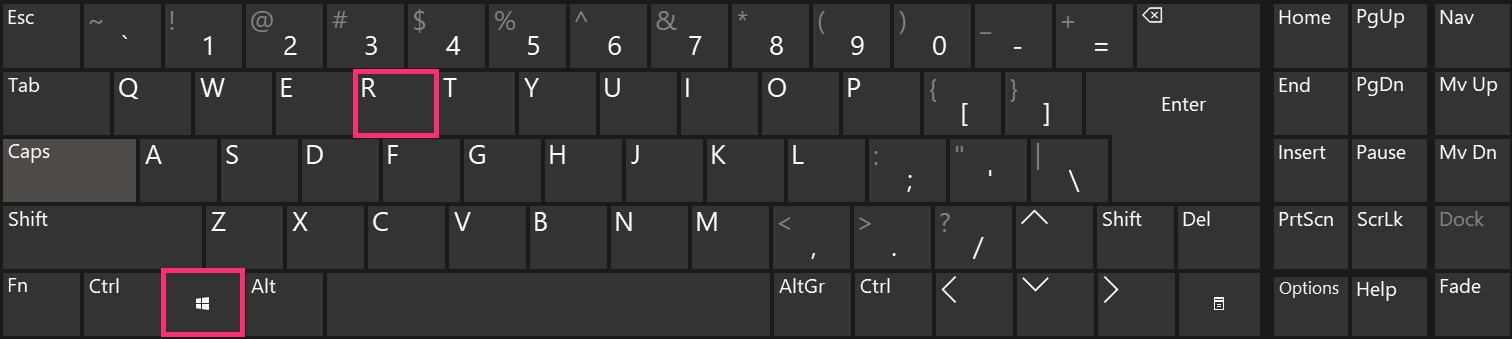
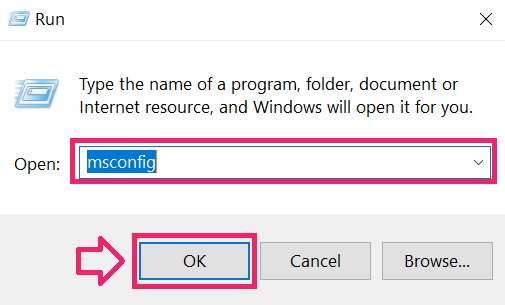
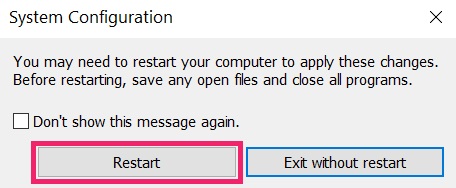
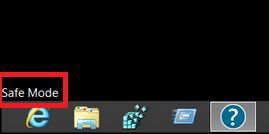
Step 2: Boot Your PC In Safe Mode

Step 3: Uninstall Slimcleaner Plus and related software from Windows
Uninstall Steps for Windows 11
Uninstall Steps for Windows 10 and Older Versions
Here is a method in few easy steps that should be able to uninstall most programs. No matter if you are using Windows 10, 8, 7, Vista or XP, those steps will get the job done. Dragging the program or its folder to the recycle bin can be a very bad decision. If you do that, bits and pieces of the program are left behind, and that can lead to unstable work of your PC, errors with the file type associations and other unpleasant activities. The proper way to get a program off your computer is to Uninstall it. To do that:
 Follow the instructions above and you will successfully uninstall most programs.
Step 4: Clean Any registries, Created by Slimcleaner Plus on Your PC.
The usually targeted registries of Windows machines are the following:
- HKEY_LOCAL_MACHINE\Software\Microsoft\Windows\CurrentVersion\Run
- HKEY_CURRENT_USER\Software\Microsoft\Windows\CurrentVersion\Run
- HKEY_LOCAL_MACHINE\Software\Microsoft\Windows\CurrentVersion\RunOnce
- HKEY_CURRENT_USER\Software\Microsoft\Windows\CurrentVersion\RunOnce
You can access them by opening the Windows registry editor and deleting any values, created by Slimcleaner Plus there. This can happen by following the steps underneath:
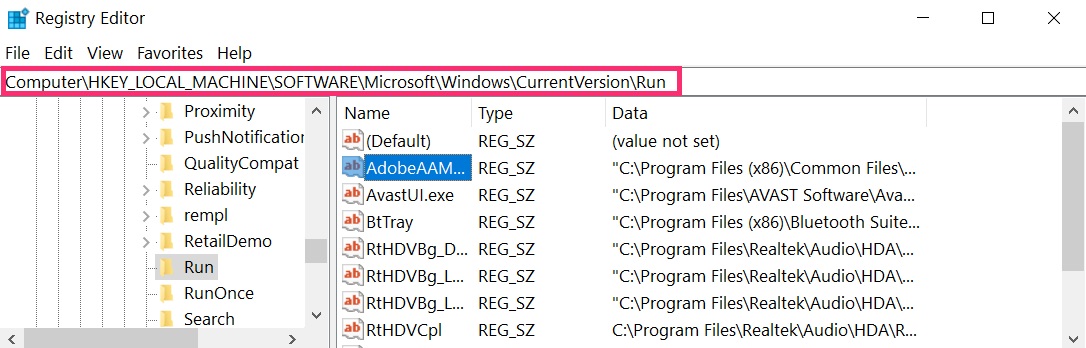
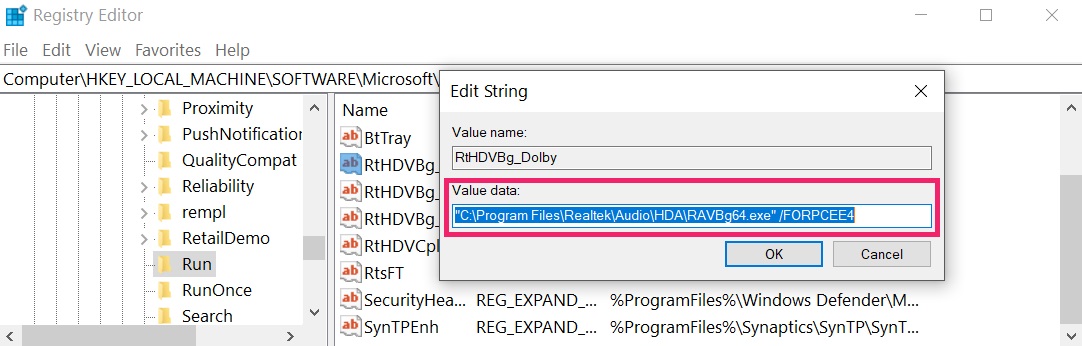 Tip: To find a virus-created value, you can right-click on it and click "Modify" to see which file it is set to run. If this is the virus file location, remove the value.
Video Removal Guide for Slimcleaner Plus (Windows).
Get rid of Slimcleaner Plus from Mac OS X.
Step 1: Uninstall Slimcleaner Plus and remove related files and objects

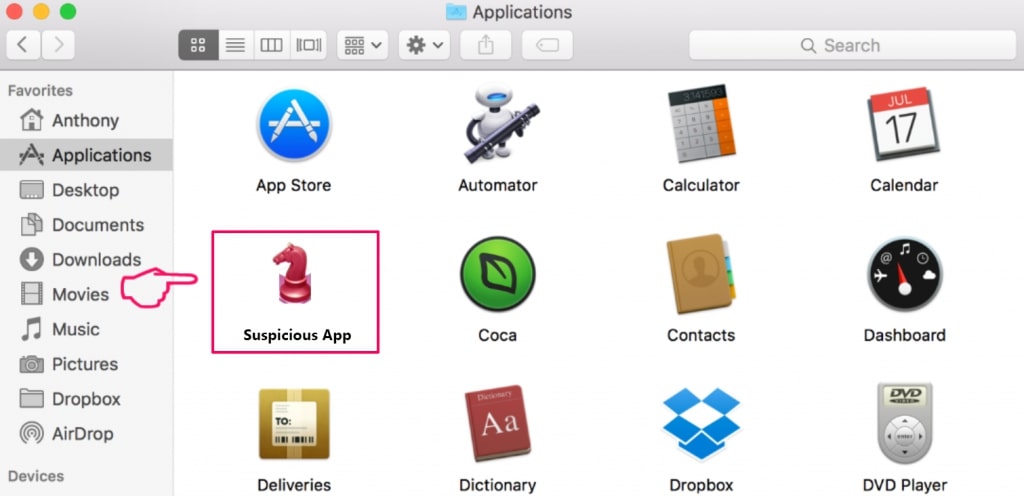
Your Mac will then show you a list of items that start automatically when you log in. Look for any suspicious apps identical or similar to Slimcleaner Plus. Check the app you want to stop from running automatically and then select on the Minus (“-“) icon to hide it.
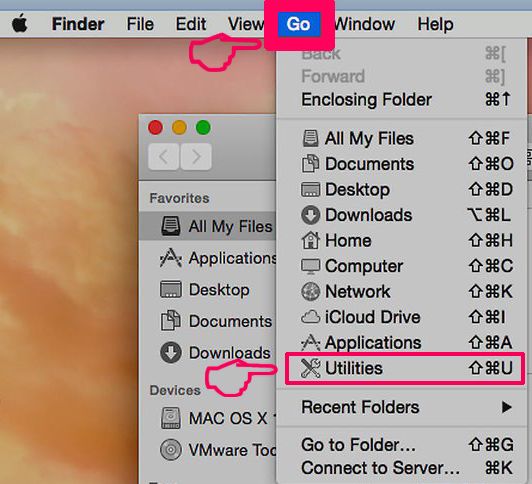
- Go to Finder.
- In the search bar type the name of the app that you want to remove.
- Above the search bar change the two drop down menus to “System Files” and “Are Included” so that you can see all of the files associated with the application you want to remove. Bear in mind that some of the files may not be related to the app so be very careful which files you delete.
- If all of the files are related, hold the ⌘+A buttons to select them and then drive them to “Trash”.
In case you cannot remove Slimcleaner Plus via Step 1 above:
In case you cannot find the virus files and objects in your Applications or other places we have shown above, you can manually look for them in the Libraries of your Mac. But before doing this, please read the disclaimer below:
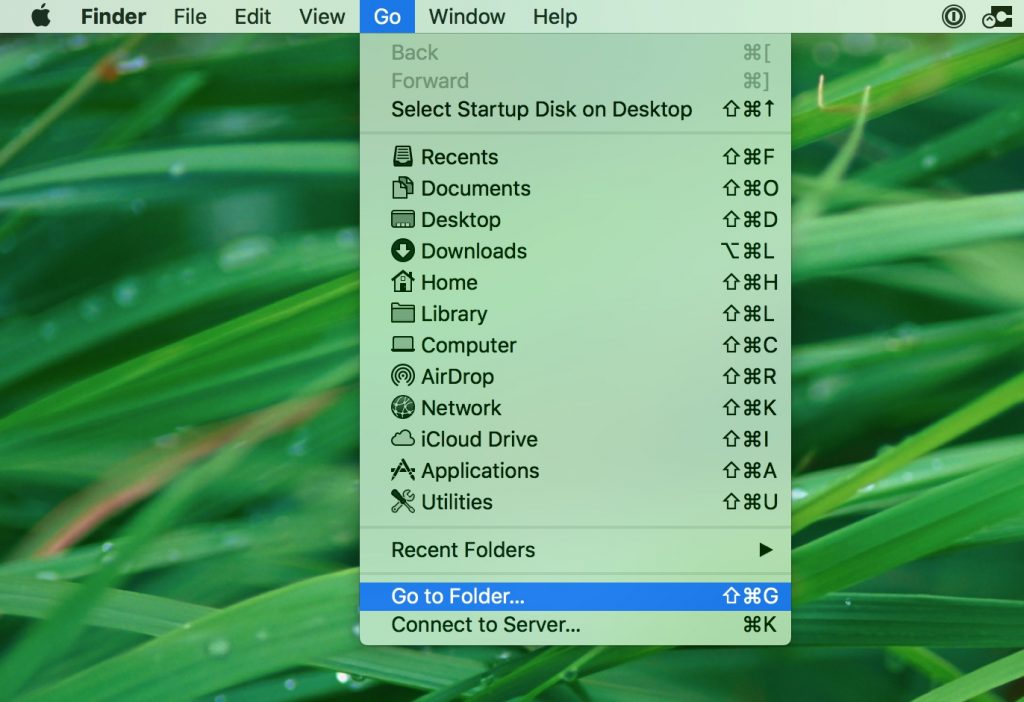
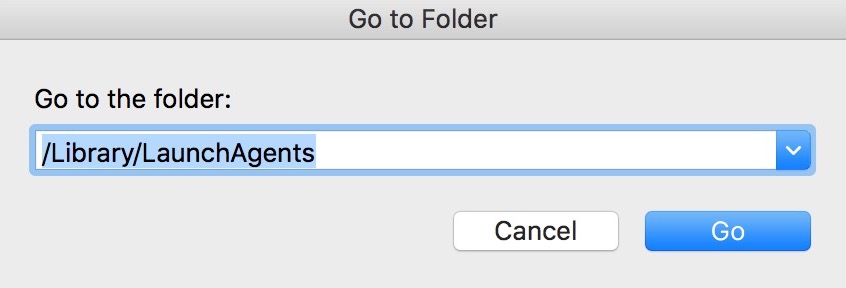
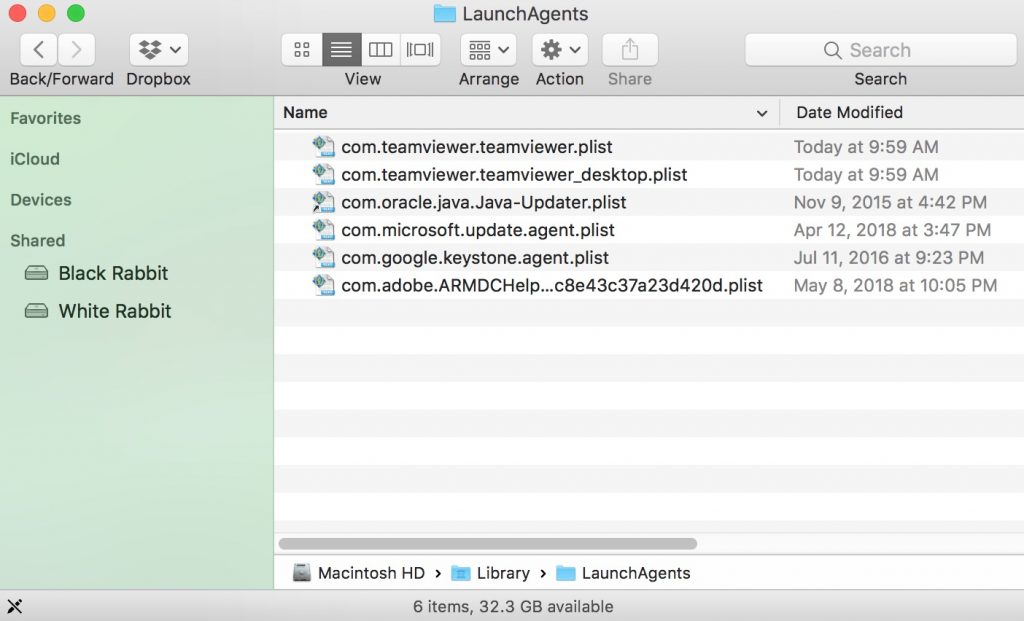
You can repeat the same procedure with the following other Library directories:
→ ~/Library/LaunchAgents
/Library/LaunchDaemons
Tip: ~ is there on purpose, because it leads to more LaunchAgents.
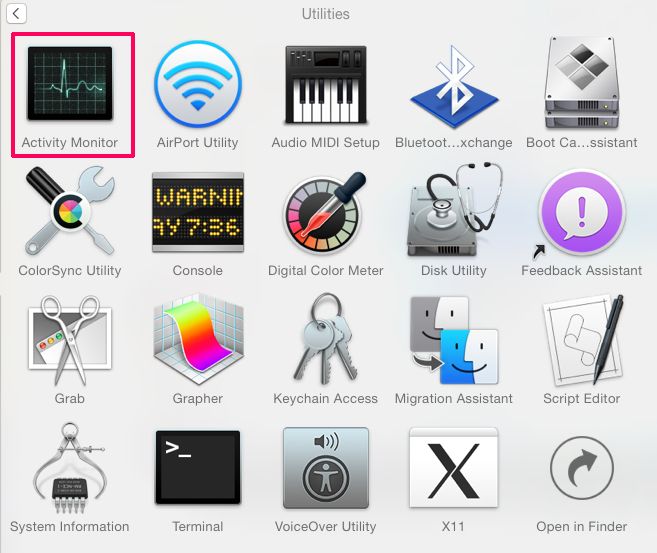
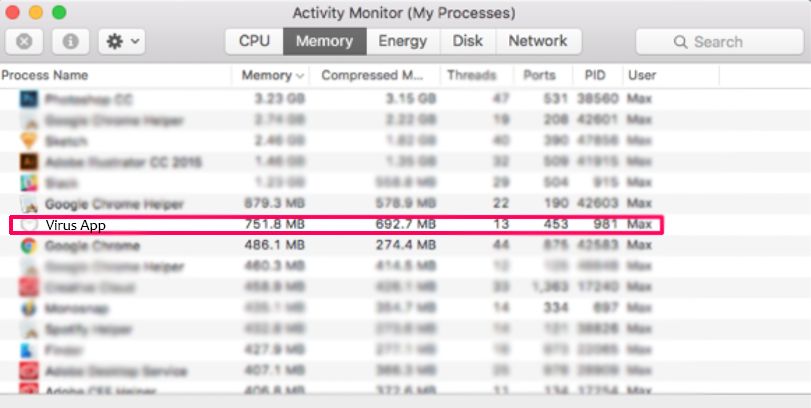
Step 2: Scan for and remove Slimcleaner Plus files from your Mac
When you are facing problems on your Mac as a result of unwanted scripts and programs such as Slimcleaner Plus, the recommended way of eliminating the threat is by using an anti-malware program. SpyHunter for Mac offers advanced security features along with other modules that will improve your Mac’s security and protect it in the future.
Video Removal Guide for Slimcleaner Plus (Mac)
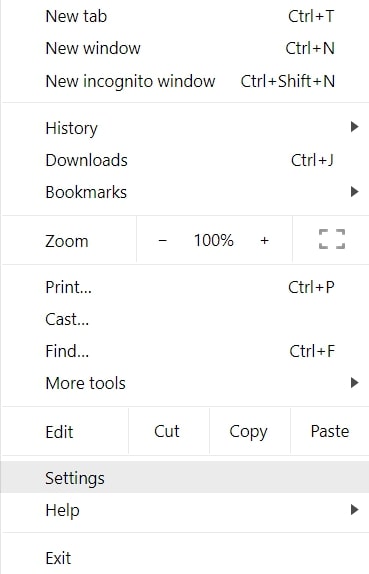
Remove Slimcleaner Plus from Google Chrome.
Step 1: Start Google Chrome and open the drop menu
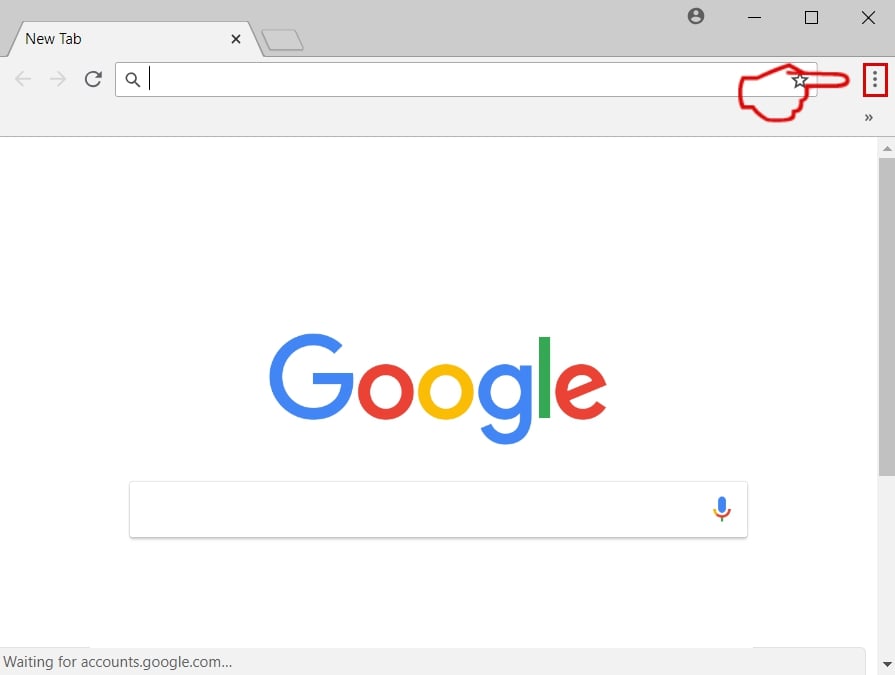
Step 2: Move the cursor over "Tools" and then from the extended menu choose "Extensions"
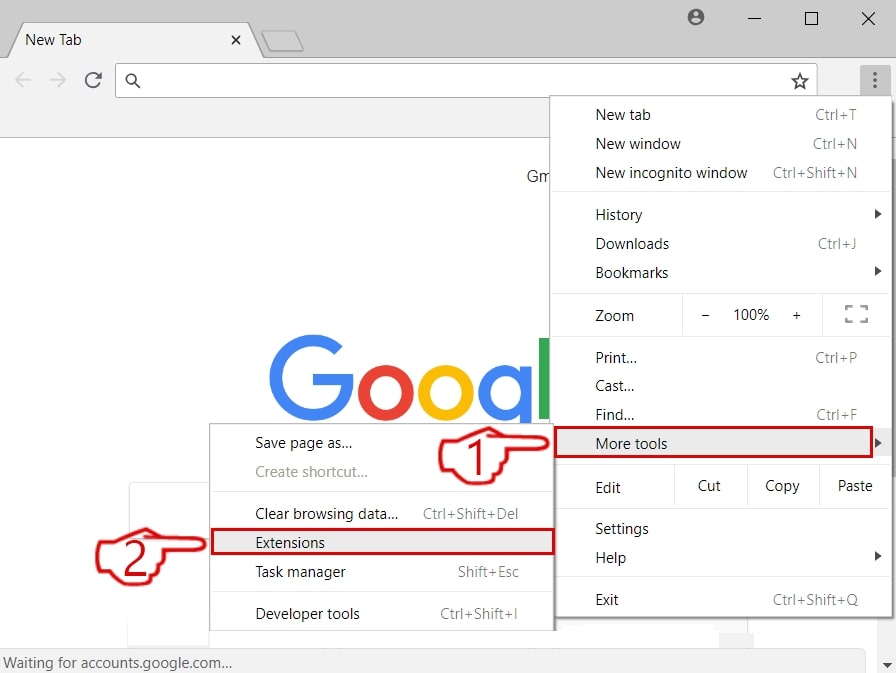
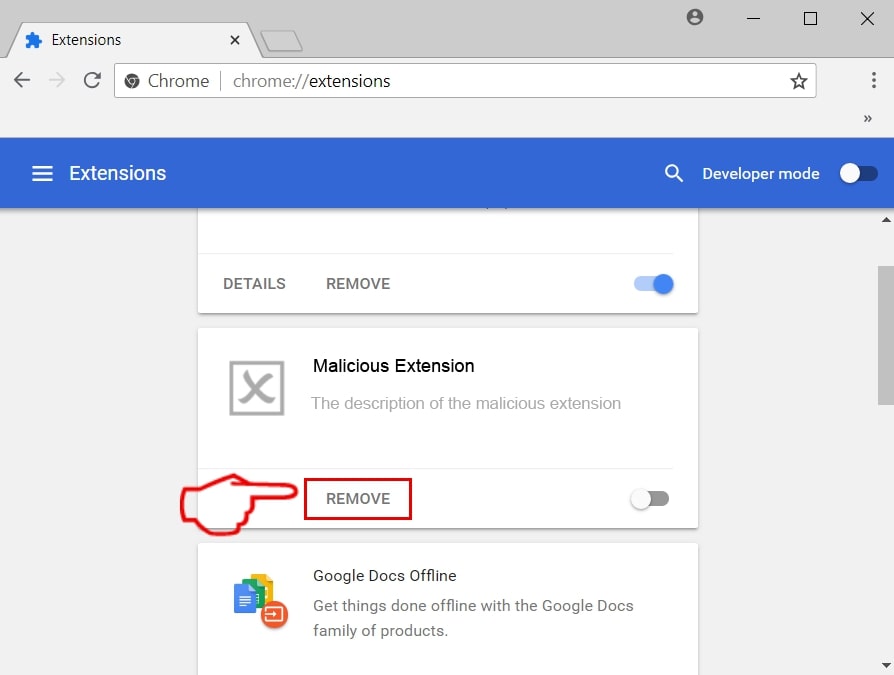
Step 3: From the opened "Extensions" menu locate the unwanted extension and click on its "Remove" button.
Step 4: After the extension is removed, restart Google Chrome by closing it from the red "X" button at the top right corner and start it again.
Erase Slimcleaner Plus from Mozilla Firefox.
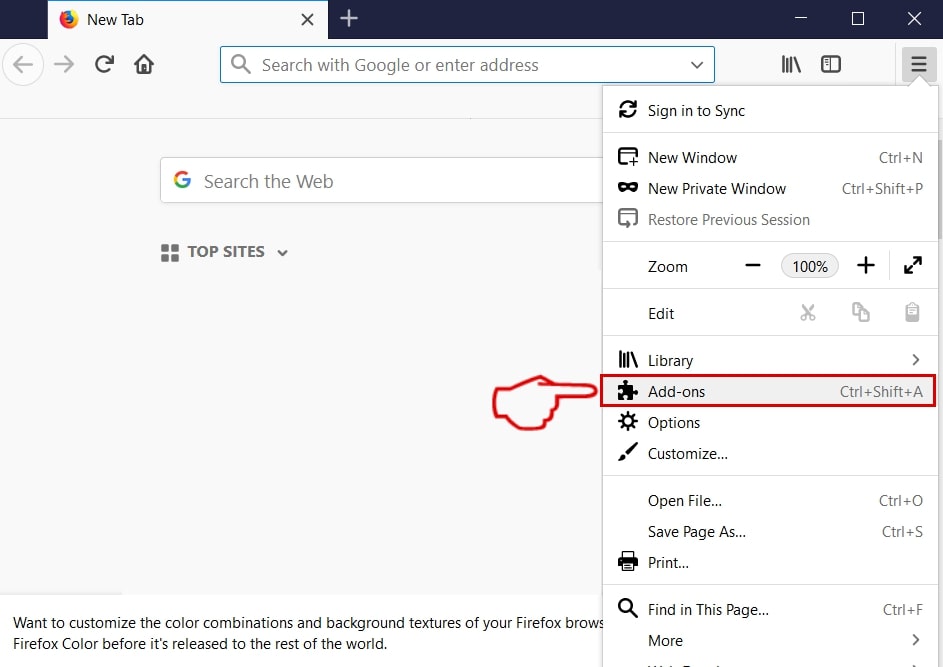
Step 1: Start Mozilla Firefox. Open the menu window:

Step 2: Select the "Add-ons" icon from the menu.
Step 3: Select the unwanted extension and click "Remove"

Step 4: After the extension is removed, restart Mozilla Firefox by closing it from the red "X" button at the top right corner and start it again.
Uninstall Slimcleaner Plus from Microsoft Edge.
Step 1: Start Edge browser.
Step 2: Open the drop menu by clicking on the icon at the top right corner.
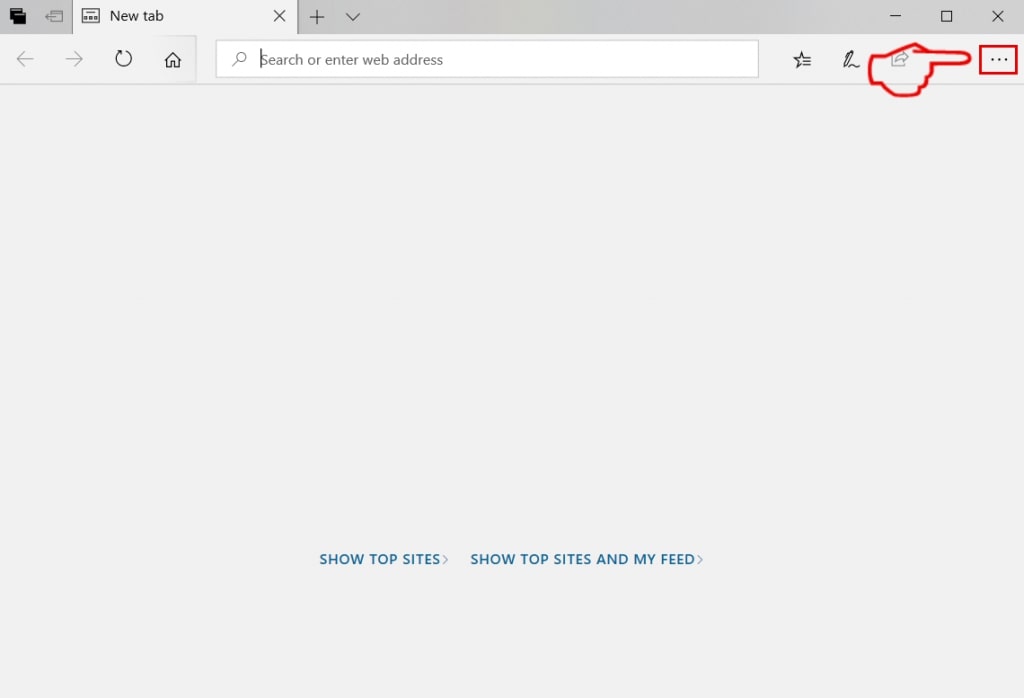
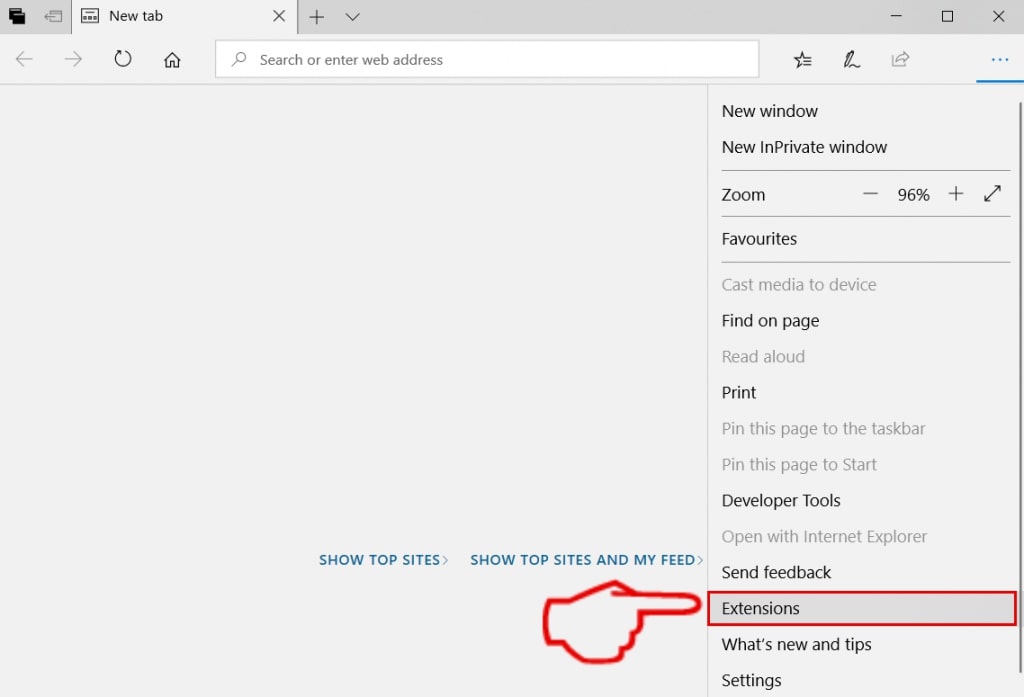
Step 3: From the drop menu select "Extensions".
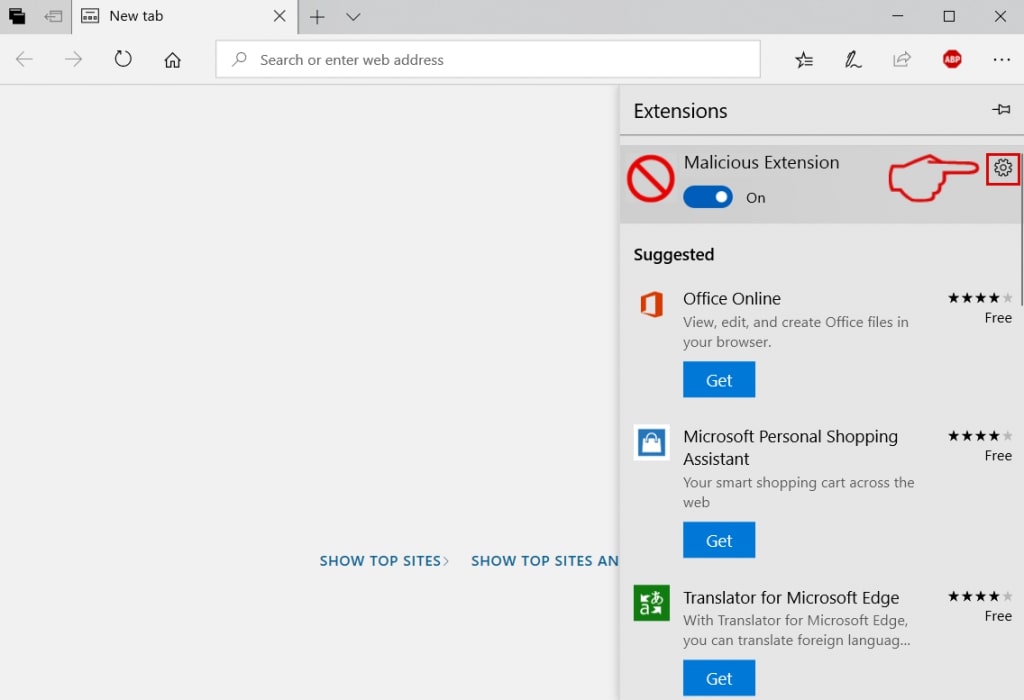
Step 4: Choose the suspected malicious extension you want to remove and then click on the gear icon.
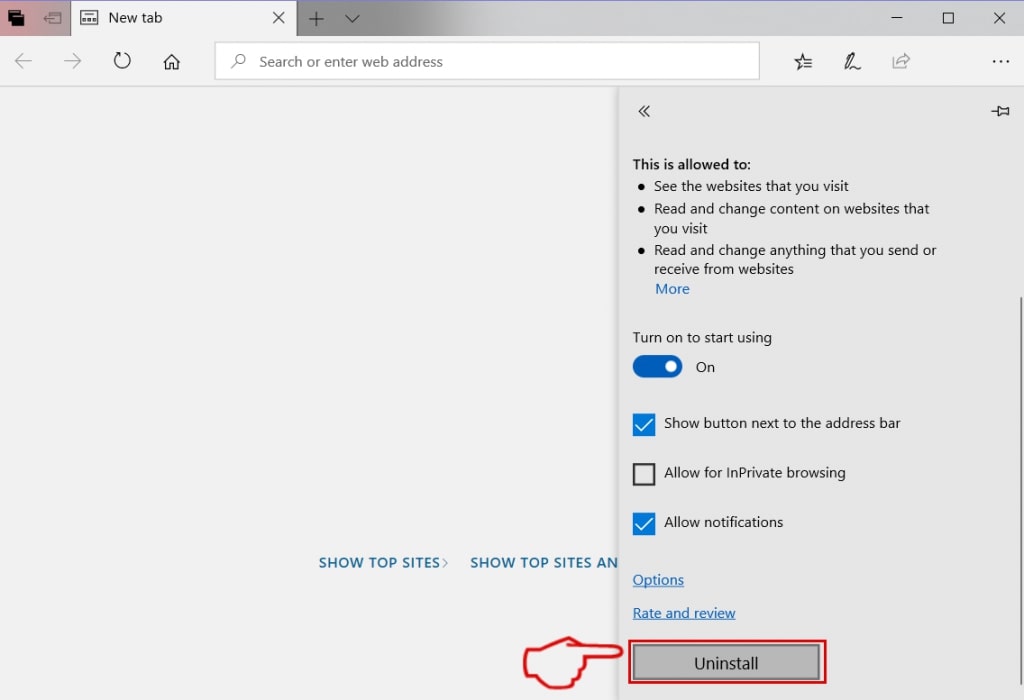
Step 5: Remove the malicious extension by scrolling down and then clicking on Uninstall.
Remove Slimcleaner Plus from Safari
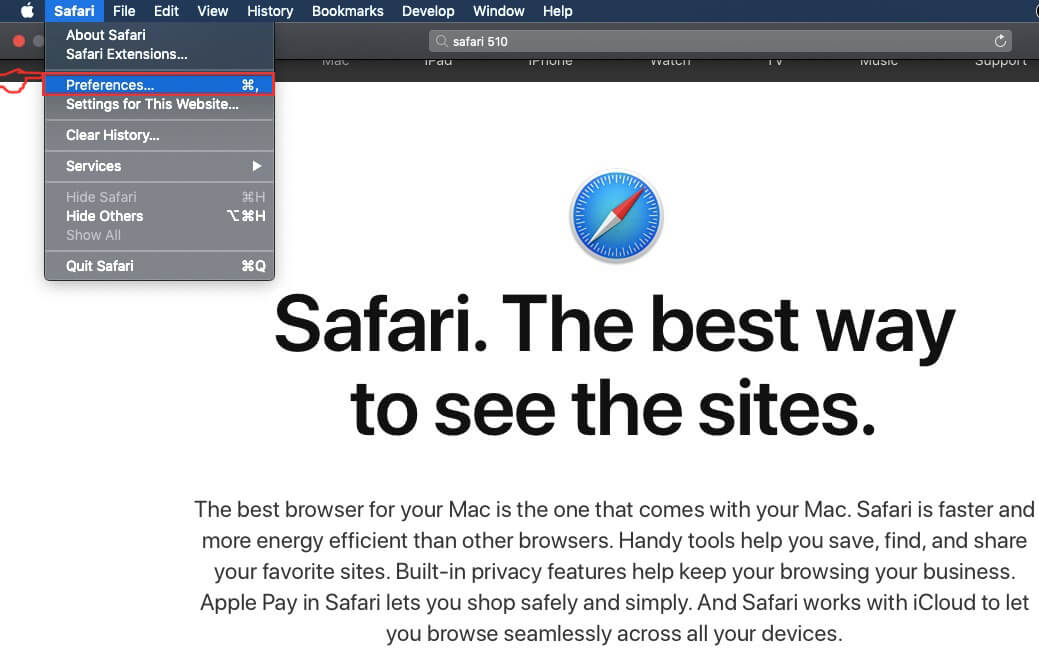
Step 1: Start the Safari app.
Step 2: After hovering your mouse cursor to the top of the screen, click on the Safari text to open its drop down menu.
Step 3: From the menu, click on "Preferences".
Step 4: After that, select the 'Extensions' Tab.

Step 5: Click once on the extension you want to remove.
Step 6: Click 'Uninstall'.
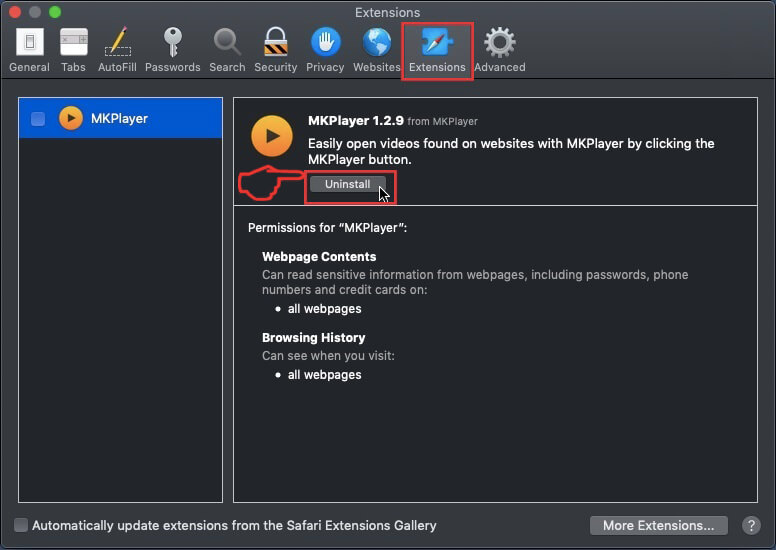
A pop-up window will appear asking for confirmation to uninstall the extension. Select 'Uninstall' again, and the Slimcleaner Plus will be removed.
Eliminate Slimcleaner Plus from Internet Explorer.
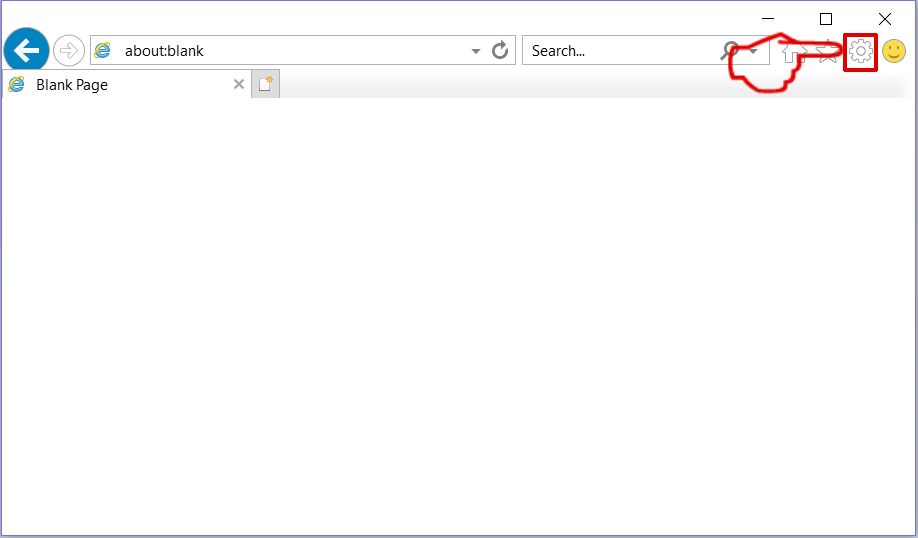
Step 1: Start Internet Explorer.
Step 2: Click on the gear icon labeled 'Tools' to open the drop menu and select 'Manage Add-ons'
Step 3: In the 'Manage Add-ons' window.
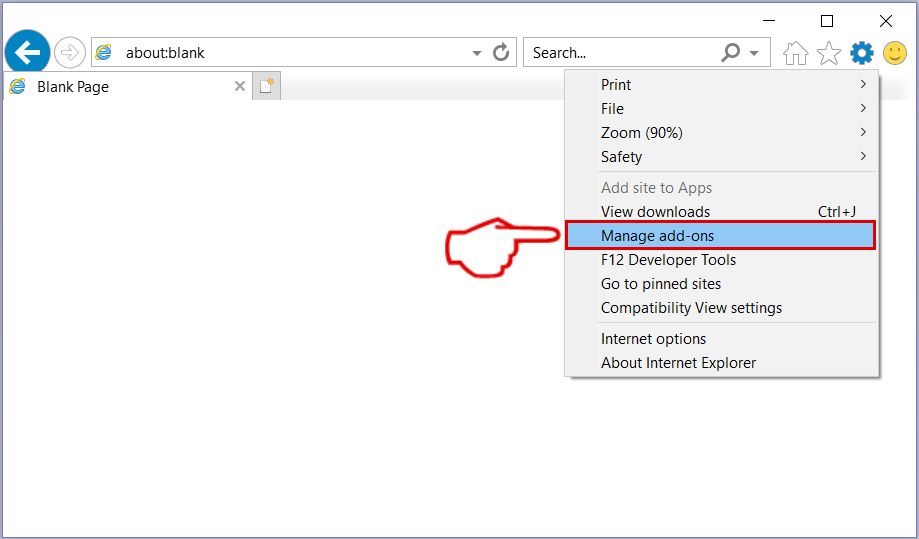
Step 4: Select the extension you want to remove and then click 'Disable'. A pop-up window will appear to inform you that you are about to disable the selected extension, and some more add-ons might be disabled as well. Leave all the boxes checked, and click 'Disable'.
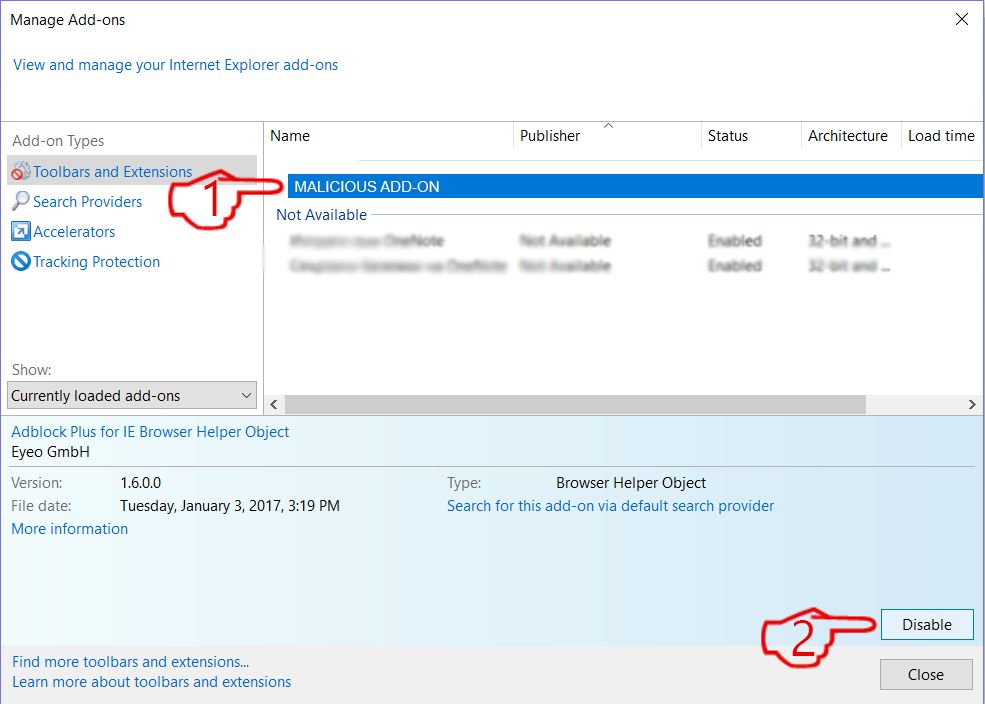
Step 5: After the unwanted extension has been removed, restart Internet Explorer by closing it from the red 'X' button located at the top right corner and start it again.
Remove Push Notifications from Your Browsers
Turn Off Push Notifications from Google Chrome
To disable any Push Notices from Google Chrome browser, please follow the steps below:
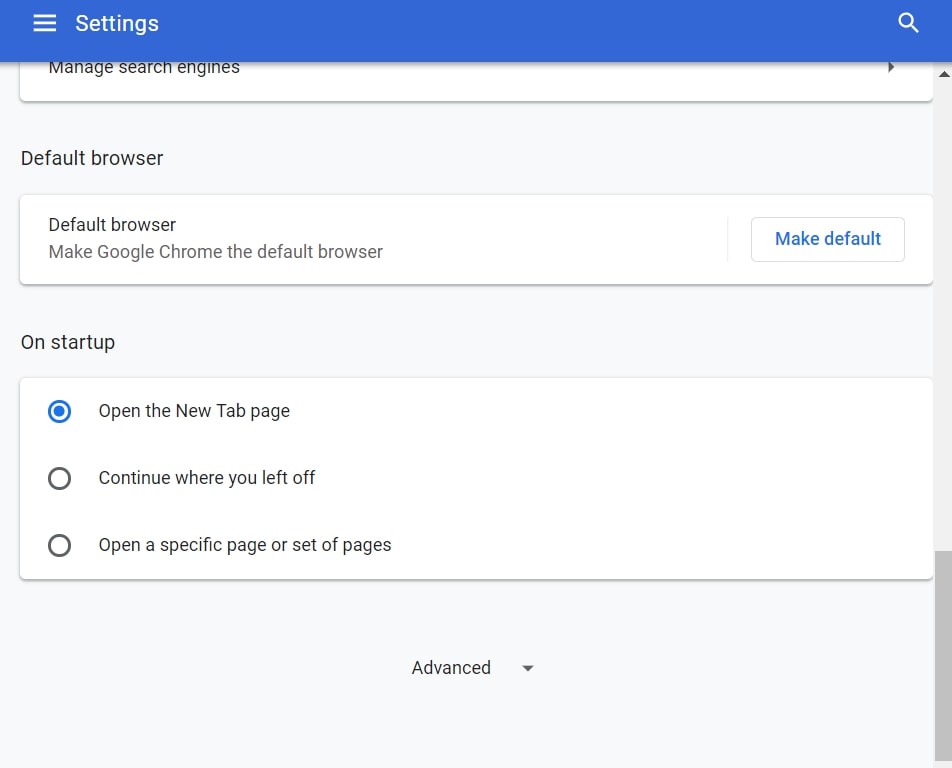
Step 1: Go to Settings in Chrome.
Step 2: In Settings, select “Advanced Settings”:
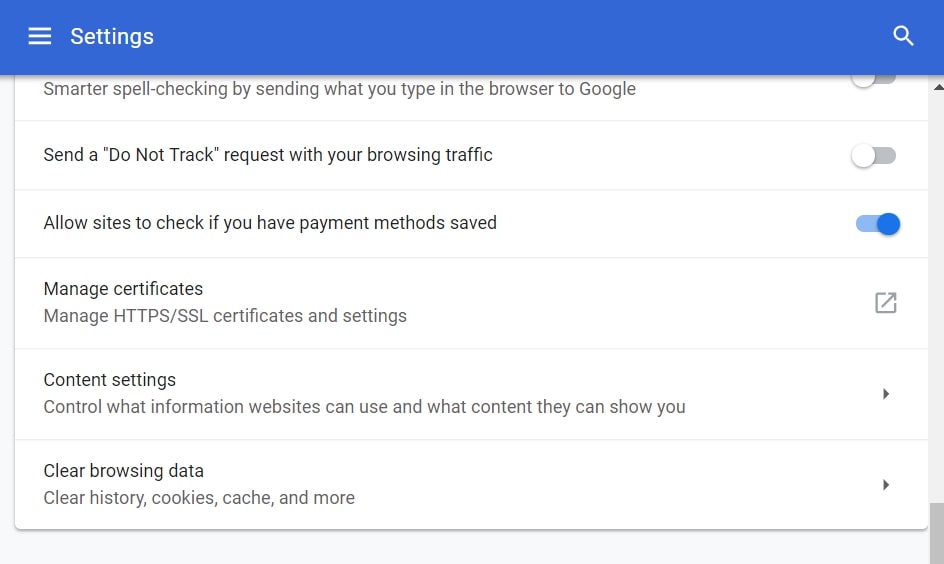
Step 3: Click “Content Settings”:
Step 4: Open “Notifications”:
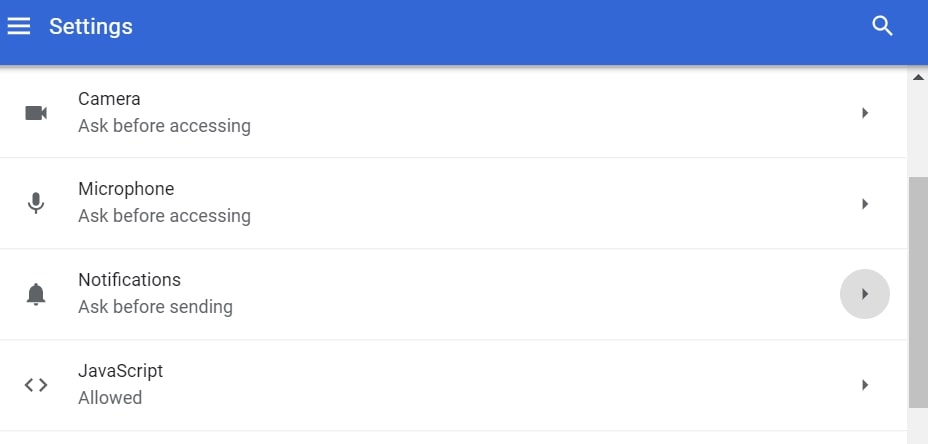
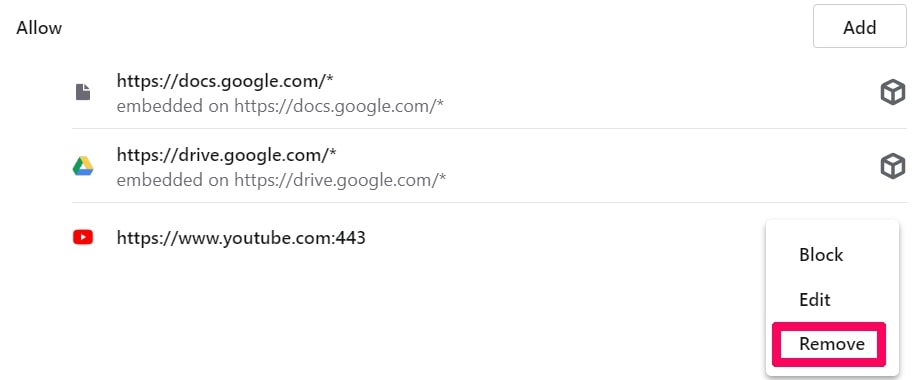
Step 5: Click the three dots and choose Block, Edit or Remove options:

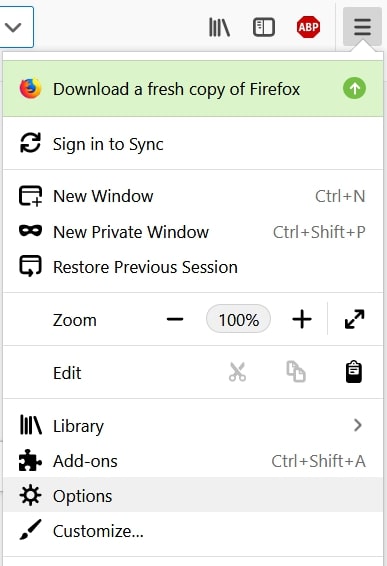
Remove Push Notifications on Firefox
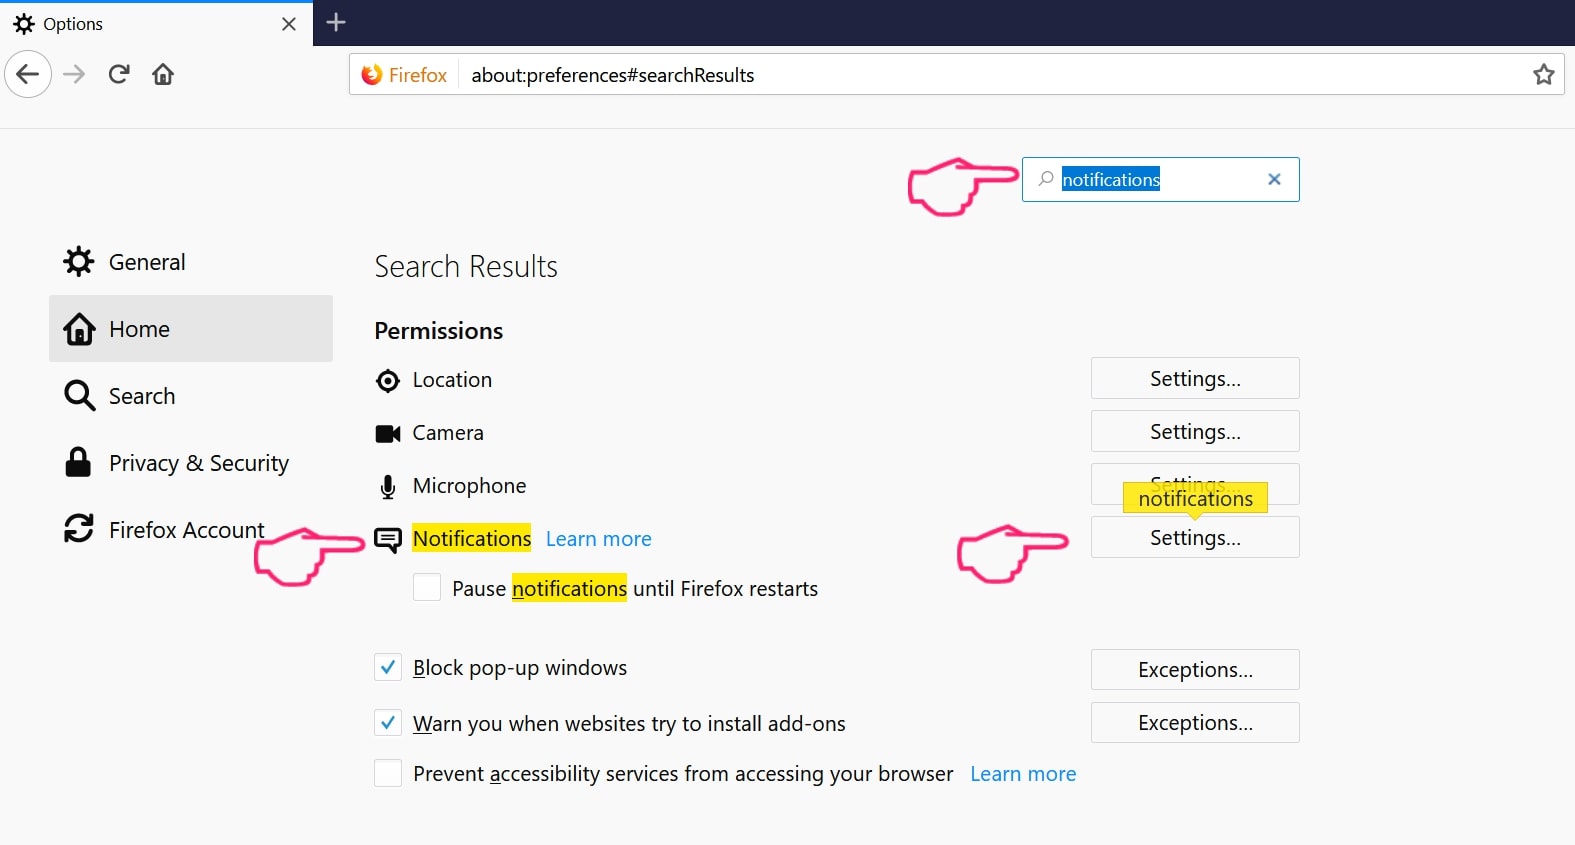
Step 1: Go to Firefox Options.
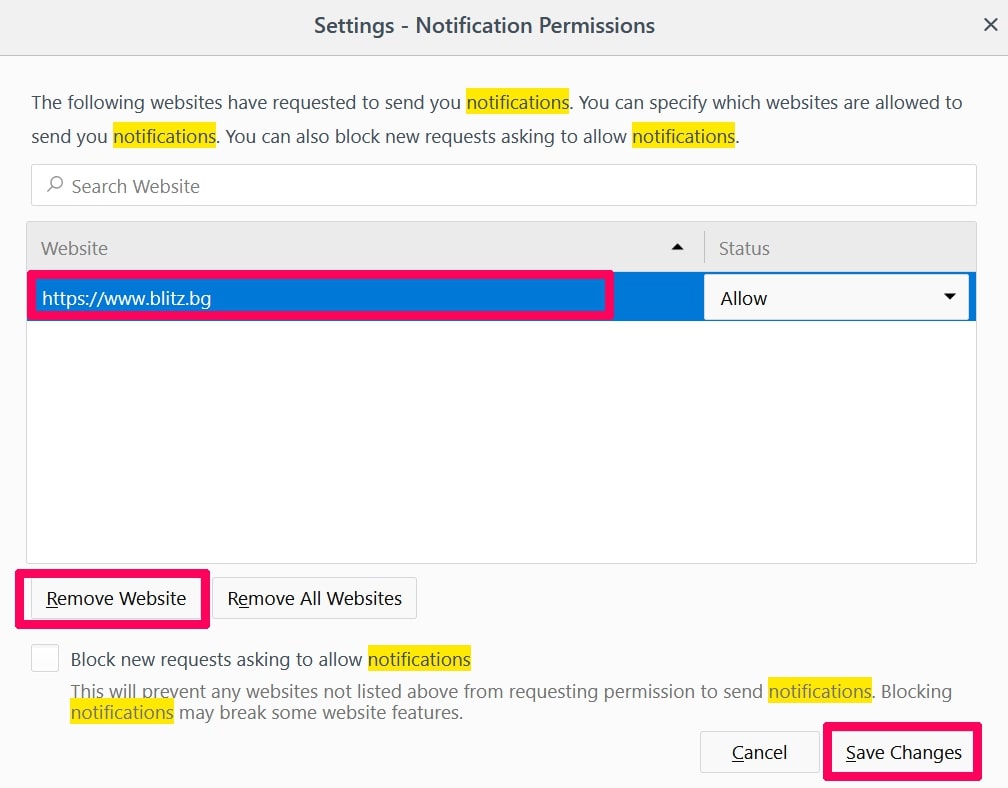
Step 2: Go to “Settings”, type “notifications” in the search bar and click "Settings":
Step 3: Click “Remove” on any site you wish notifications gone and click “Save Changes”
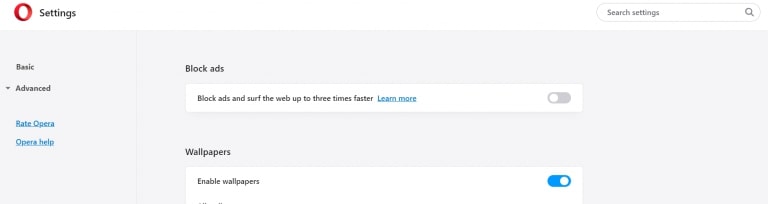
Stop Push Notifications on Opera
Step 1: In Opera, press ALT+P to go to Settings.
Step 2: In Setting search, type “Content” to go to Content Settings.
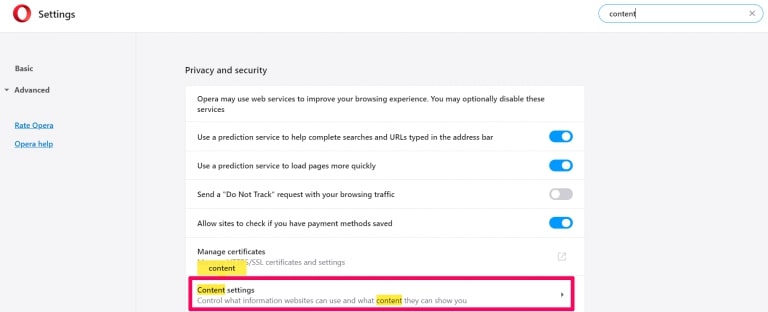
Step 3: Open Notifications:
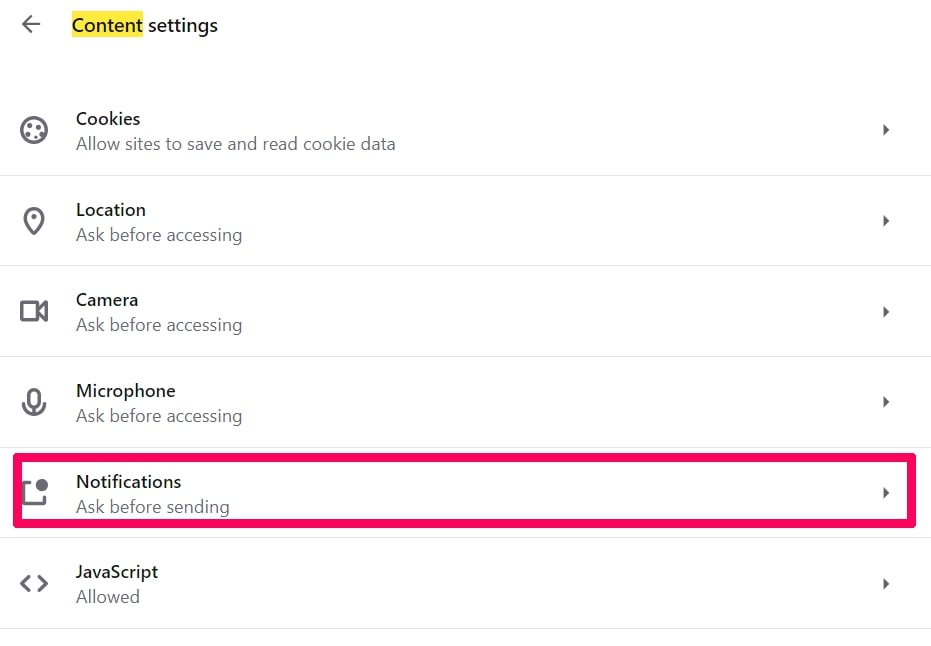
Step 4: Do the same as you did with Google Chrome (explained below):
Eliminate Push Notifications on Safari
Step 1: Open Safari Preferences.
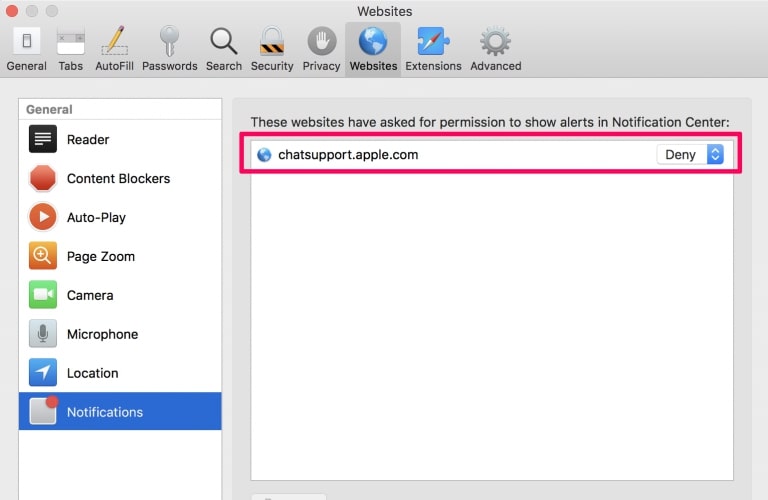
Step 2: Choose the domain from where you like push pop-ups gone and change to "Deny" from "Allow".
Slimcleaner Plus-FAQ
What Is Slimcleaner Plus?
The Slimcleaner Plus threat is adware or browser redirect virus.
It may slow your computer down significantly and display advertisements. The main idea is for your information to likely get stolen or more ads to appear on your device.
The creators of such unwanted apps work with pay-per-click schemes to get your computer to visit risky or different types of websites that may generate them funds. This is why they do not even care what types of websites show up on the ads. This makes their unwanted software indirectly risky for your OS.
What Are the Symptoms of Slimcleaner Plus?
There are several symptoms to look for when this particular threat and also unwanted apps in general are active:
Symptom #1: Your computer may become slow and have poor performance in general.
Symptom #2: You have toolbars, add-ons or extensions on your web browsers that you don't remember adding.
Symptom #3: You see all types of ads, like ad-supported search results, pop-ups and redirects to randomly appear.
Symptom #4: You see installed apps on your Mac running automatically and you do not remember installing them.
Symptom #5: You see suspicious processes running in your Task Manager.
If you see one or more of those symptoms, then security experts recommend that you check your computer for viruses.
What Types of Unwanted Programs Are There?
According to most malware researchers and cyber-security experts, the threats that can currently affect your device can be rogue antivirus software, adware, browser hijackers, clickers, fake optimizers and any forms of PUPs.
What to Do If I Have a "virus" like Slimcleaner Plus?
With few simple actions. First and foremost, it is imperative that you follow these steps:
Step 1: Find a safe computer and connect it to another network, not the one that your Mac was infected in.
Step 2: Change all of your passwords, starting from your email passwords.
Step 3: Enable two-factor authentication for protection of your important accounts.
Step 4: Call your bank to change your credit card details (secret code, etc.) if you have saved your credit card for online shopping or have done online activities with your card.
Step 5: Make sure to call your ISP (Internet provider or carrier) and ask them to change your IP address.
Step 6: Change your Wi-Fi password.
Step 7: (Optional): Make sure to scan all of the devices connected to your network for viruses and repeat these steps for them if they are affected.
Step 8: Install anti-malware software with real-time protection on every device you have.
Step 9: Try not to download software from sites you know nothing about and stay away from low-reputation websites in general.
If you follow these recommendations, your network and all devices will become significantly more secure against any threats or information invasive software and be virus free and protected in the future too.
How Does Slimcleaner Plus Work?
Once installed, Slimcleaner Plus can collect data using trackers. This data is about your web browsing habits, such as the websites you visit and the search terms you use. It is then used to target you with ads or to sell your information to third parties.
Slimcleaner Plus can also download other malicious software onto your computer, such as viruses and spyware, which can be used to steal your personal information and show risky ads, that may redirect to virus sites or scams.
Is Slimcleaner Plus Malware?
The truth is that PUPs (adware, browser hijackers) are not viruses, but may be just as dangerous since they may show you and redirect you to malware websites and scam pages.
Many security experts classify potentially unwanted programs as malware. This is because of the unwanted effects that PUPs can cause, such as displaying intrusive ads and collecting user data without the user’s knowledge or consent.
About the Slimcleaner Plus Research
The content we publish on SensorsTechForum.com, this Slimcleaner Plus how-to removal guide included, is the outcome of extensive research, hard work and our team’s devotion to help you remove the specific, adware-related problem, and restore your browser and computer system.
How did we conduct the research on Slimcleaner Plus?
Please note that our research is based on independent investigation. We are in contact with independent security researchers, thanks to which we receive daily updates on the latest malware, adware, and browser hijacker definitions.
Furthermore, the research behind the Slimcleaner Plus threat is backed with VirusTotal.
To better understand this online threat, please refer to the following articles which provide knowledgeable details.