

What is Testlibrary?
You took a personality or IQ test on Testlibrary, paid what looked like a tiny $1.95 one-time fee to see your results — and now you’re noticing mysterious monthly charges hitting your card. You’re not alone, and you’re in the right place. Read this article to understand exactly what Testlibrary is doing and how to stop it, then follow the guide at the bottom right now.
Testlibrary (testlibrary.com) is a personality assessment and aptitude testing platform that presents itself as a legitimate psychological testing service. The site itself is 11 years old and Gridinsoft gives it a 79/100 trust score with no major malware detections — so it’s not a criminal scam site in the traditional sense. However, Scam Detector gives it just 15.6 out of 100 and flags it as “Controversial,” and hundreds of verified Trustpilot and ProductReview.com.au users consistently report the same thing: they paid a small upfront fee (typically $1.95) for a personality or career test report, had no idea they were enrolling in an ongoing monthly subscription, and were subsequently charged anywhere from $39 to $55+ per month without clear consent. Multiple users on ProductReview explicitly describe this as a “scam” and “trap.” One documented complaint states: “The website said the report cost $1.95, then 1 week later I was hit with a subscription charge which I did not sign up for.” This hidden subscription model is the core problem — and it’s been going on for years.
Testlibrary Short Overview
| Type | Online personality/aptitude testing platform using hidden subscription trap — low upfront “trial” fee concealing recurring monthly charges of $39–$55+. |
| Symptoms | Charged $1.95 or similar small fee for a test report. Unexpected monthly subscription charges appearing on bank statement afterward. Inability to view test results without paying. No clear disclosure of subscription terms at point of payment. Unresponsive customer service when attempting cancellation or refund. |
| Removal Time | Approximately 15 minutes for a full-system scan |
| Removal Tool |
See If Your System Has Been Affected by malware
Download
Malware Removal Tool
|
How Did I Get Caught in the Testlibrary Subscription?
The Testlibrary subscription trap works because the consent mechanism is deliberately designed to be easy to miss. Here’s exactly how it happens:
- Social media and search ads with buried terms — Users typically find Testlibrary through malicious advertising-adjacent paid campaigns promoting “free” or very cheap personality tests. The ad presents the experience as a one-time low-cost service — there is no mention of a subscription in the ad itself.
- Checkout dark patterns — The subscription enrollment is buried in fine print or a pre-checked checkbox at checkout, technically disclosing the recurring charge but in a way designed to be overlooked. This is a classic dark pattern that exploits normal user behavior — people don’t read every word of checkout terms when paying $1.95 for something.
- Phishing-adjacent data collection — To pay for the $1.95 report, users enter their full card details. That’s all Testlibrary needs to begin charging the monthly subscription fee. The data collection at checkout is the actual goal — not the test result.
- Redirects from third-party quiz sites — Some users arrive at Testlibrary through redirects from social media personality quizzes or third-party quiz platforms, which hand off to Testlibrary’s paid report funnel without making the transition — or the billing implications — obvious.
What Does Testlibrary Do?
Here’s the full picture of what Testlibrary does once you complete a test and submit your payment details:
- Withholds results to force payment — Multiple users report completing tests of 100+ questions only to be told they cannot view their results without paying the $1.95 fee. The test is not the product — getting you to submit card details is the product.
- Enrolls you in a hidden subscription — By accepting the $1.95 charge, users are automatically enrolled in a recurring monthly membership that costs $39–$55+ per month. This charge appears with no advance warning and continues until actively cancelled — which Testlibrary makes deliberately difficult.
- Ignores cancellation requests — Dozens of documented complaints confirm that Testlibrary does not respond to emails requesting cancellation or refunds, or responds with delays and runarounds designed to let another billing cycle pass before resolution.
- Personal data harvesting — The test completion process collects detailed demographic and psychological information alongside your name, email, and payment details. This data feeds directly into trackers-based data collection and is shared with advertising partners per the site’s privacy policy.
Testlibrary operates in a grey zone — it technically discloses the subscription, but in a way specifically engineered to avoid genuine informed consent. Consumer protection agencies in Australia, the UK, and the US classify this practice as deceptive regardless of technical legal compliance.
What Should You Do?
Contact your bank or credit card provider immediately and dispute any subscription charges you didn’t knowingly authorize — document the lack of clear disclosure as evidence. Request a chargeback and ask your bank to block future charges from Testlibrary. Report the deceptive subscription practice to the FTC at reportfraud.ftc.gov (US), Trading Standards (UK), or the ACCC (Australia). Run a full device scan using the guide below to check for any spyware or trackers installed through the site. Follow the complete guide below this article for all recommended steps.

Ventsislav Krastev
Ventsislav is a cybersecurity expert at SensorsTechForum since 2015. He has been researching, covering, helping victims with the latest malware infections plus testing and reviewing software and the newest tech developments. Having graduated Marketing as well, Ventsislav also has passion for learning new shifts and innovations in cybersecurity that become game changers. After studying Value Chain Management, Network Administration and Computer Administration of System Applications, he found his true calling within the cybersecrurity industry and is a strong believer in the education of every user towards online safety and security.
Follow Me:
- Windows
- Mac OS X
- Google Chrome
- Mozilla Firefox
- Microsoft Edge
- Safari
- Internet Explorer
- Stop Push Pop-ups
How to Remove Testlibrary from Windows.
Step 1: Scan for Testlibrary with SpyHunter Anti-Malware Tool
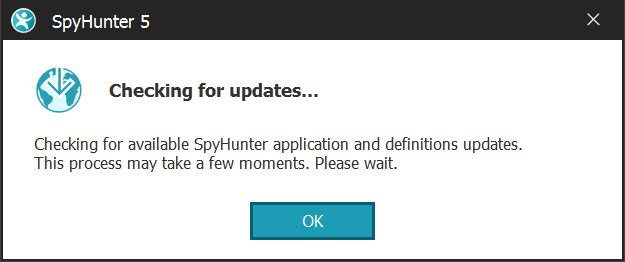
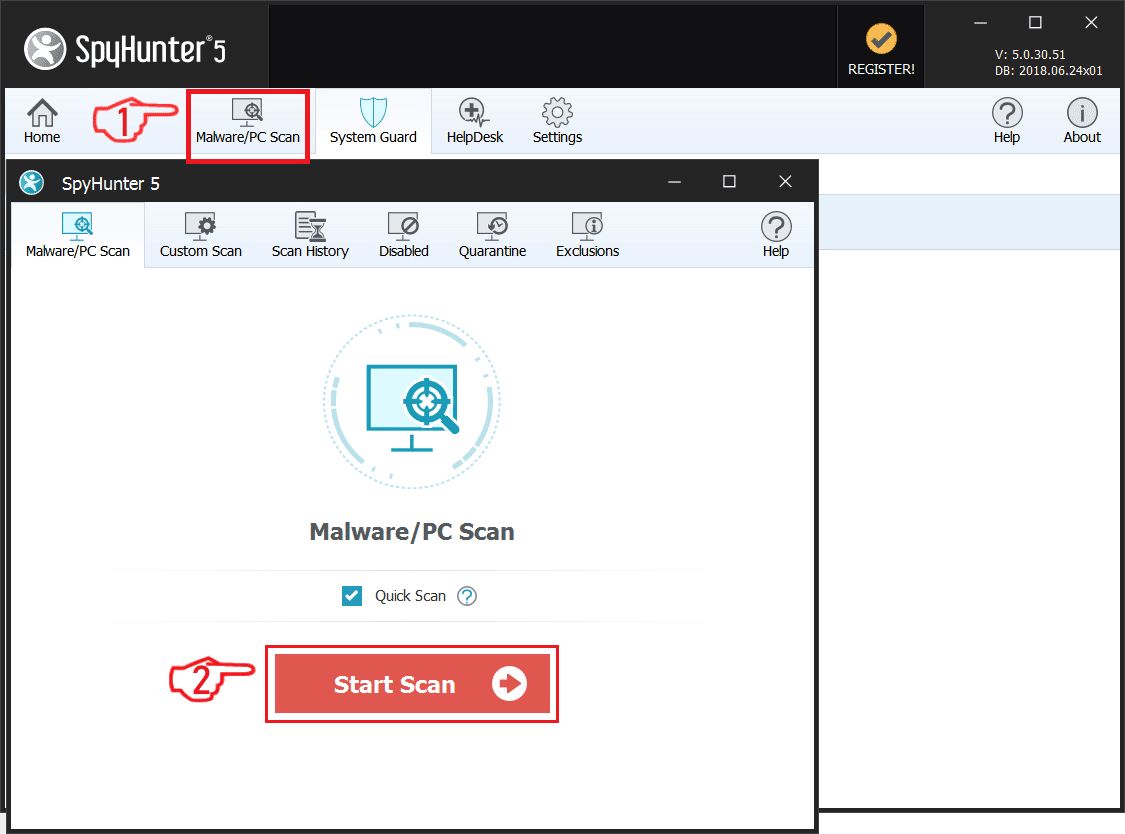
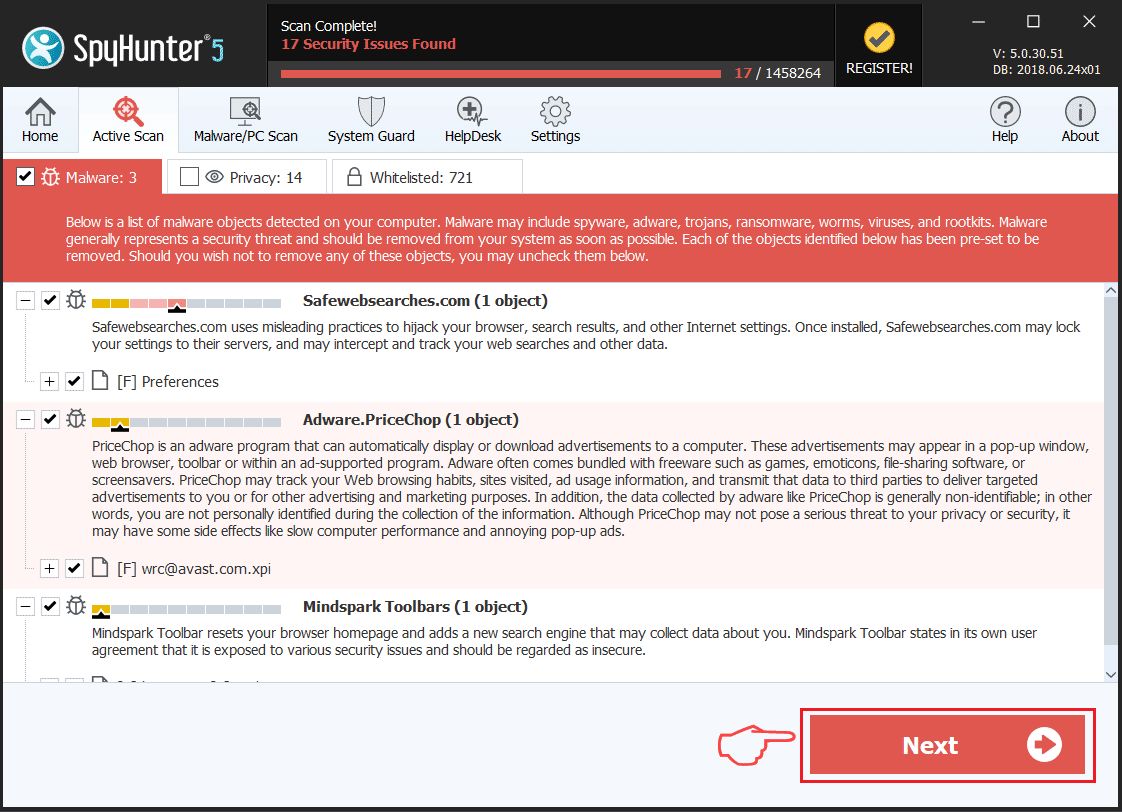
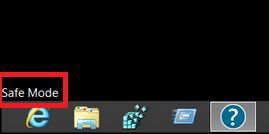
Step 2: Boot Your PC In Safe Mode
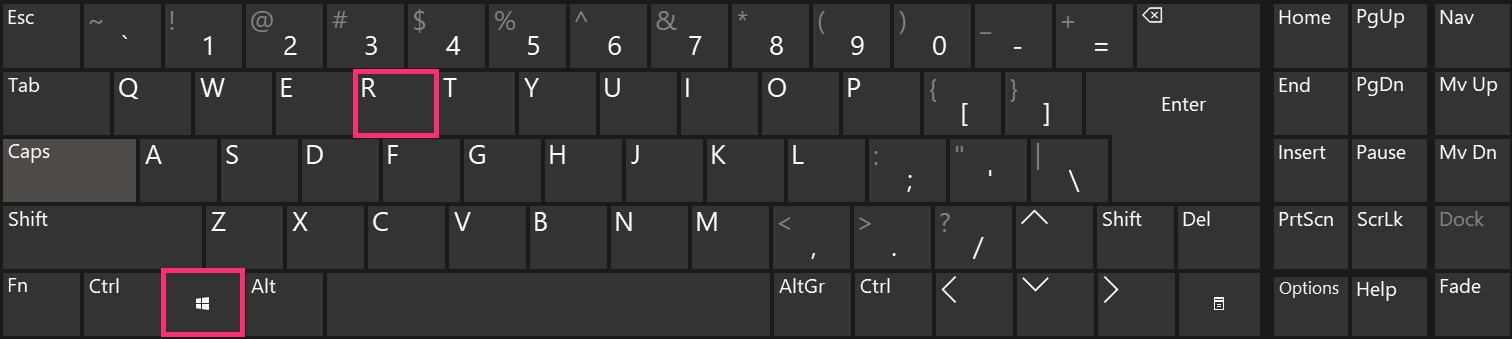
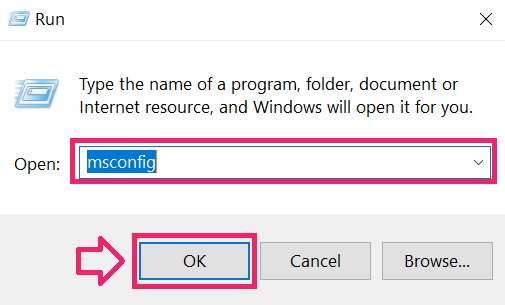
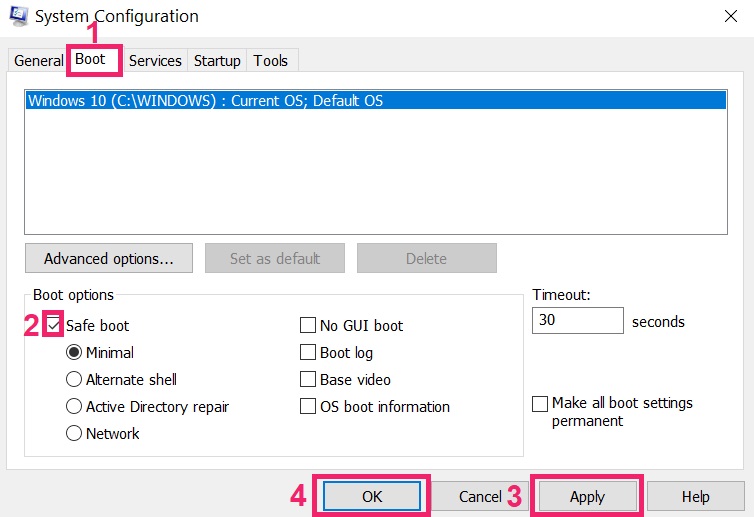
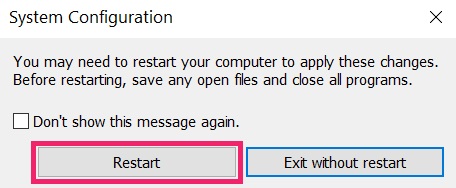
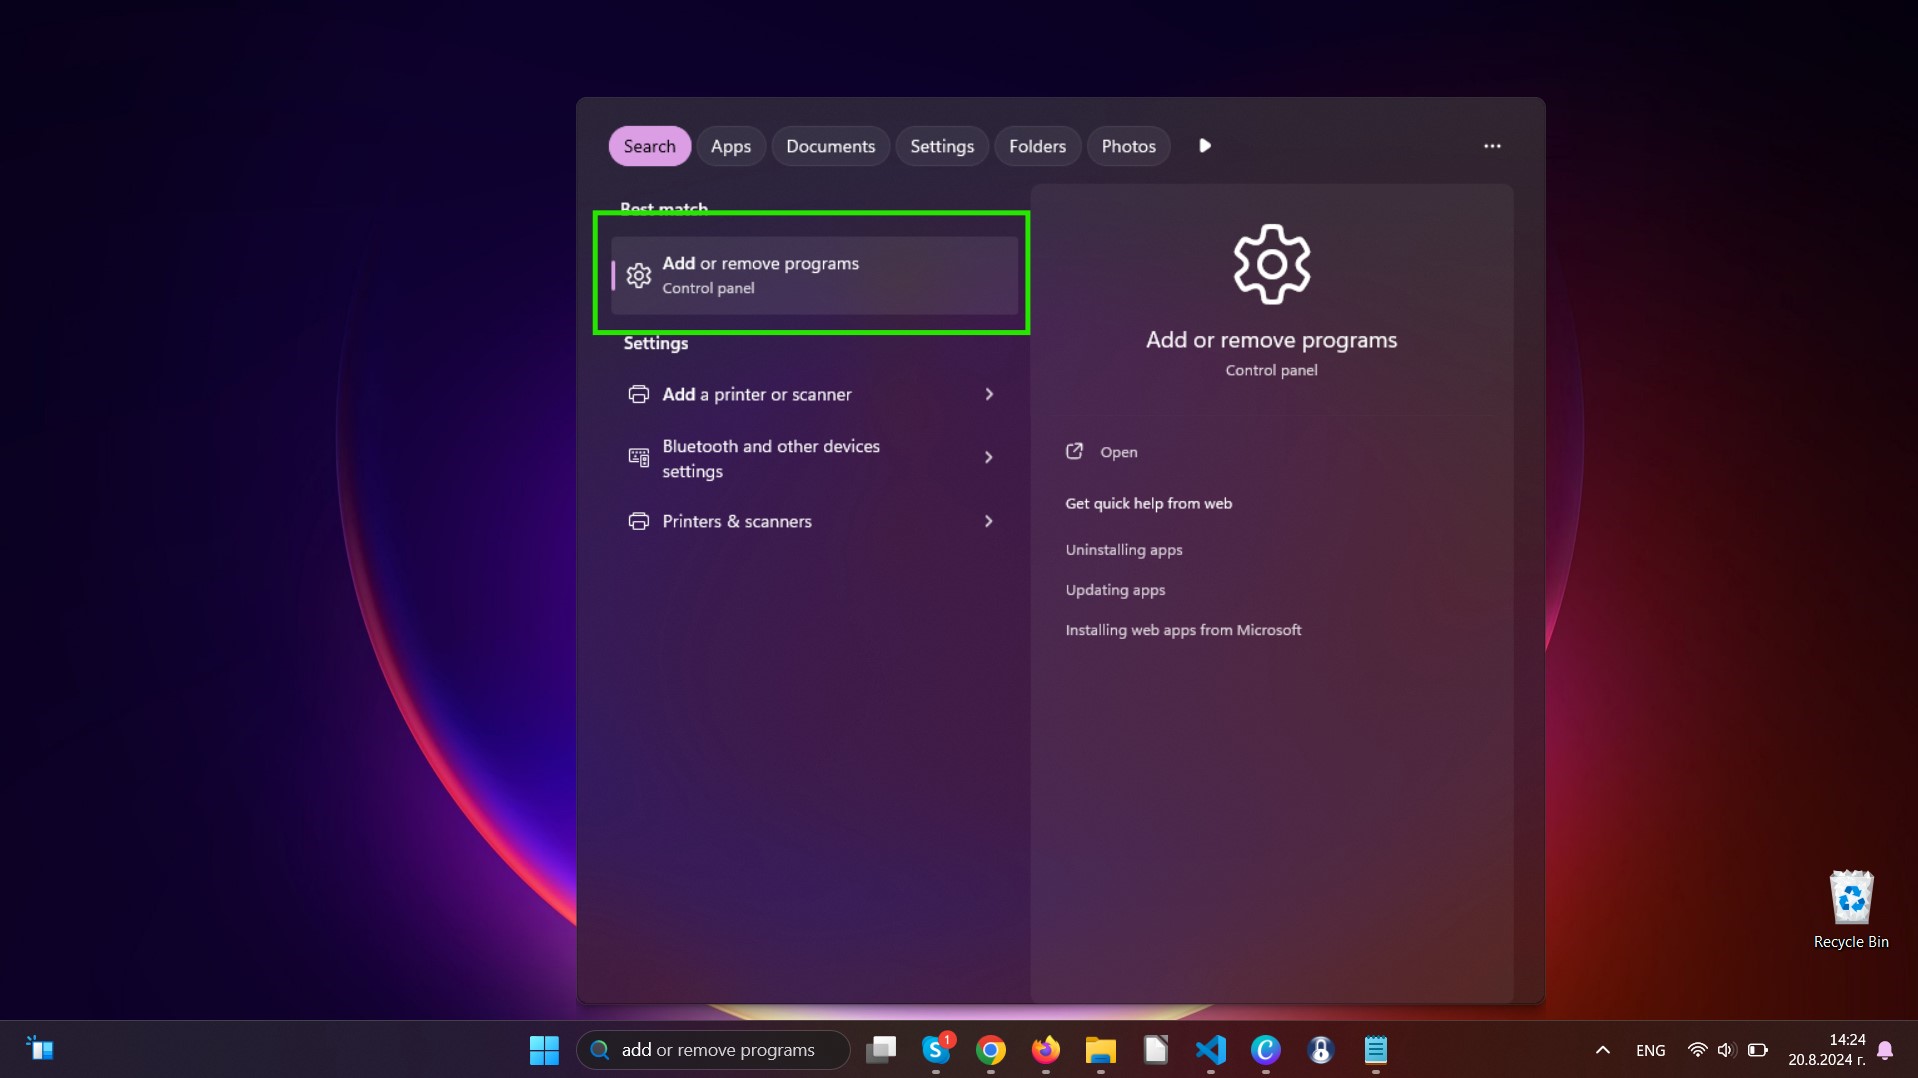
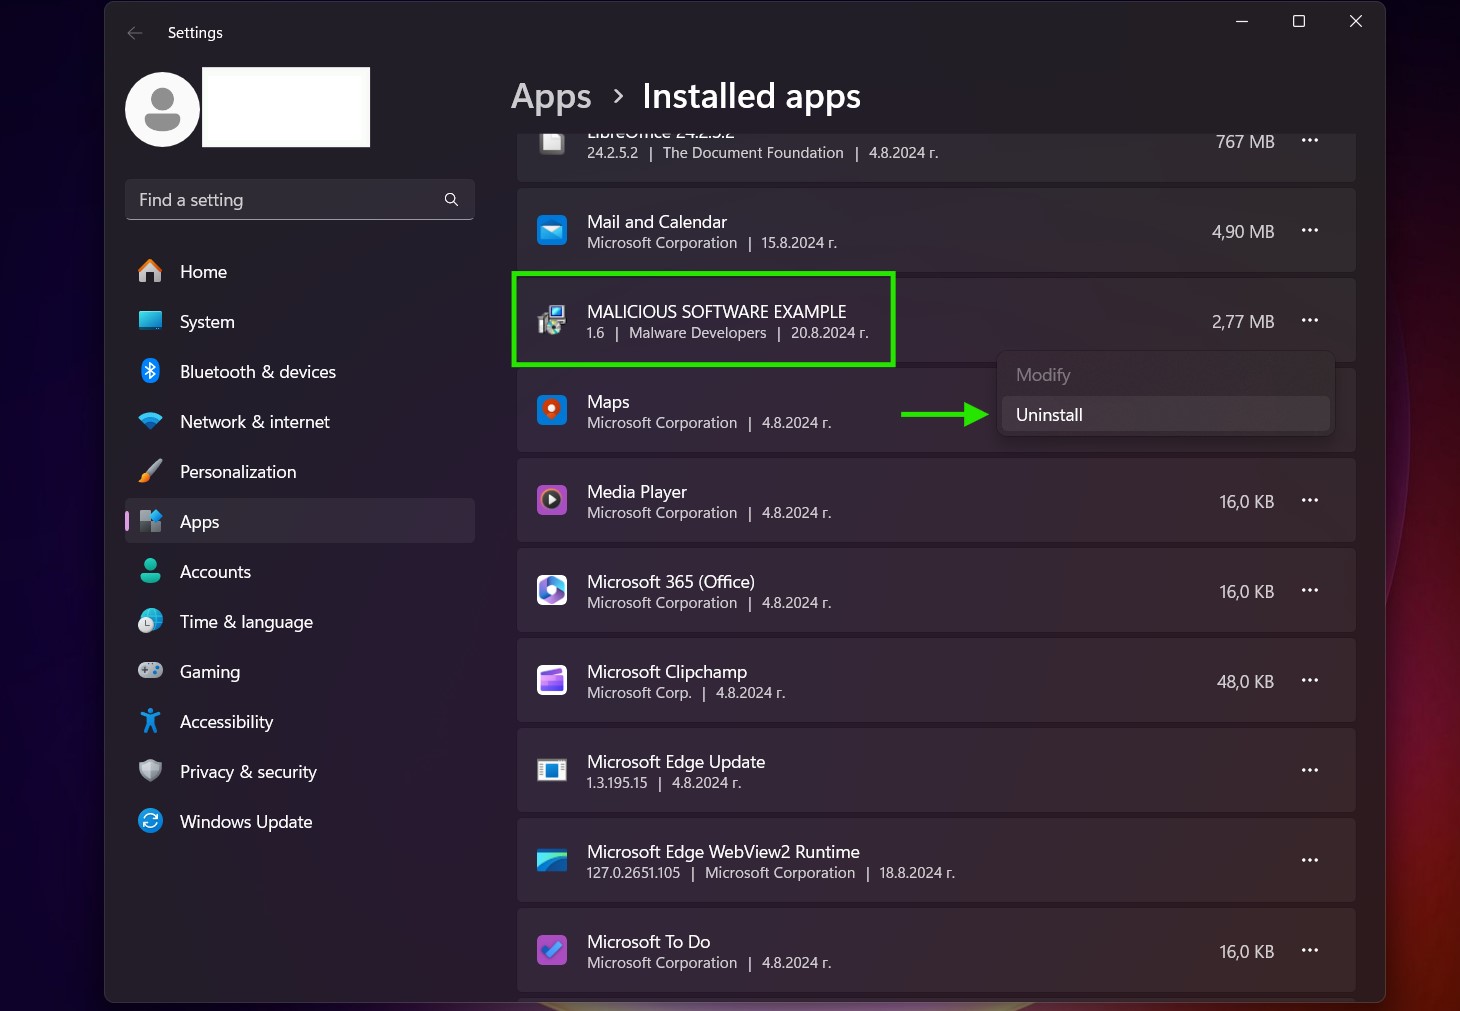
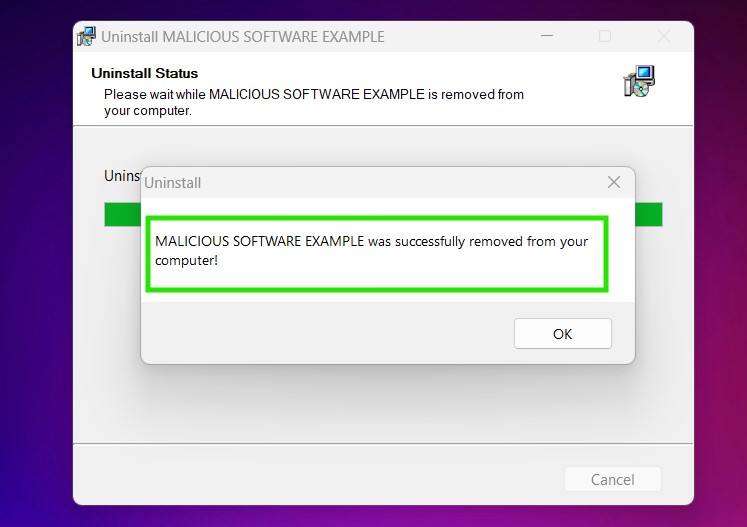
Step 3: Uninstall Testlibrary and related software from Windows
Uninstall Steps for Windows 11
Uninstall Steps for Windows 10 and Older Versions
Here is a method in few easy steps that should be able to uninstall most programs. No matter if you are using Windows 10, 8, 7, Vista or XP, those steps will get the job done. Dragging the program or its folder to the recycle bin can be a very bad decision. If you do that, bits and pieces of the program are left behind, and that can lead to unstable work of your PC, errors with the file type associations and other unpleasant activities. The proper way to get a program off your computer is to Uninstall it. To do that:
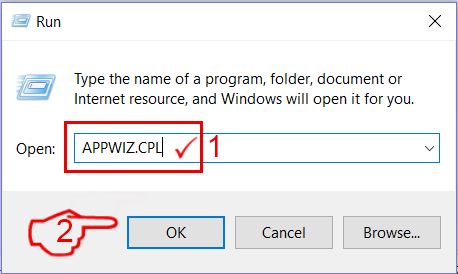
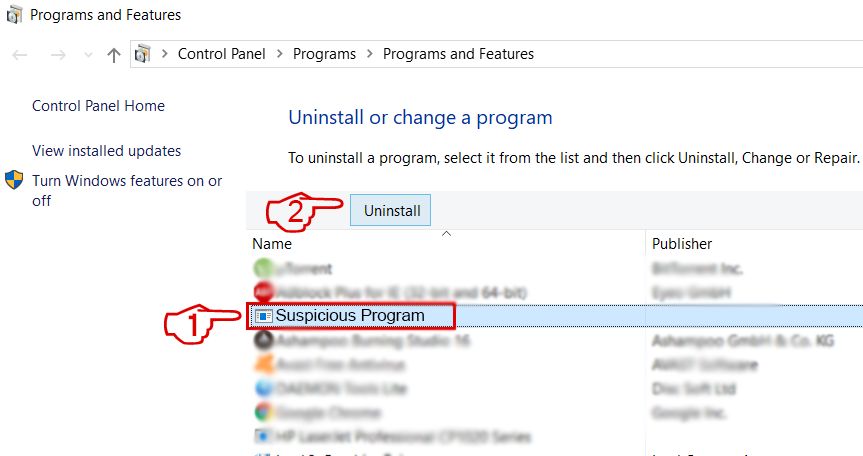 Follow the instructions above and you will successfully uninstall most programs.
Step 4: Clean Any registries, Created by Testlibrary on Your PC.
The usually targeted registries of Windows machines are the following:
- HKEY_LOCAL_MACHINE\Software\Microsoft\Windows\CurrentVersion\Run
- HKEY_CURRENT_USER\Software\Microsoft\Windows\CurrentVersion\Run
- HKEY_LOCAL_MACHINE\Software\Microsoft\Windows\CurrentVersion\RunOnce
- HKEY_CURRENT_USER\Software\Microsoft\Windows\CurrentVersion\RunOnce
You can access them by opening the Windows registry editor and deleting any values, created by Testlibrary there. This can happen by following the steps underneath:
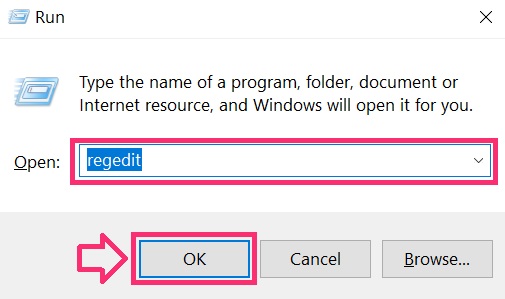
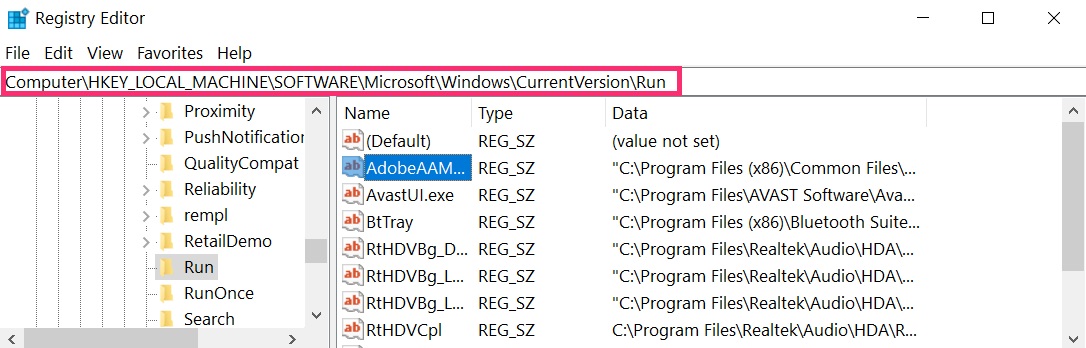
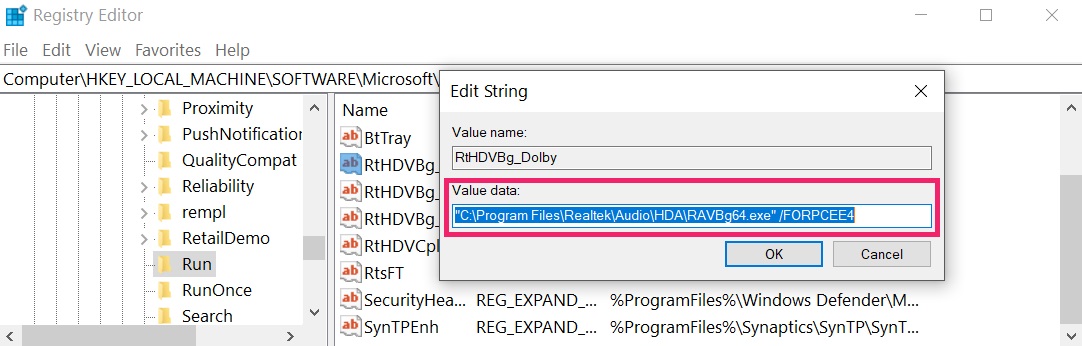 Tip: To find a virus-created value, you can right-click on it and click "Modify" to see which file it is set to run. If this is the virus file location, remove the value.
Video Removal Guide for Testlibrary (Windows).
Get rid of Testlibrary from Mac OS X.
Step 1: Uninstall Testlibrary and remove related files and objects
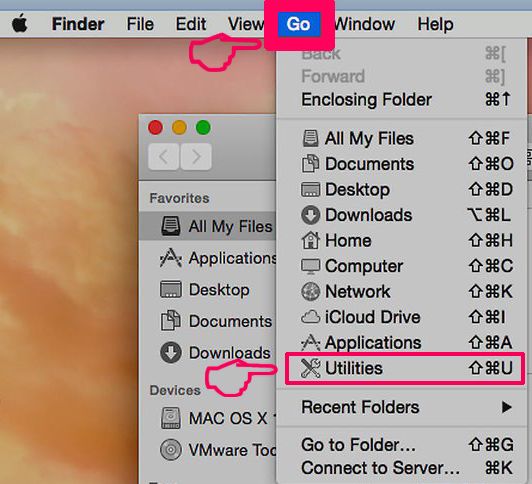
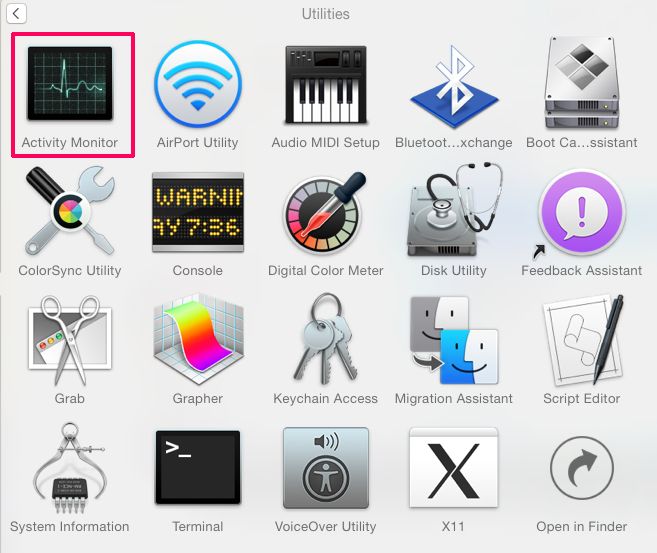
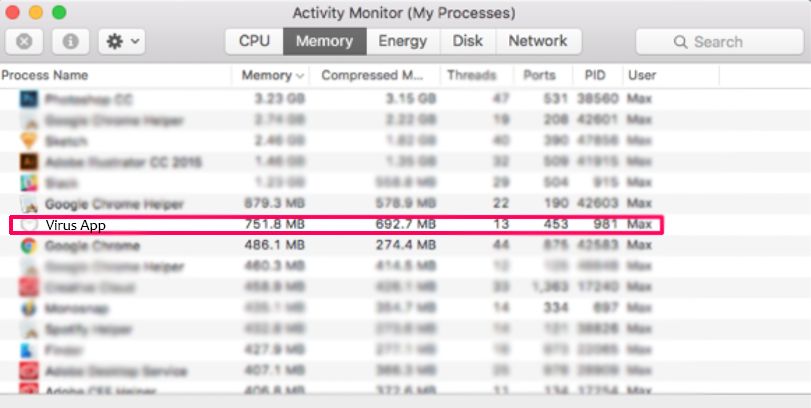
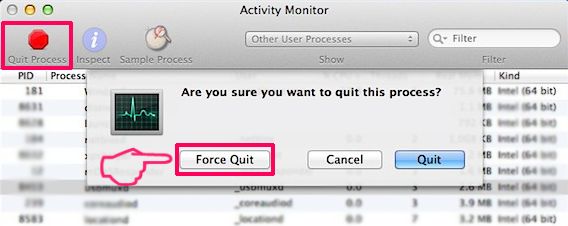
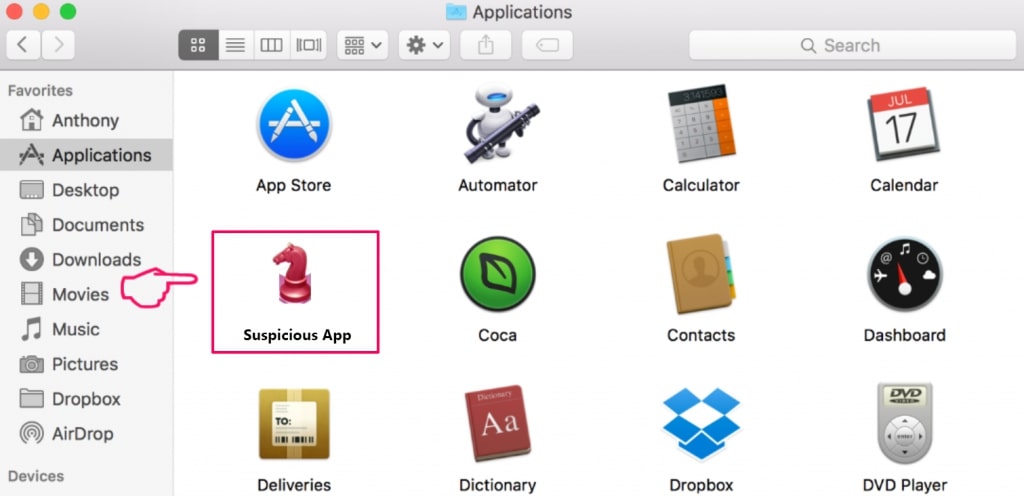
Your Mac will then show you a list of items that start automatically when you log in. Look for any suspicious apps identical or similar to Testlibrary. Check the app you want to stop from running automatically and then select on the Minus (“-“) icon to hide it.
- Go to Finder.
- In the search bar type the name of the app that you want to remove.
- Above the search bar change the two drop down menus to “System Files” and “Are Included” so that you can see all of the files associated with the application you want to remove. Bear in mind that some of the files may not be related to the app so be very careful which files you delete.
- If all of the files are related, hold the ⌘+A buttons to select them and then drive them to “Trash”.
In case you cannot remove Testlibrary via Step 1 above:
In case you cannot find the virus files and objects in your Applications or other places we have shown above, you can manually look for them in the Libraries of your Mac. But before doing this, please read the disclaimer below:
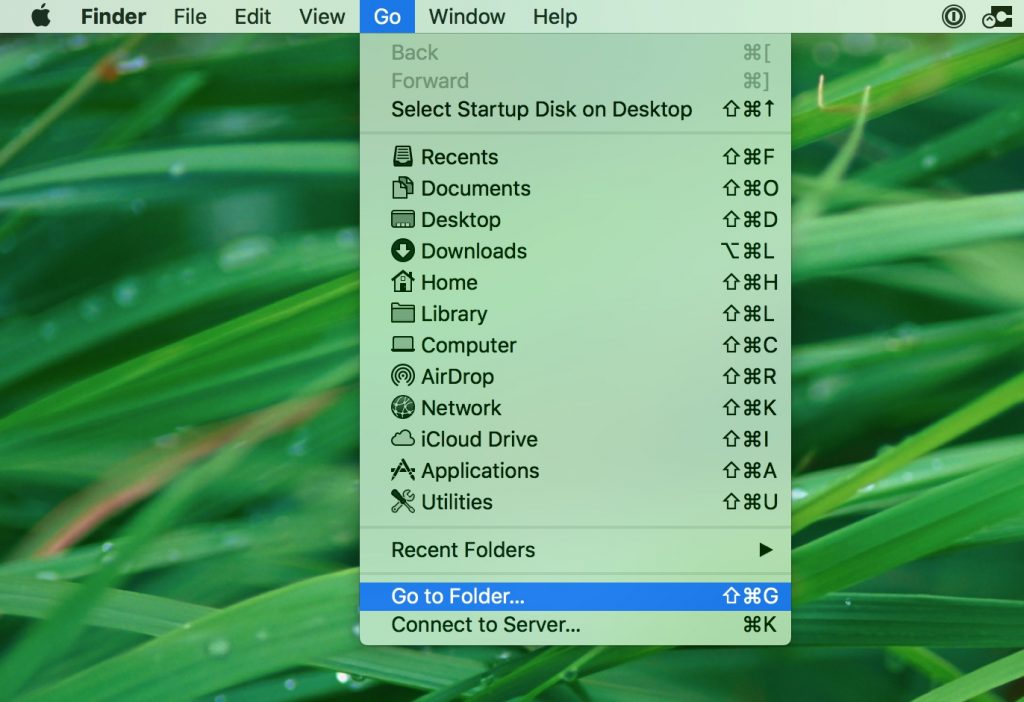
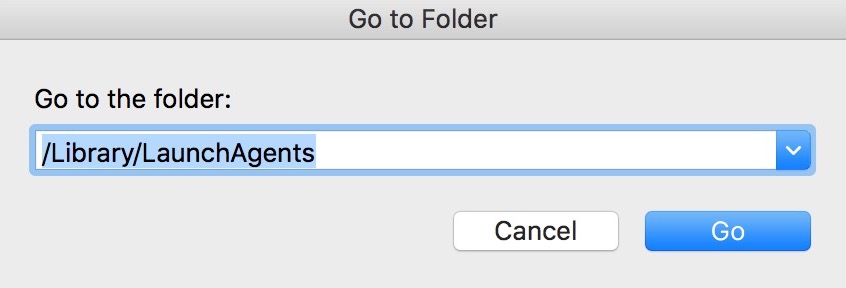
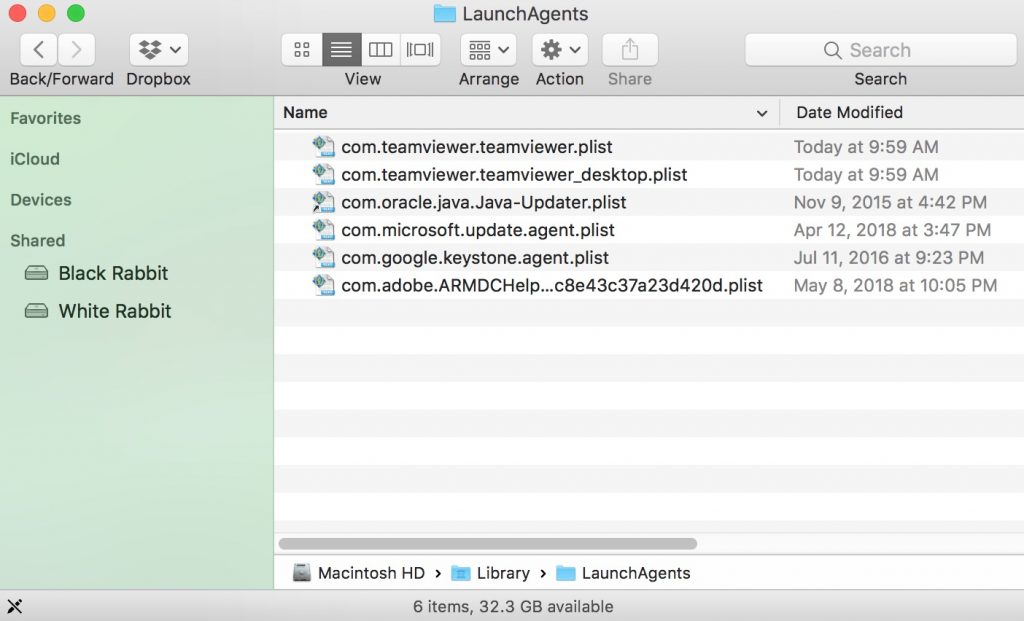
You can repeat the same procedure with the following other Library directories:
→ ~/Library/LaunchAgents
/Library/LaunchDaemons
Tip: ~ is there on purpose, because it leads to more LaunchAgents.
Step 2: Scan for and remove Testlibrary files from your Mac
When you are facing problems on your Mac as a result of unwanted scripts and programs such as Testlibrary, the recommended way of eliminating the threat is by using an anti-malware program. SpyHunter for Mac offers advanced security features along with other modules that will improve your Mac’s security and protect it in the future.
Video Removal Guide for Testlibrary (Mac)
Remove Testlibrary from Google Chrome.
Step 1: Start Google Chrome and open the drop menu
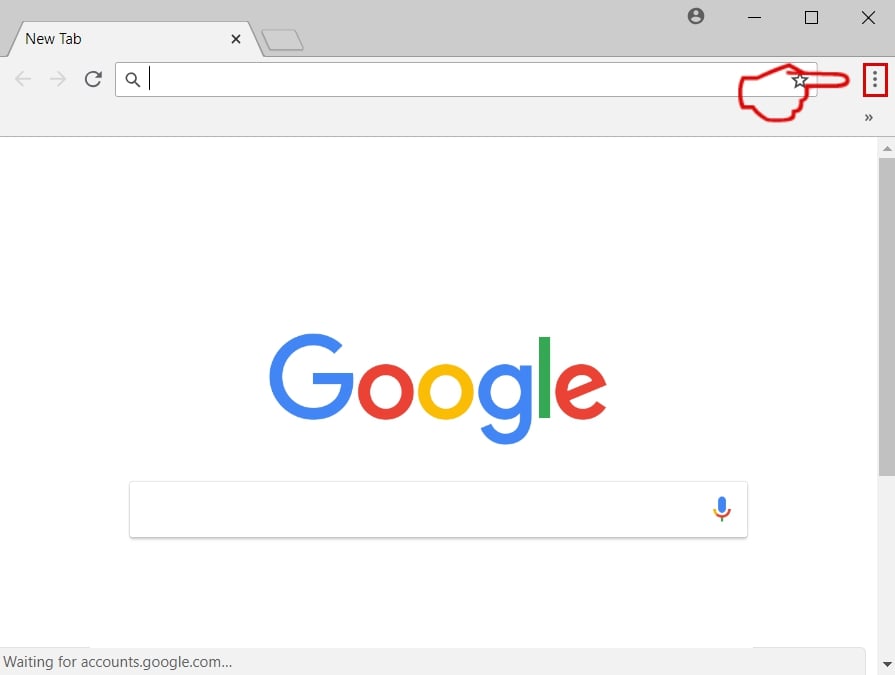
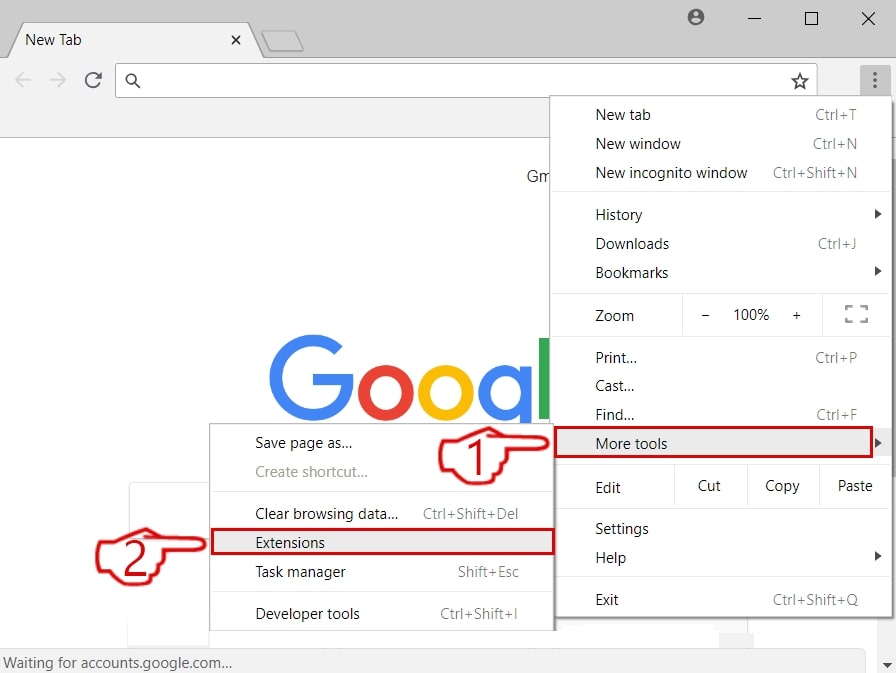
Step 2: Move the cursor over "Tools" and then from the extended menu choose "Extensions"
Step 3: From the opened "Extensions" menu locate the unwanted extension and click on its "Remove" button.
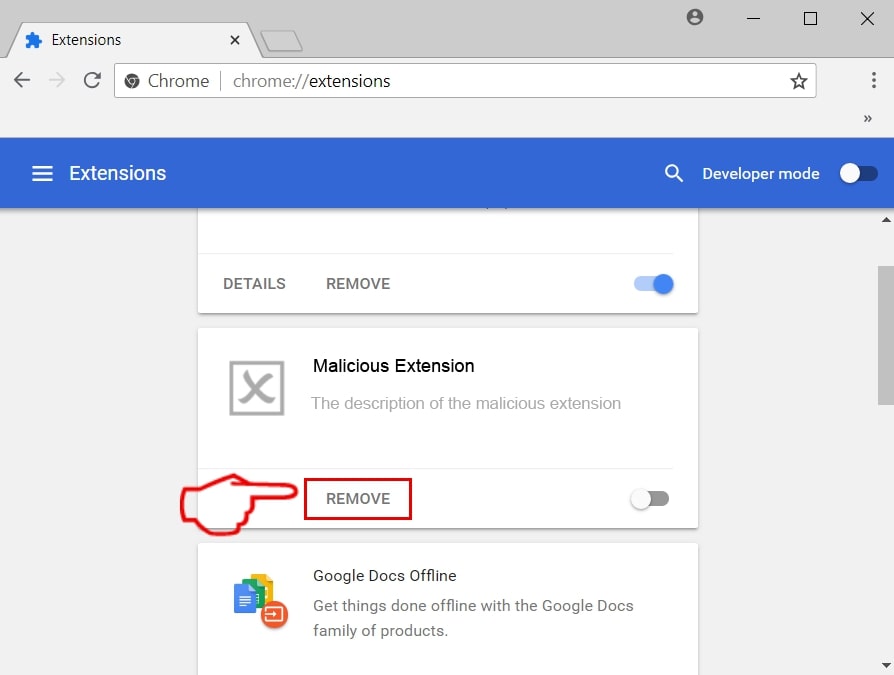
Step 4: After the extension is removed, restart Google Chrome by closing it from the red "X" button at the top right corner and start it again.
Erase Testlibrary from Mozilla Firefox.
Step 1: Start Mozilla Firefox. Open the menu window:
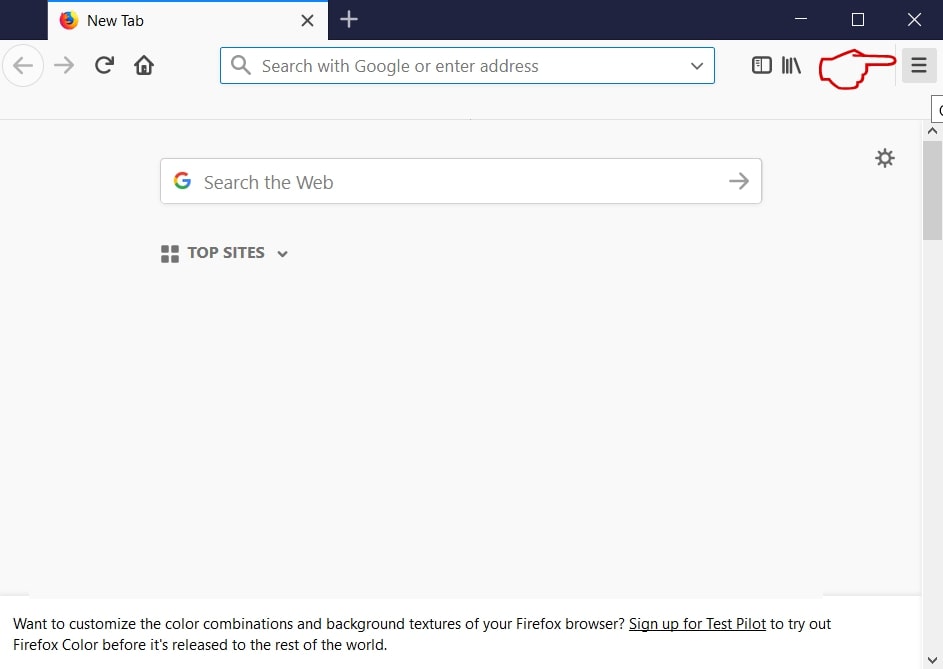
Step 2: Select the "Add-ons" icon from the menu.
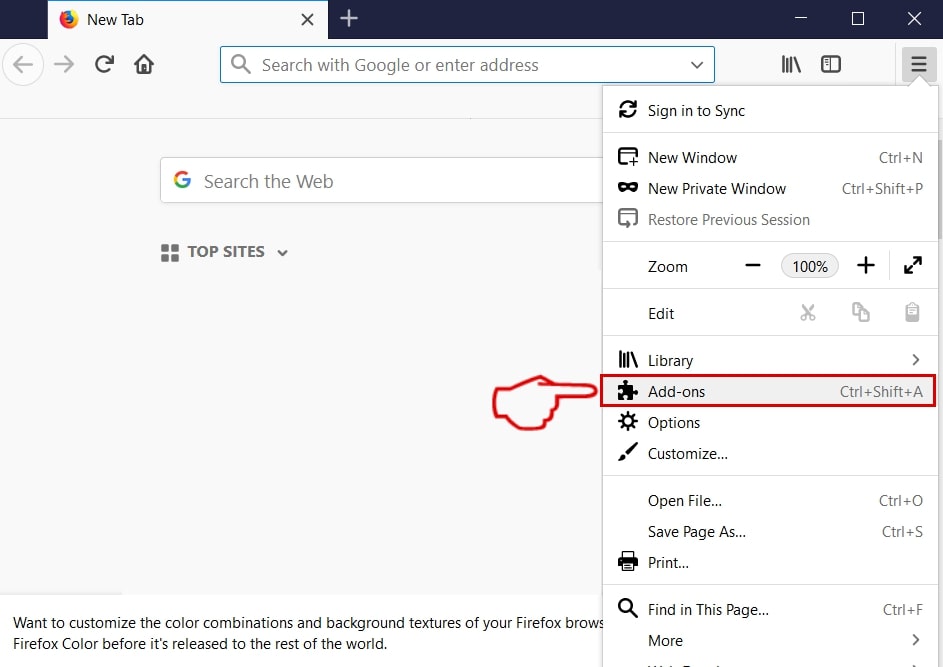
Step 3: Select the unwanted extension and click "Remove"

Step 4: After the extension is removed, restart Mozilla Firefox by closing it from the red "X" button at the top right corner and start it again.
Uninstall Testlibrary from Microsoft Edge.
Step 1: Start Edge browser.
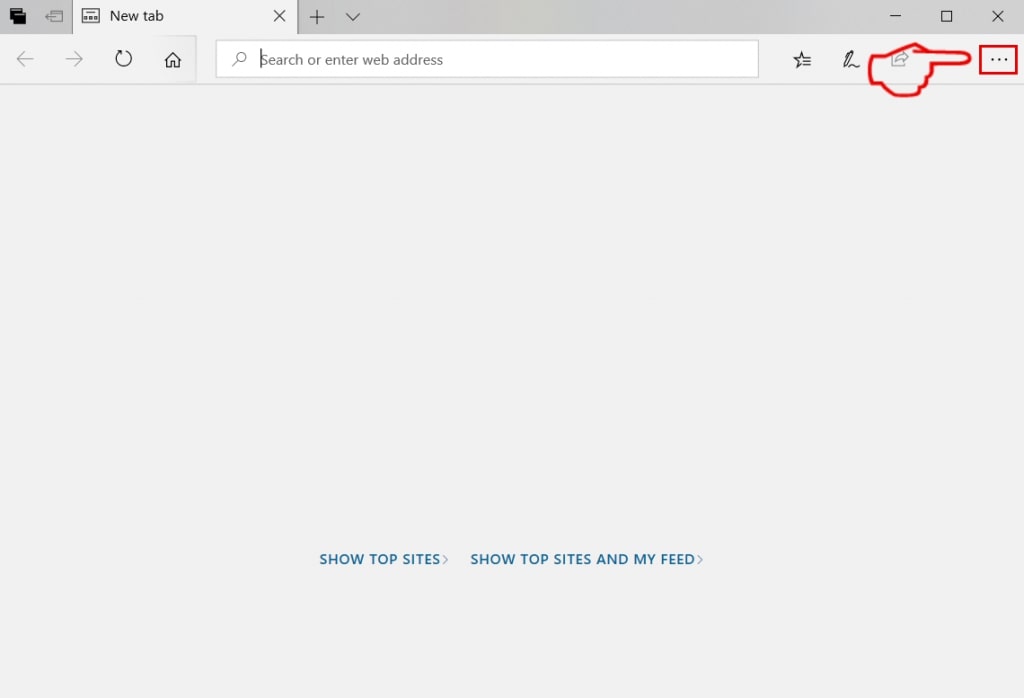
Step 2: Open the drop menu by clicking on the icon at the top right corner.
Step 3: From the drop menu select "Extensions".
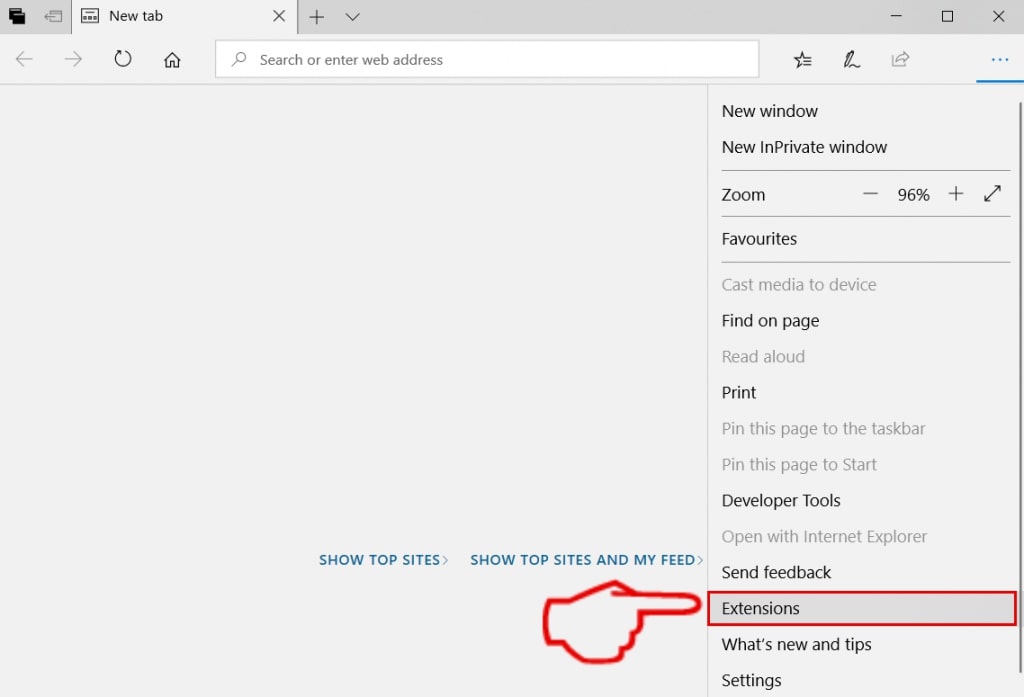
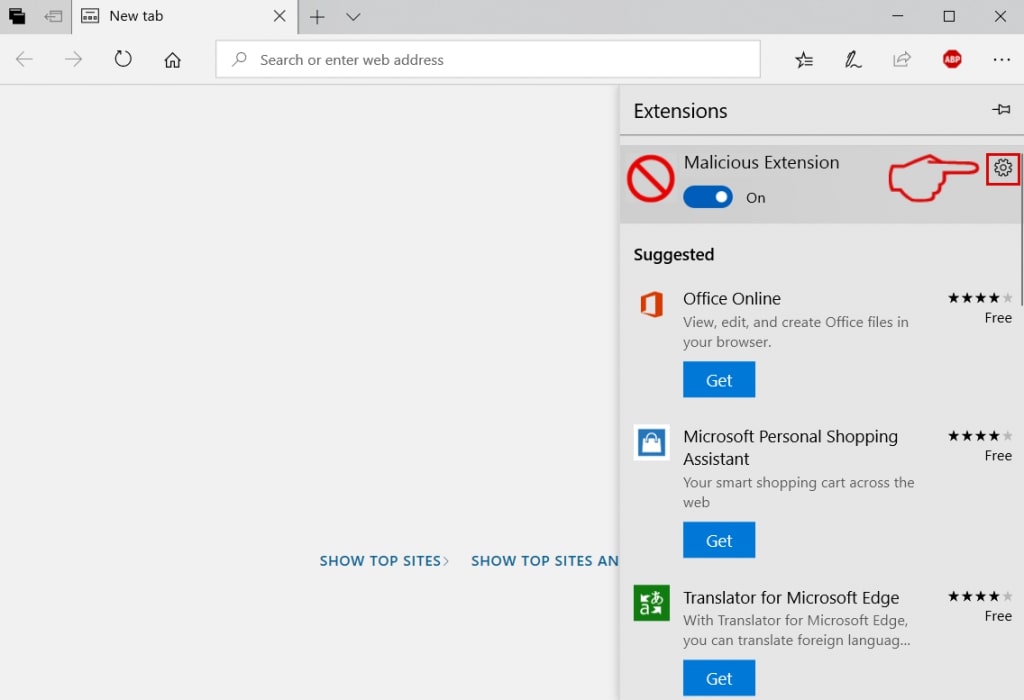
Step 4: Choose the suspected malicious extension you want to remove and then click on the gear icon.
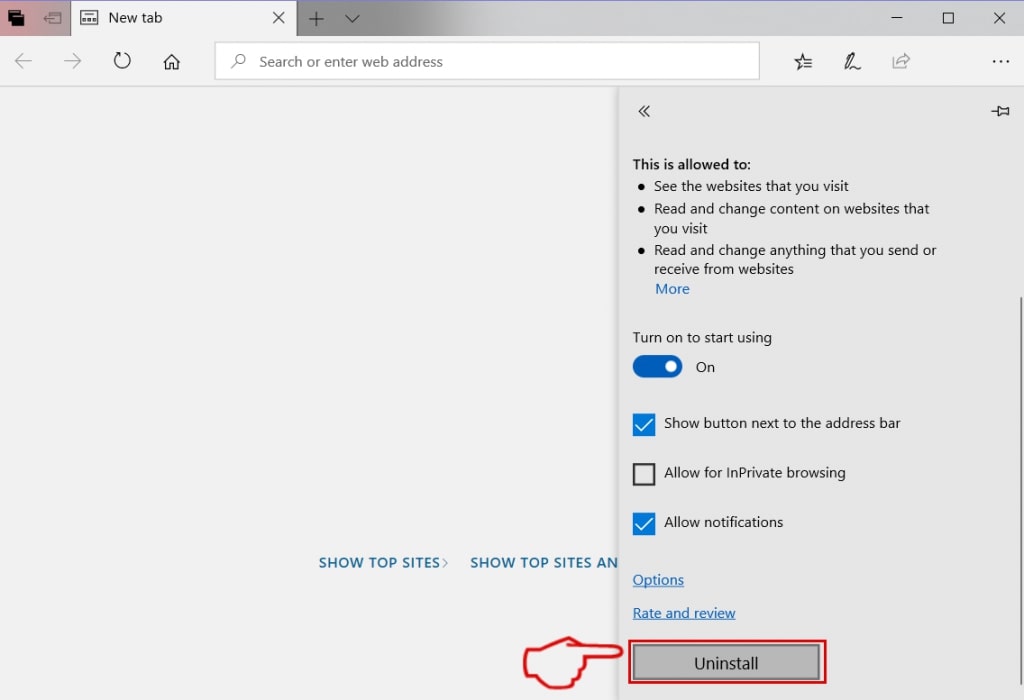
Step 5: Remove the malicious extension by scrolling down and then clicking on Uninstall.
Remove Testlibrary from Safari
Step 1: Start the Safari app.
Step 2: After hovering your mouse cursor to the top of the screen, click on the Safari text to open its drop down menu.
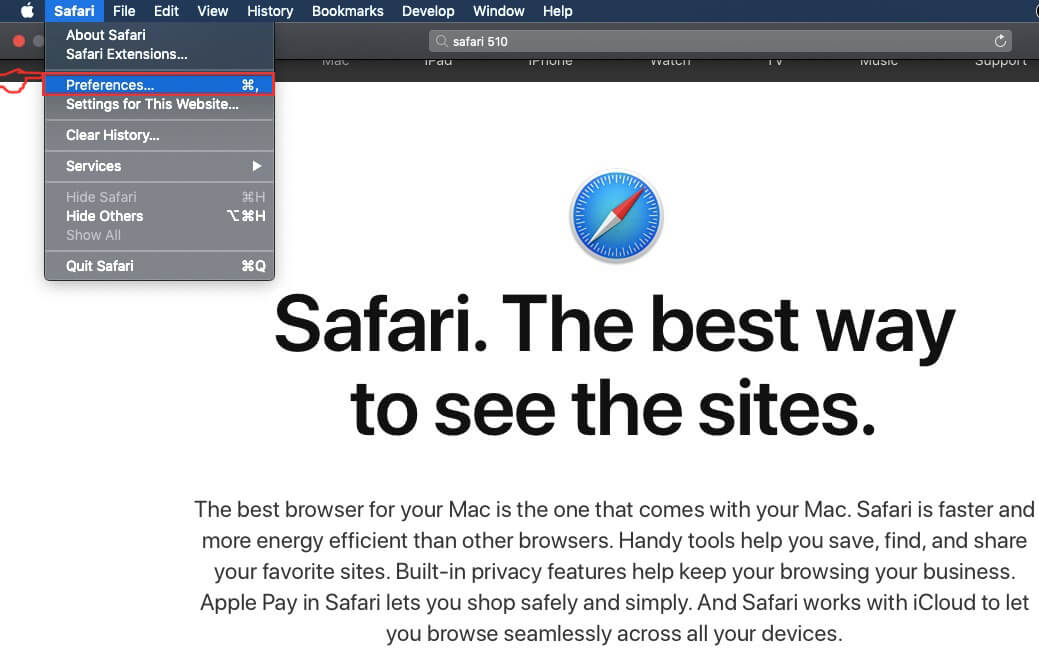
Step 3: From the menu, click on "Preferences".
Step 4: After that, select the 'Extensions' Tab.

Step 5: Click once on the extension you want to remove.
Step 6: Click 'Uninstall'.
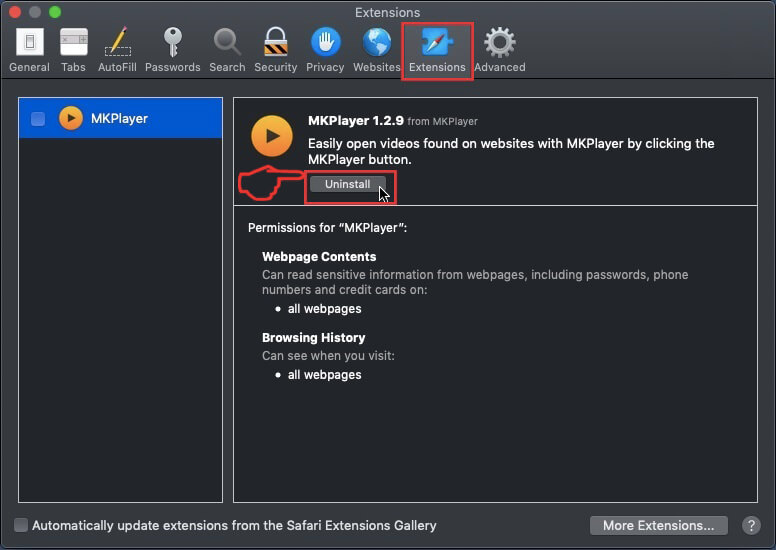
A pop-up window will appear asking for confirmation to uninstall the extension. Select 'Uninstall' again, and the Testlibrary will be removed.
Eliminate Testlibrary from Internet Explorer.
Step 1: Start Internet Explorer.
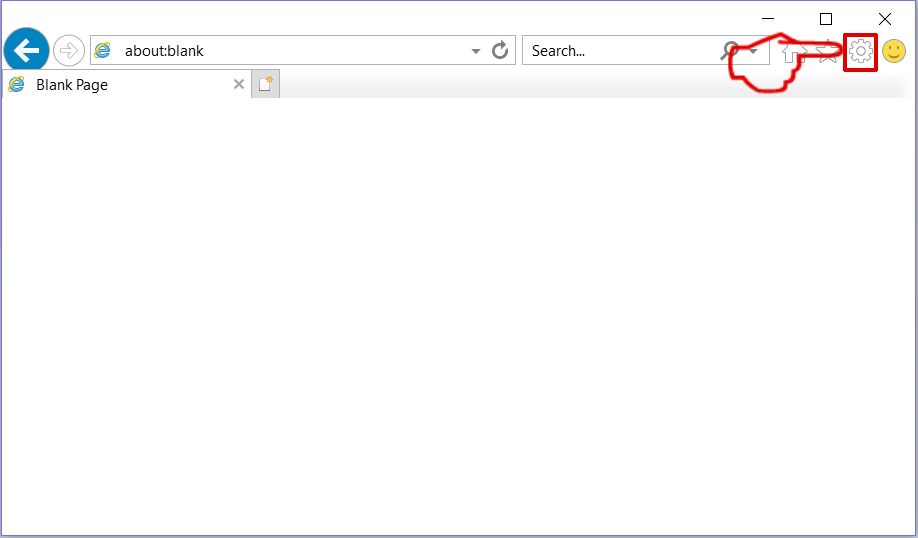
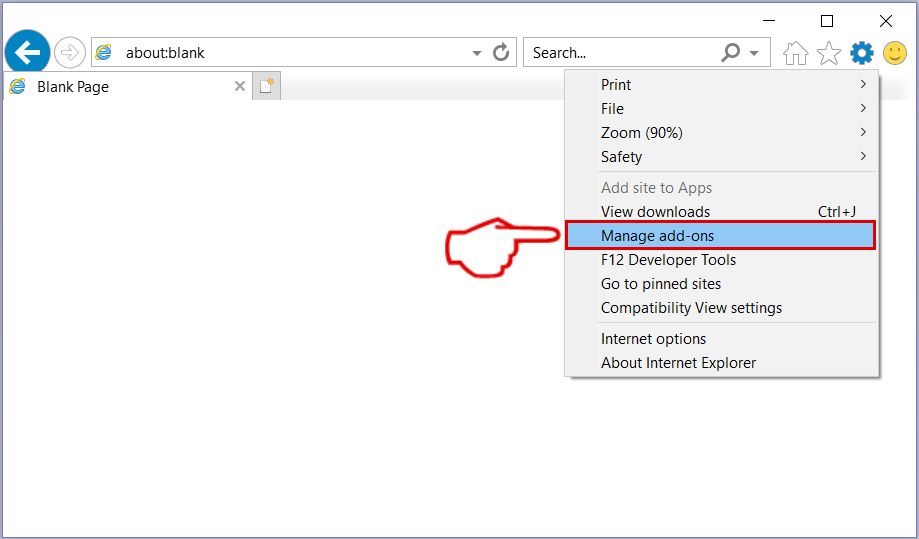
Step 2: Click on the gear icon labeled 'Tools' to open the drop menu and select 'Manage Add-ons'
Step 3: In the 'Manage Add-ons' window.
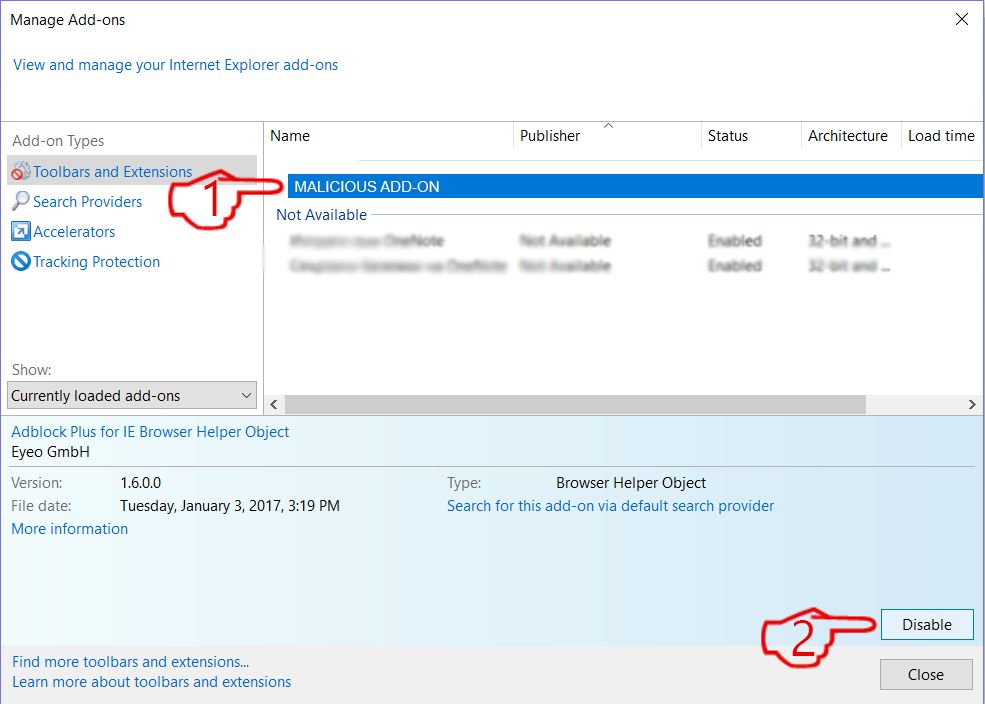
Step 4: Select the extension you want to remove and then click 'Disable'. A pop-up window will appear to inform you that you are about to disable the selected extension, and some more add-ons might be disabled as well. Leave all the boxes checked, and click 'Disable'.
Step 5: After the unwanted extension has been removed, restart Internet Explorer by closing it from the red 'X' button located at the top right corner and start it again.
Remove Push Notifications from Your Browsers
Turn Off Push Notifications from Google Chrome
To disable any Push Notices from Google Chrome browser, please follow the steps below:
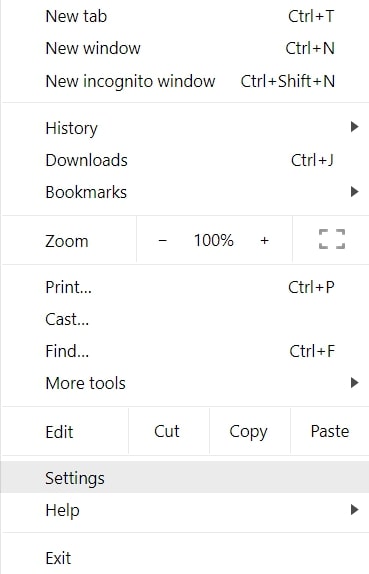
Step 1: Go to Settings in Chrome.
Step 2: In Settings, select “Advanced Settings”:
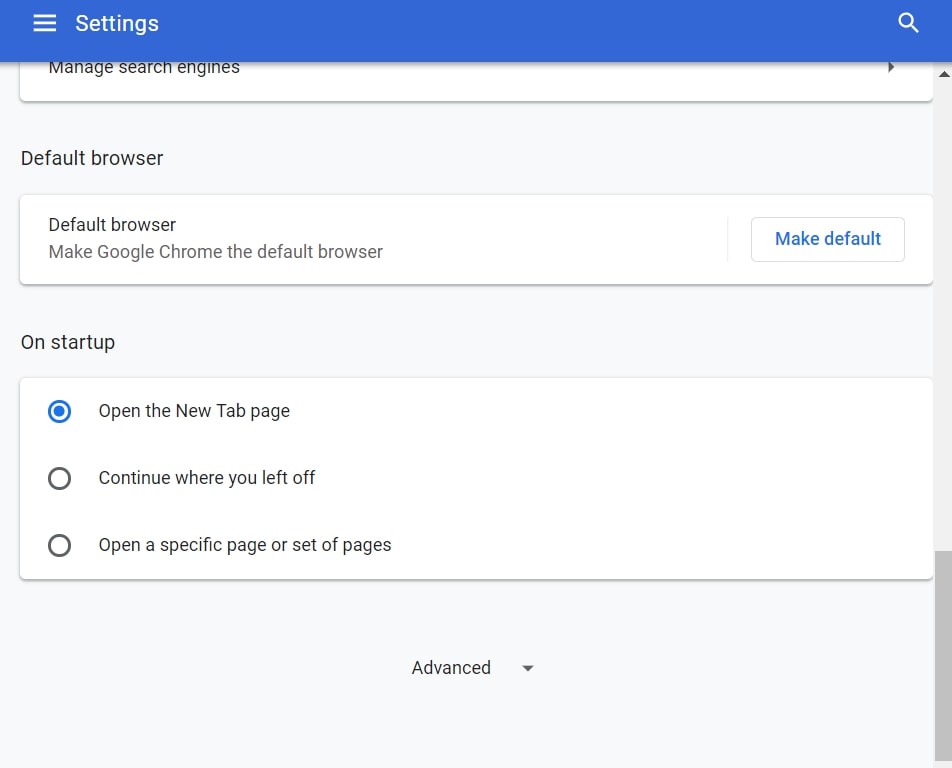
Step 3: Click “Content Settings”:
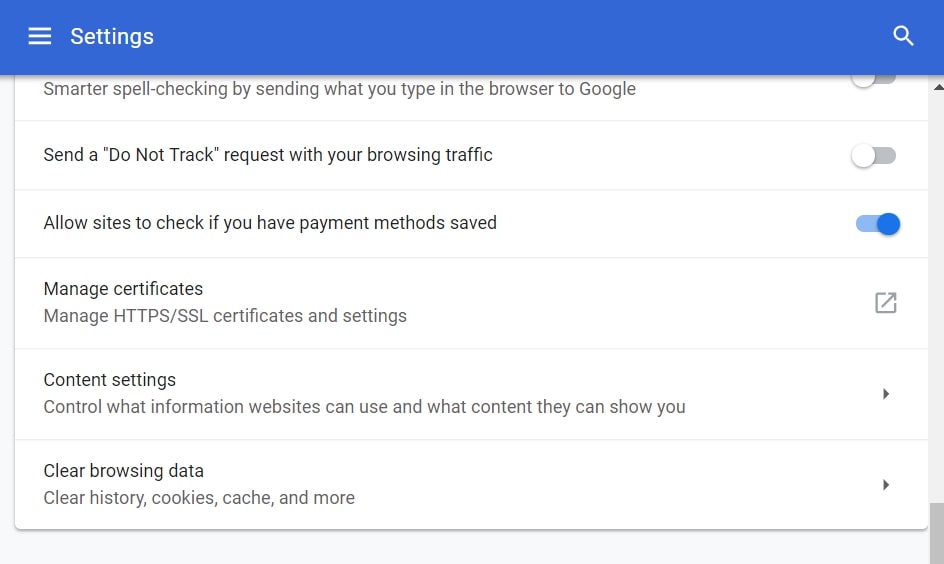
Step 4: Open “Notifications”:
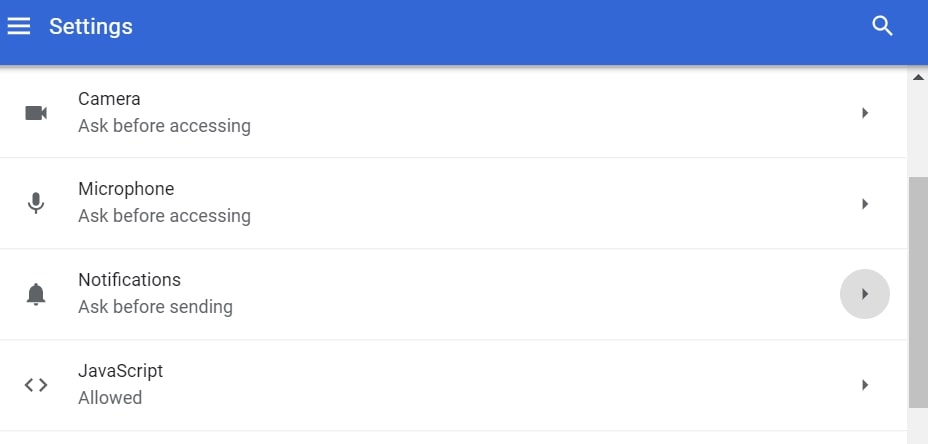
Step 5: Click the three dots and choose Block, Edit or Remove options:

Remove Push Notifications on Firefox
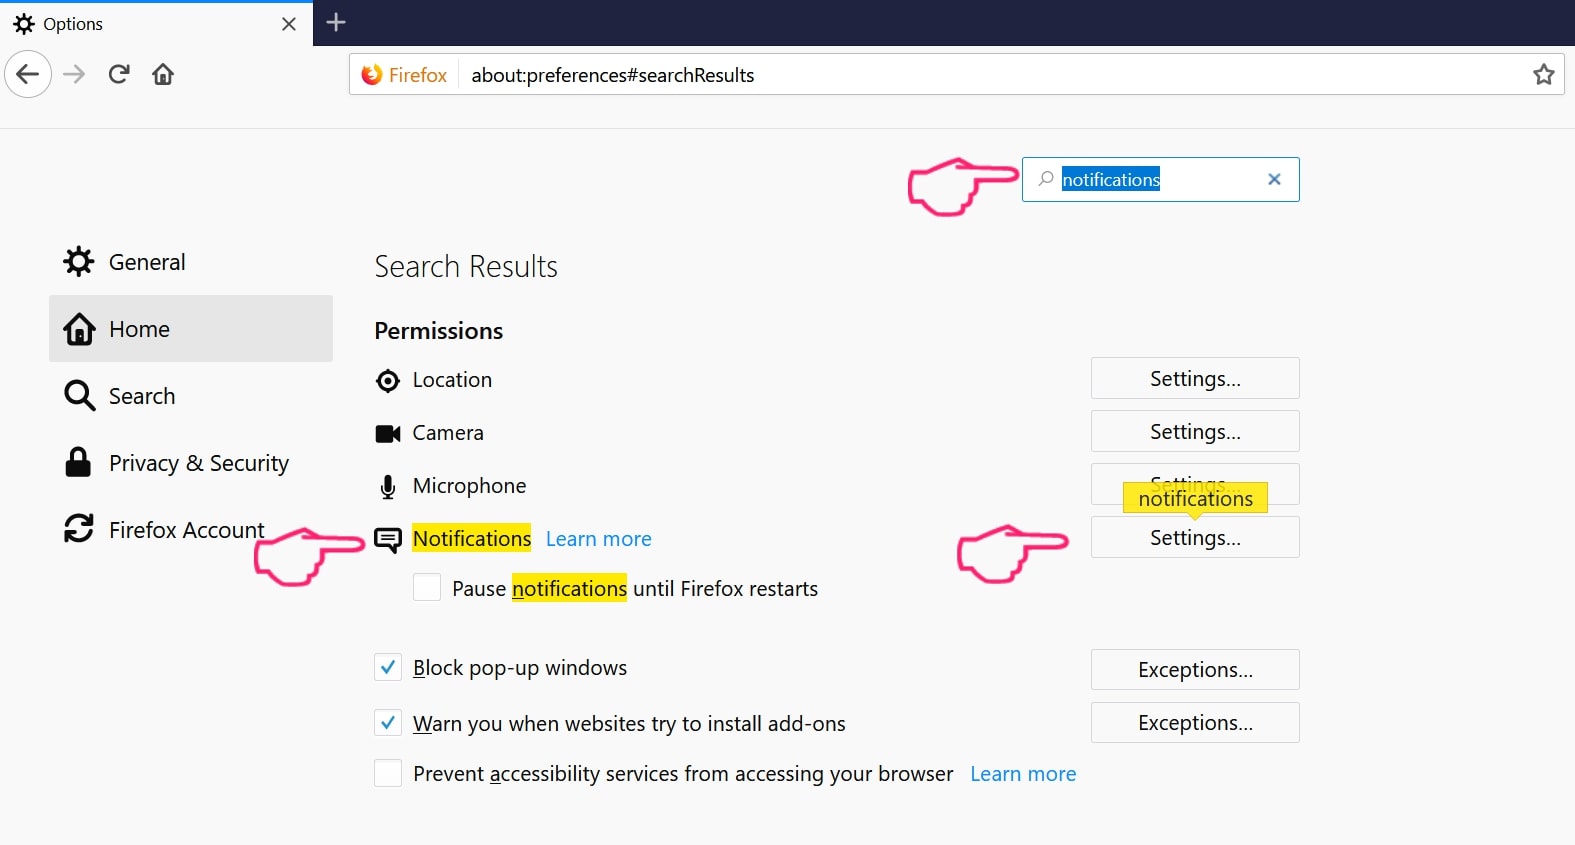
Step 1: Go to Firefox Options.
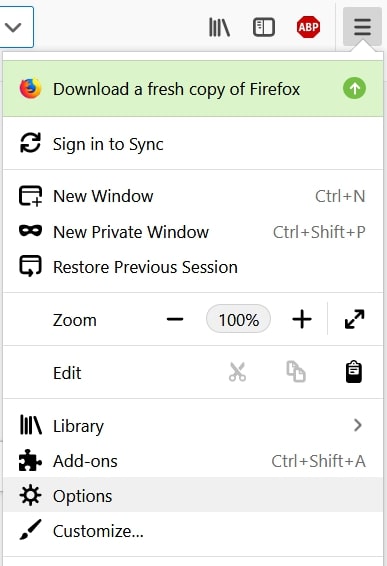
Step 2: Go to “Settings”, type “notifications” in the search bar and click "Settings":
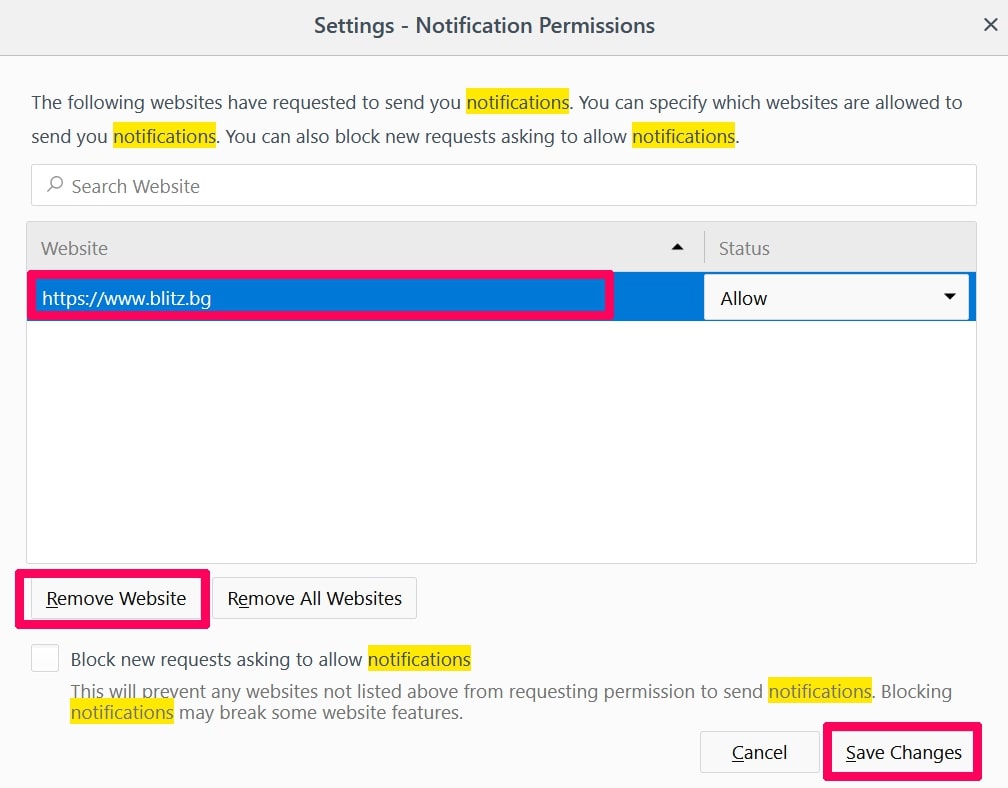
Step 3: Click “Remove” on any site you wish notifications gone and click “Save Changes”
Stop Push Notifications on Opera
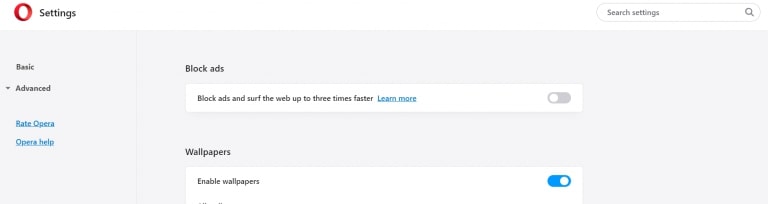
Step 1: In Opera, press ALT+P to go to Settings.
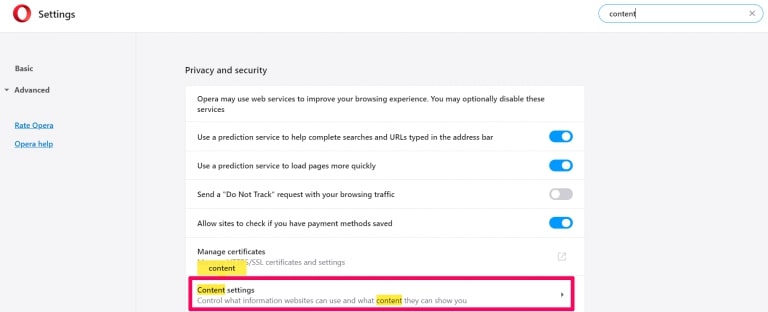
Step 2: In Setting search, type “Content” to go to Content Settings.
Step 3: Open Notifications:
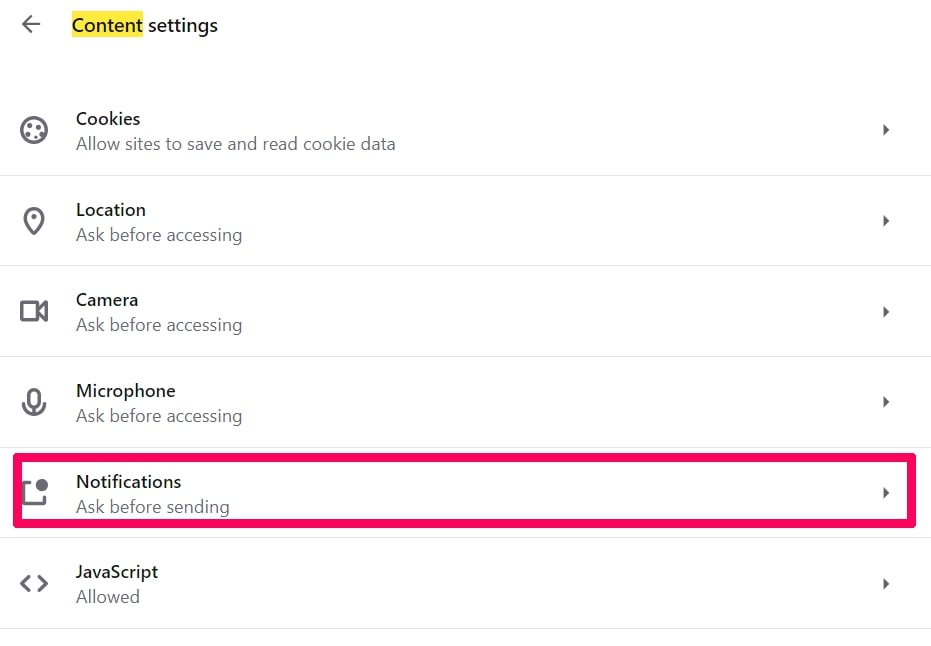
Step 4: Do the same as you did with Google Chrome (explained below):
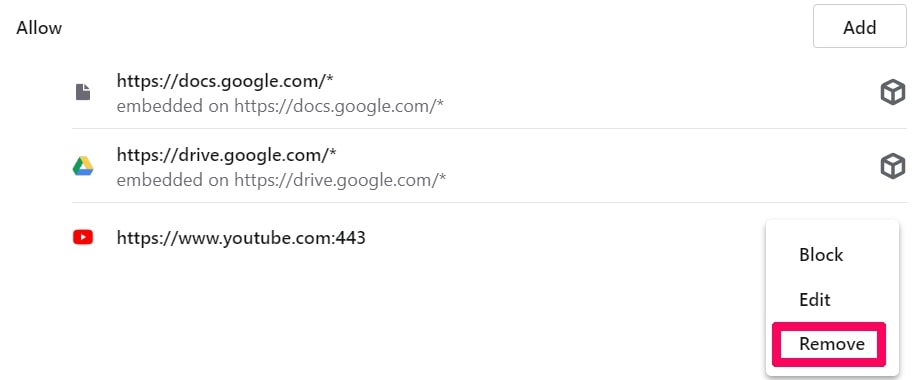
Eliminate Push Notifications on Safari
Step 1: Open Safari Preferences.
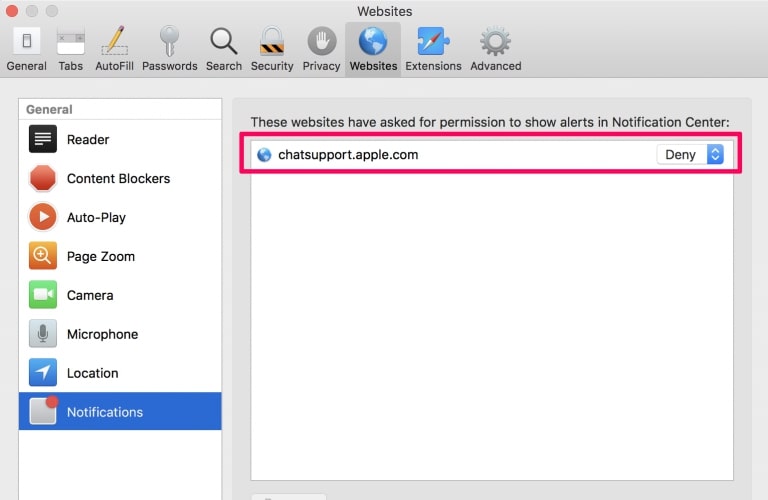
Step 2: Choose the domain from where you like push pop-ups gone and change to "Deny" from "Allow".
Testlibrary-FAQ
What Is Testlibrary?
The Testlibrary threat is adware or browser redirect virus.
It may slow your computer down significantly and display advertisements. The main idea is for your information to likely get stolen or more ads to appear on your device.
The creators of such unwanted apps work with pay-per-click schemes to get your computer to visit risky or different types of websites that may generate them funds. This is why they do not even care what types of websites show up on the ads. This makes their unwanted software indirectly risky for your OS.
What Are the Symptoms of Testlibrary?
There are several symptoms to look for when this particular threat and also unwanted apps in general are active:
Symptom #1: Your computer may become slow and have poor performance in general.
Symptom #2: You have toolbars, add-ons or extensions on your web browsers that you don't remember adding.
Symptom #3: You see all types of ads, like ad-supported search results, pop-ups and redirects to randomly appear.
Symptom #4: You see installed apps on your Mac running automatically and you do not remember installing them.
Symptom #5: You see suspicious processes running in your Task Manager.
If you see one or more of those symptoms, then security experts recommend that you check your computer for viruses.
What Types of Unwanted Programs Are There?
According to most malware researchers and cyber-security experts, the threats that can currently affect your device can be rogue antivirus software, adware, browser hijackers, clickers, fake optimizers and any forms of PUPs.
What to Do If I Have a "virus" like Testlibrary?
With few simple actions. First and foremost, it is imperative that you follow these steps:
Step 1: Find a safe computer and connect it to another network, not the one that your Mac was infected in.
Step 2: Change all of your passwords, starting from your email passwords.
Step 3: Enable two-factor authentication for protection of your important accounts.
Step 4: Call your bank to change your credit card details (secret code, etc.) if you have saved your credit card for online shopping or have done online activities with your card.
Step 5: Make sure to call your ISP (Internet provider or carrier) and ask them to change your IP address.
Step 6: Change your Wi-Fi password.
Step 7: (Optional): Make sure to scan all of the devices connected to your network for viruses and repeat these steps for them if they are affected.
Step 8: Install anti-malware software with real-time protection on every device you have.
Step 9: Try not to download software from sites you know nothing about and stay away from low-reputation websites in general.
If you follow these recommendations, your network and all devices will become significantly more secure against any threats or information invasive software and be virus free and protected in the future too.
How Does Testlibrary Work?
Once installed, Testlibrary can collect data using trackers. This data is about your web browsing habits, such as the websites you visit and the search terms you use. It is then used to target you with ads or to sell your information to third parties.
Testlibrary can also download other malicious software onto your computer, such as viruses and spyware, which can be used to steal your personal information and show risky ads, that may redirect to virus sites or scams.
Is Testlibrary Malware?
The truth is that PUPs (adware, browser hijackers) are not viruses, but may be just as dangerous since they may show you and redirect you to malware websites and scam pages.
Many security experts classify potentially unwanted programs as malware. This is because of the unwanted effects that PUPs can cause, such as displaying intrusive ads and collecting user data without the user’s knowledge or consent.
About the Testlibrary Research
The content we publish on SensorsTechForum.com, this Testlibrary how-to removal guide included, is the outcome of extensive research, hard work and our team’s devotion to help you remove the specific, adware-related problem, and restore your browser and computer system.
How did we conduct the research on Testlibrary?
Please note that our research is based on independent investigation. We are in contact with independent security researchers, thanks to which we receive daily updates on the latest malware, adware, and browser hijacker definitions.
Furthermore, the research behind the Testlibrary threat is backed with VirusTotal.
To better understand this online threat, please refer to the following articles which provide knowledgeable details.