
 What is a virus? How does a virus infect a computer? How to remove virus files manually without an antivirus program?
Viruses have been around ever since the first virus has been written, called “The Creeper”, first detected in the 1970s. From harmless threats that show cute animations, they have evolved into something quite devastating. Some of them even had the capability of attacking Nuclear Power plants, which was outright scary to even think about. Now, we are even more connected in the world with so many mobile as well as smart devices invading our lives. But in this article, we would like to focus on computers and focus on showing you how you can perform fixes on your computer, in the even it has been infected with malware.
Preparation Phase:
With several simple steps, we will show you different actions that you can perform by yourself and they will allow you to remove the threat. But before you begin to follow the steps, you will need to have the following preparation:
1. Know what is your virus. We strive to include as much information for new viruses as possible and they are available on our site.
2. Know what your virus does – the activities of the malware are important for the isolation of the threat.
3. Know where are the files and objects, created by the virus, infecting your PC.
Step 1: Isolate the virus and remove it’s files on your computer.
To isolate the malware, infecting your computer, you will have to boot in Safe Mode (for Windows machines). This will create a separate environment in which third-party software cannot run. For maximum effectiveness, you should boot into Safe Mode without networking. Here is how to do that:
Boot Your PC Into Safe Mode
For Windows XP, Vista and 7 systems:
1. Remove all CDs and DVDs, and then Restart your PC from the “Start” menu.
2. Select one of the two options provided below:
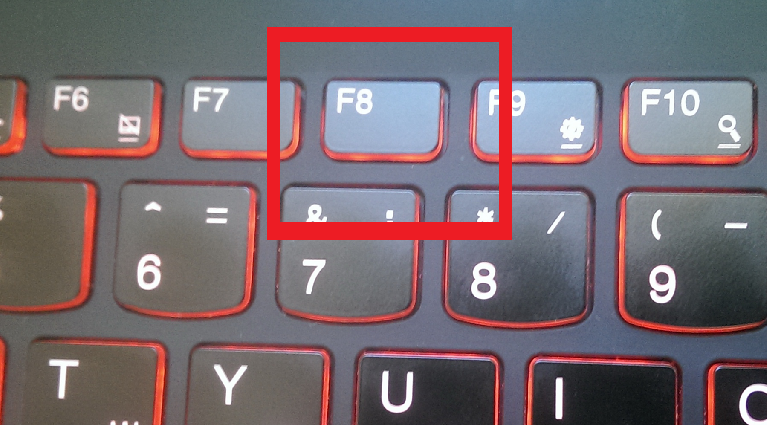
– For PCs with a single operating system: Press “F8” repeatedly after the first boot screen shows up during the restart of your computer. In case the Windows logo appears on the screen, you have to repeat the same task again.
– For PCs with multiple operating systems: Тhe arrow keys will help you select the operating system you prefer to start in Safe Mode. Press “F8” just as described for a single operating system.
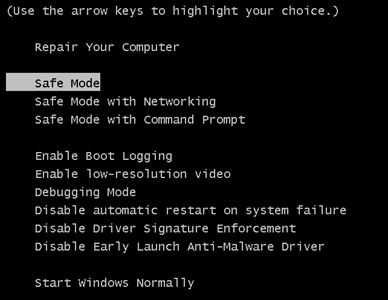
3. As the “Advanced Boot Options” screen appears, select the Safe Mode option you want using the arrow keys. As you make your selection, press “Enter“.
4. Log on to your computer using your administrator account
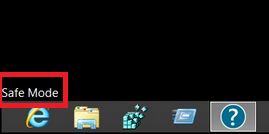
While your computer is in Safe Mode, the words “Safe Mode” will appear in all four corners of your screen.
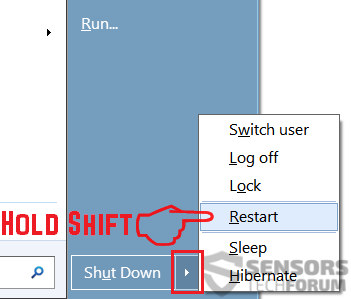
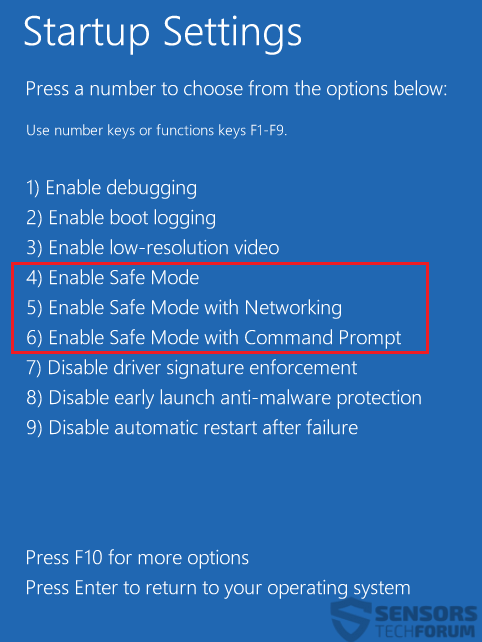
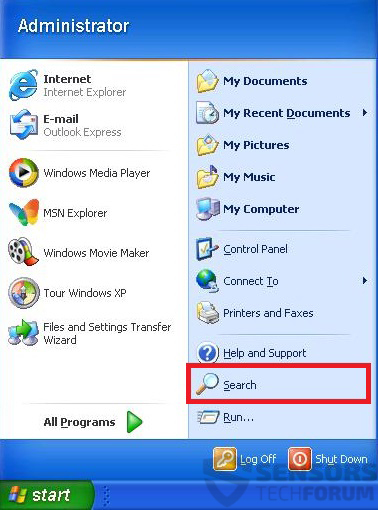
Step 1: Open up the Start Menu.
Step 2: Click on the Power button (for Windows 8 it is the little arrow next to the “Shut Down” button) and whilst holding down “Shift” click on Restart.
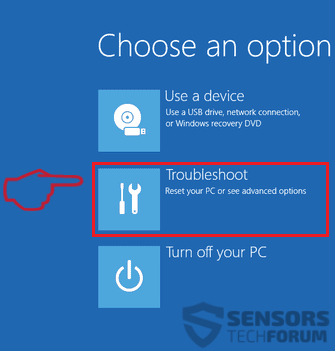
Step 3: After reboot, a blue menu with options will appear. From them you should choose Troubleshoot.
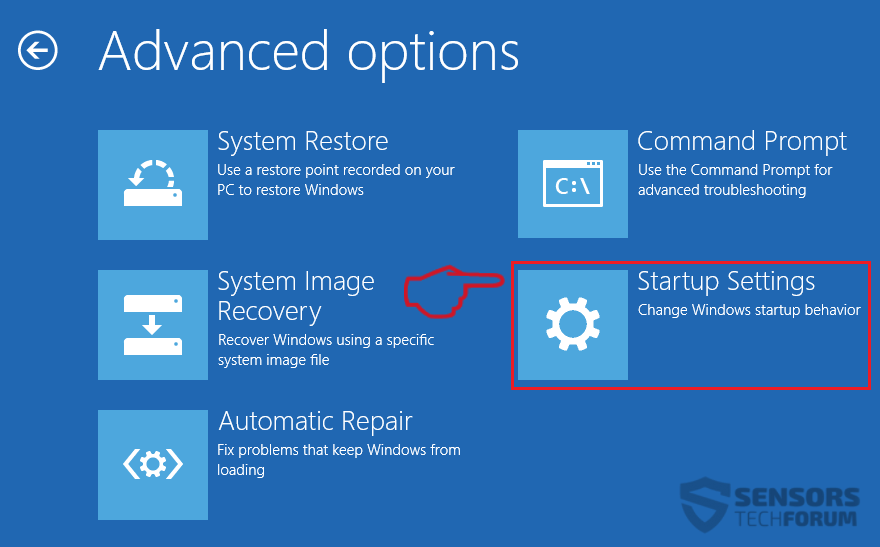
Step 4: You will see the Troubleshoot menu. From this menu choose Advanced Options.

Step 5: After the Advanced Options menu appears, click on Startup Settings.
Step 6: From the Startup Settings menu, click on Restart.
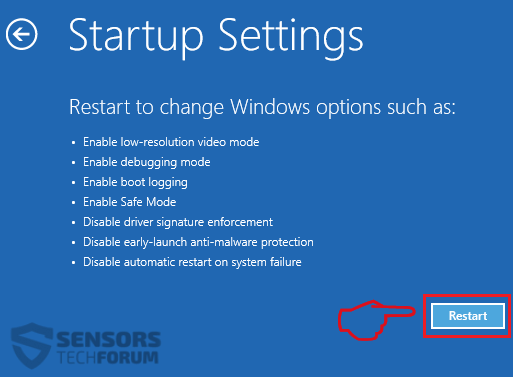
Step 7: A menu will appear upon reboot. You can choose any of the three Safe Mode options by pressing its corresponding number and the machine will restart.
Step 2: Find any malicious files and objects on your computer
In order for you to locate such malicious files on your computer, you have to be very well informed on their actual locations. The main need for that is to manually hunt them down and eliminate the files. Some viruses create copies of the malicious files and also add objects in the registry editor, so you need to be careful for that as well. Below you can see the necessary steps to take towards removing such files:
Find malicious files created by viruses
For Newer Windows Operating Systems
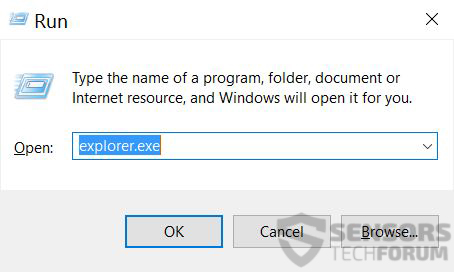
Step 1:
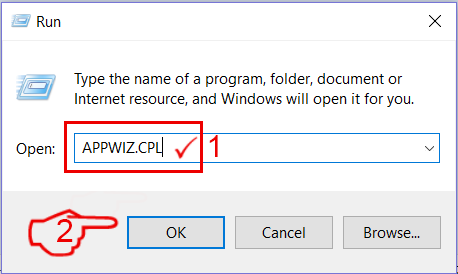
On your keyboard press + R and write explorer.exe in the Run text box and then click on the Ok button.
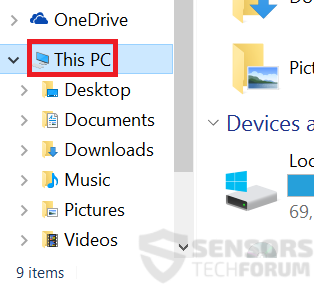
Step 2:
Click on your PC from the quick access bar. This is usually an icon with a monitor and its name is either “My Computer”, “My PC” or “This PC” or whatever you have named it.
Step 3:
Navigate to the search box in the top-right of your PC’s screen and type “fileextension:” and after which type the file extension. If you are looking for malicious executables, an example may be “fileextension:exe”. After doing that, leave a space and type the file name you believe the malware has created. Here is how it may appear if your file has been found:
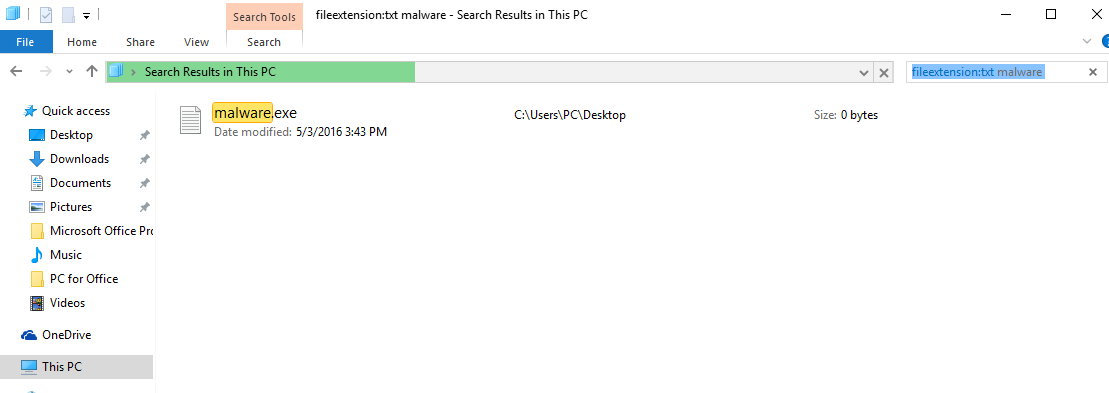
N.B. We recommend to wait for the green loading bar in the navination box to fill up in case the PC is looking for the file and hasn’t found it yet.
For Older Windows Operating Systems
In older Windows OS’s the conventional approach should be the effective one:
Step 1:
Click on the Start Menu icon (usually on your bottom-left) and then choose the Search preference.
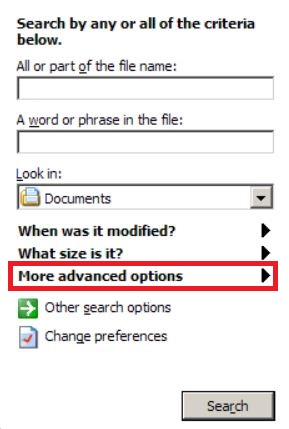
Step 2:
After the search window appears, choose More Advanced Options from the search assistant box. Another way is by clicking on All Files and Folders.
Step 3:
After that type the name of the file you are looking for and click on the Search button. This might take some time after which results will appear. If you have found the malicious file, you may copy or open its location by right-clicking on it.
Now you should be able to discover any file on Windows as long as it is on your hard drive and is not concealed via special software.
Step 3: Clean up your registries.
What Is Windows Registry Editor and How Does It Work
Windows Registry Editor contains all configuration options in your operating system. The editor contains Keys, Values and data in them. The path in the Editor is very similar to any other Windows directory, containing “/” navigational sign.
Here are the most frequently used registry keys when you open the Windows Registry Editor
- HKEY_LOCAL_MACHINE or HKLM
- HKEY_CLASSES_ROOT or HKCR
- HKEY_USERS or HKU
- HKEY_CURRENT_USER or HKCU
If a malicious process has set a module, called “virus.exe” in the %AllUsers% profile directory, the registry entry may look like the following example:
→HKEY_CURRENT_USER\Software\Microsoft\Windows\CurrentVersion\Run\”cssys” = “%AllUsers%\virus.exe”
Where the “%AllUsers%\virus.exe” set as a different type of value:
- String Value
- DWORD Value (32 bit)
- QWORD Value (64 bit)
- Multi-String Value
- Expandable String Value
Every type of value is created to perform a function that varies from the other. Malware can create new values for its files or modify your current Windows Values.
Preparation
In case you are looking forward to remove malware from your registry, bear in mind that you should first clean the malware from your computer. Attempting to clean the registries without getting rid of any viruses that create and modify them is NOT recommended. For best results, we advise to use an advanced anti-malware tool with malicious registry entries detection abilities.
In order to restore the permissions that may have been modified by malware in your Windows Registry back to the way they were, you need to follow these simple steps:
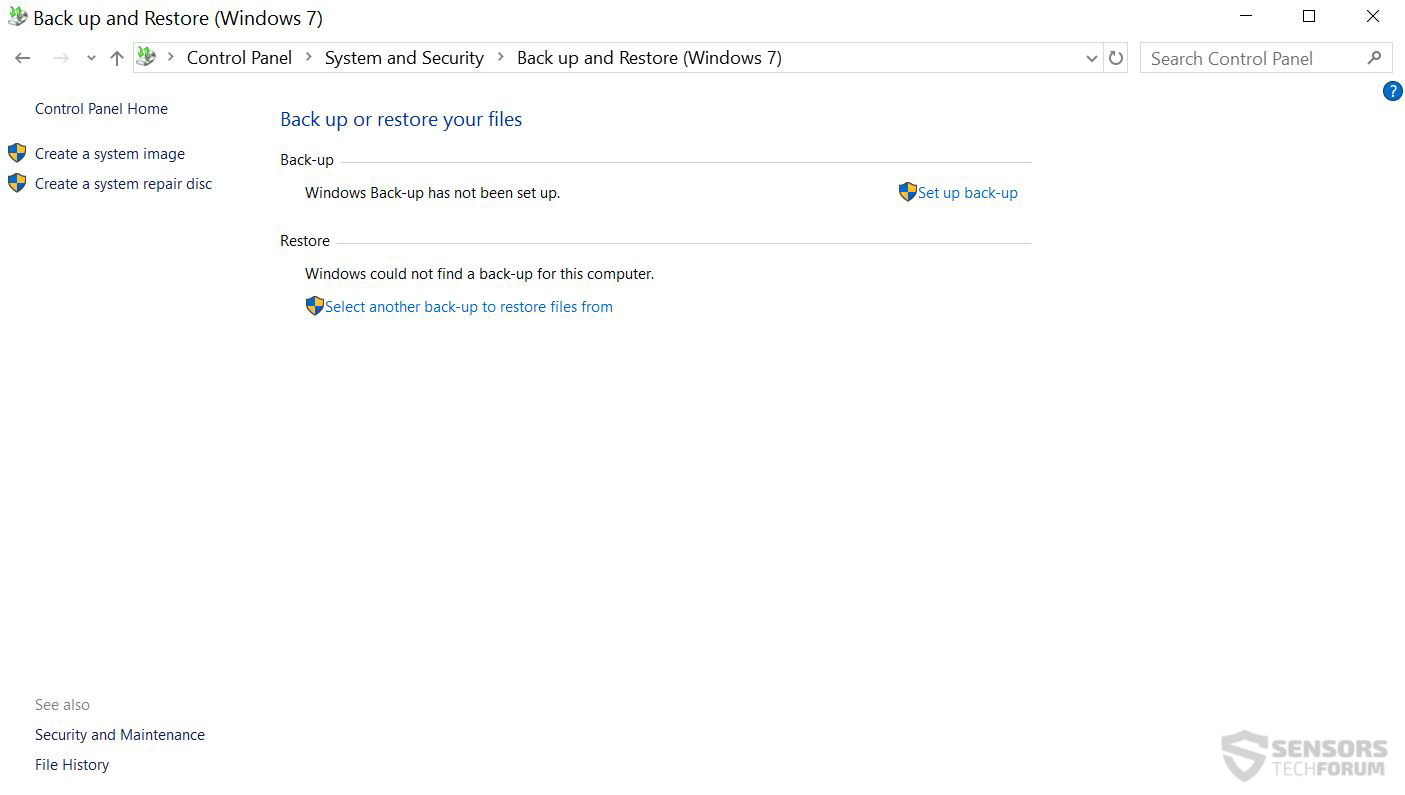
1. Backup the Data on Your Computer Before Starting to Clean up the Registry.
Before beginning to modify the Windows Registry, it is important to take into consideration what impact it may have on your PC, especially if it is infected. This is why you should backup your data. You can use external drives such as USB, Memory Stick, etc. Additionally, you may use a cloud service or perform a Windows Backup in Control Panel:
2. Backup the Data of Your Current Windows Registry Entries.
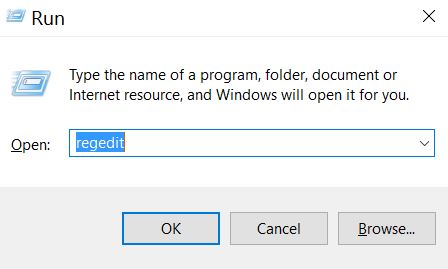
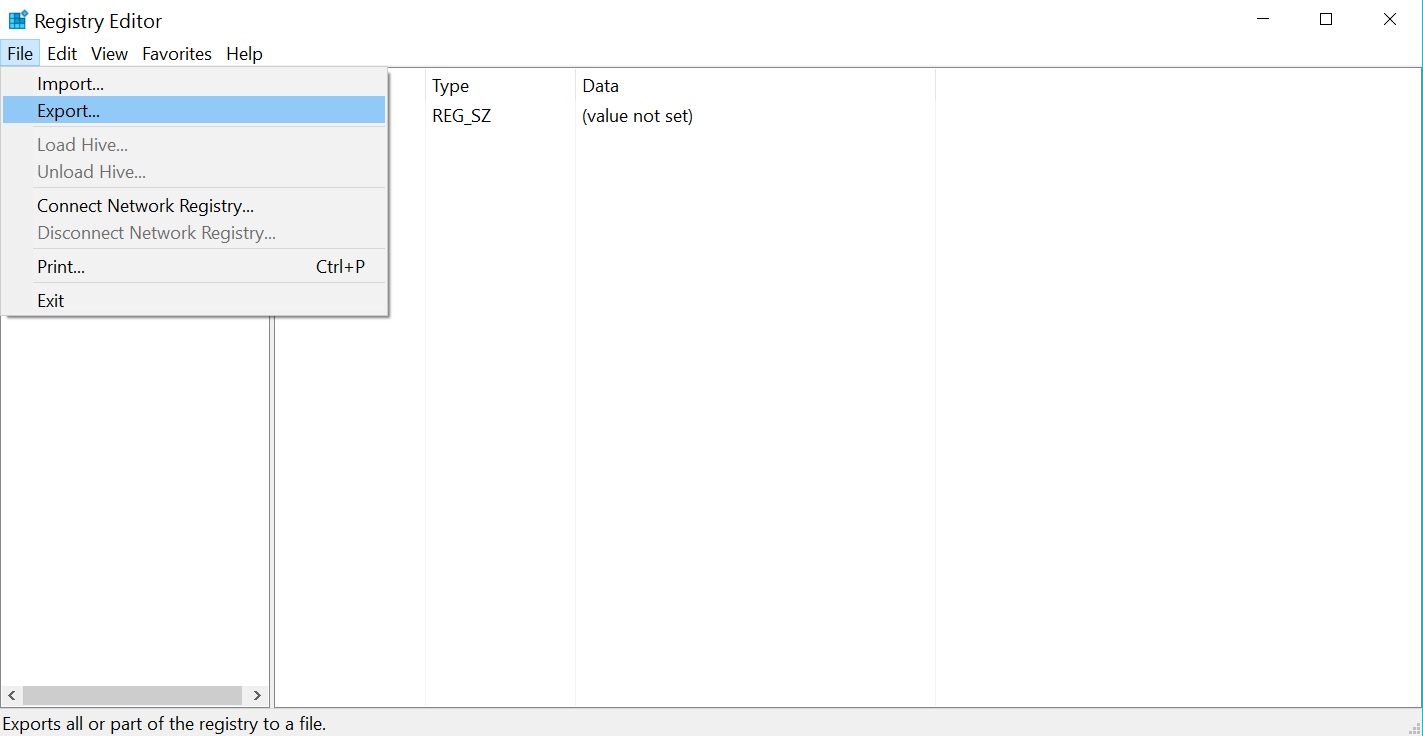
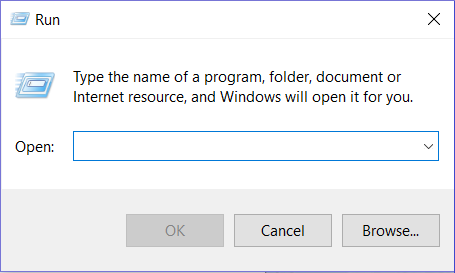
Substep 1: Open the Run window by pressing +R.
Substep 2: In it, type “regedit”.
Substep 3: The Registry Editor will appear. In it, click on the File drop-down menu, located on the top left corner.
Substep 4: From the File menu, choose Export.
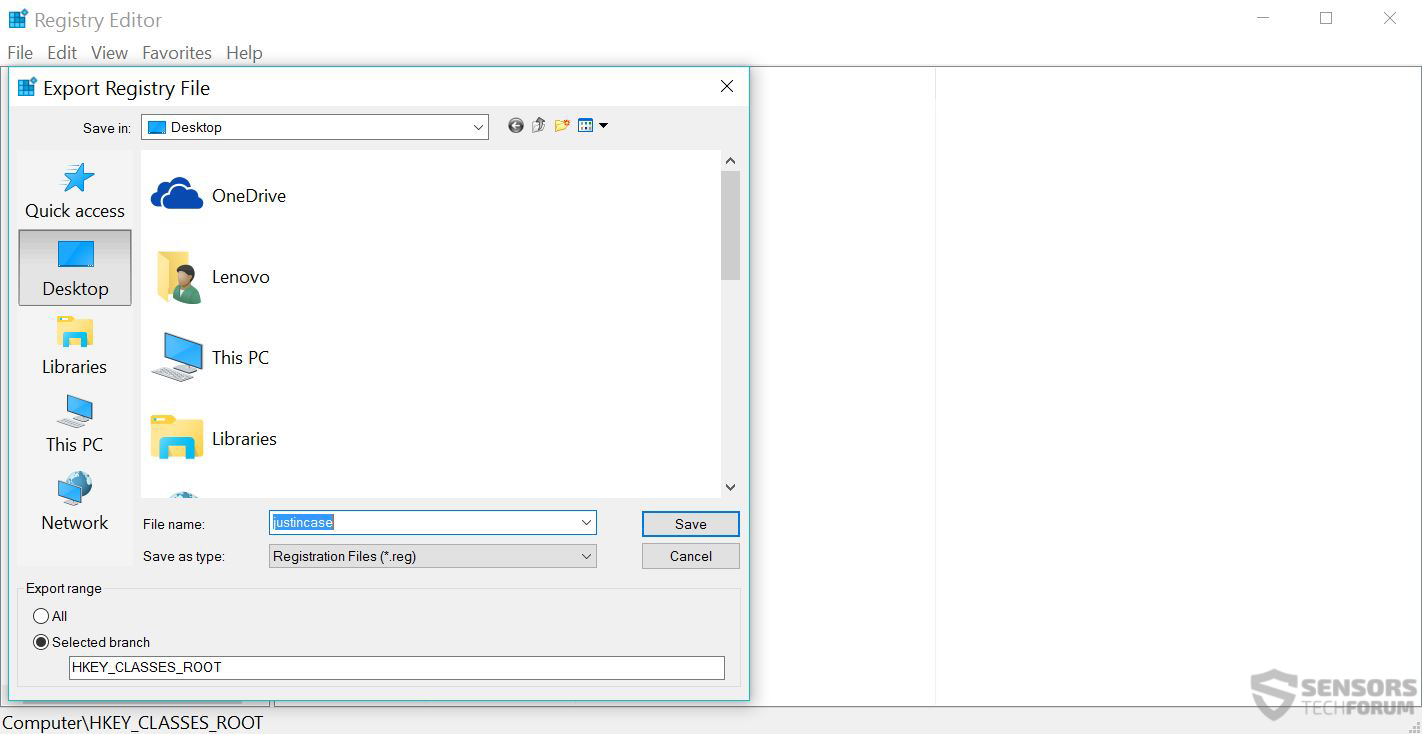
Substep 5: Choose a place to export the backup and name it as you wish. For this example we named it “justincase.reg”.
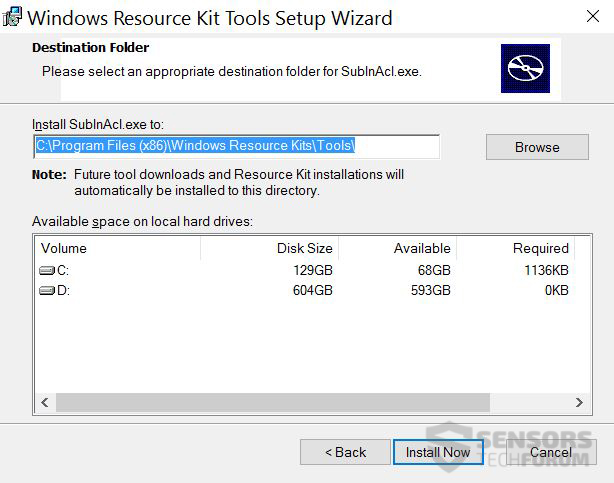
3. Download and Install SubInACL from Microsoft’s Website to Reset Registry Permissions
Substep 1: Find a reliable source like Microsoft’s official website and download SubInACL.
Substep 2: Install SuInACL in its default directory.
4. Create a Registry Fixing Script.
Substep 1: Right-click on a blank space of your desktop somewhere and choose New > Text Document to create a .txt file.
Substep 2: Open the text document and in it paste the following script:
subinacl /subkeyreg HKEY_LOCAL_MACHINE /setowner=Administrators
subinacl /subkeyreg HKEY_CURRENT_USER /setowner=Administrators
subinacl /subkeyreg HKEY_CLASSES_ROOT /setowner=Administrators
subinacl /subdirectories %SystemDrive% /setowner=Administrators
subinacl /subkeyreg HKEY_LOCAL_MACHINE /grant=system=f
subinacl /subkeyreg HKEY_CURRENT_USER /grant=system=f
subinacl /subkeyreg HKEY_CLASSES_ROOT /grant=system=f
subinacl /subdirectories %SystemDrive% /grant=system=f
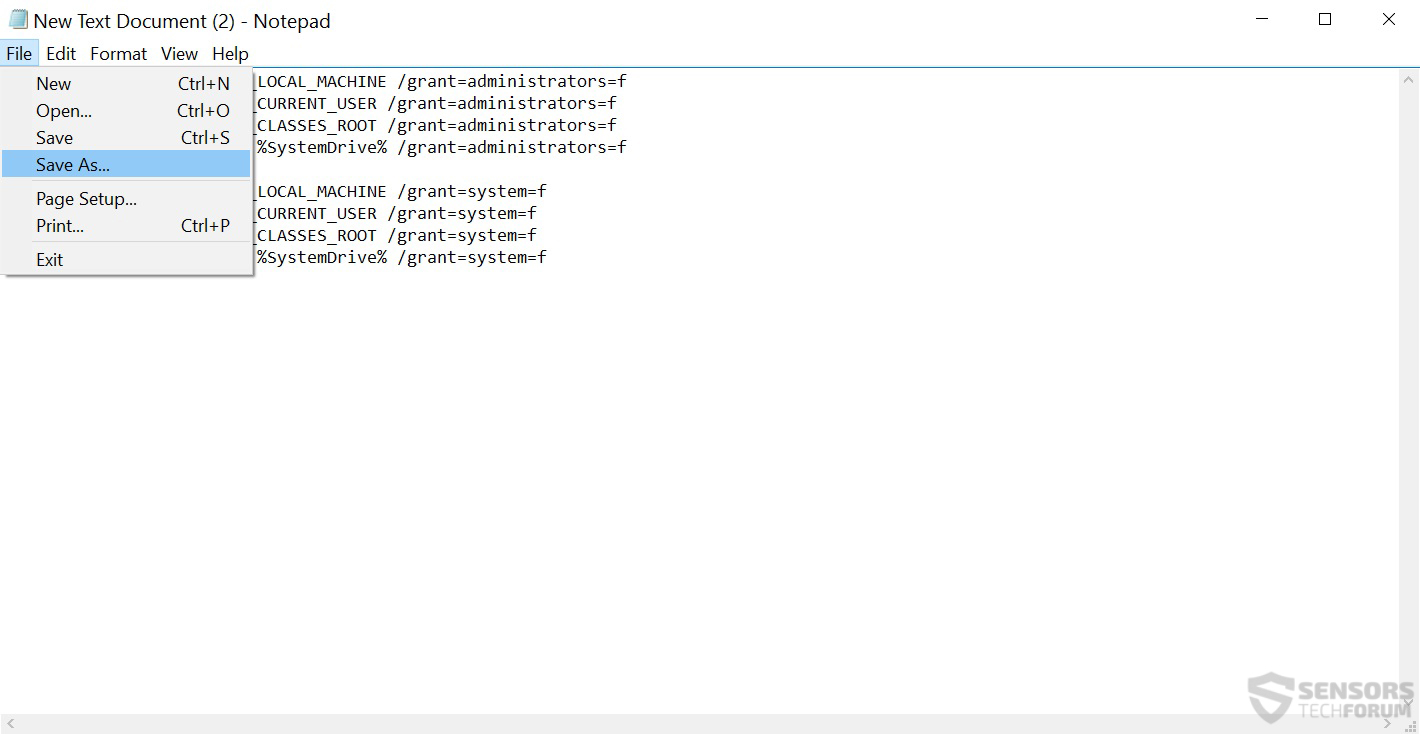
Save the file as a .bat file by clicking on File > Save As… and from the window that will appear instead of Text Documents(*.txt) choose All Files. Then in name type “fix.bat” and save it in “C:\Program files\Windows Resource Kits\Tools”.
5. Clean up Your Registries.
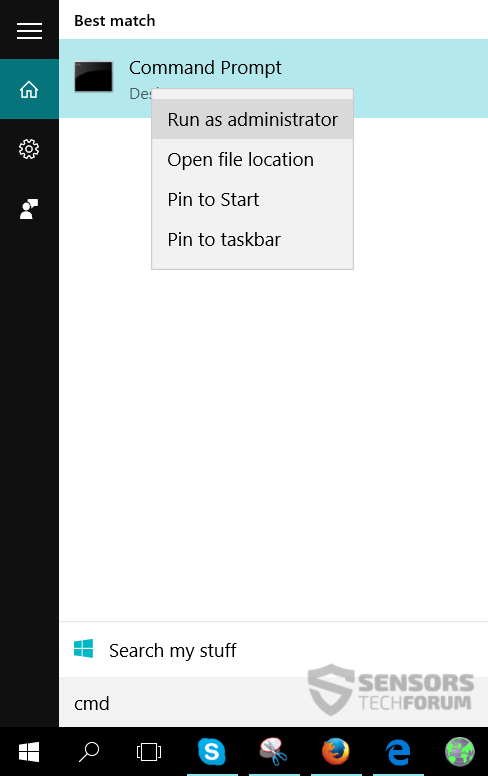
Substep 1: Open the Command prompt by searching it in the Start menu. After you find it, right-click on it and choose Run as Administrator:
Substep 2: In the Command prompt window type one of those two commands, depending on where your “Windows Resource Kits” folder is located:
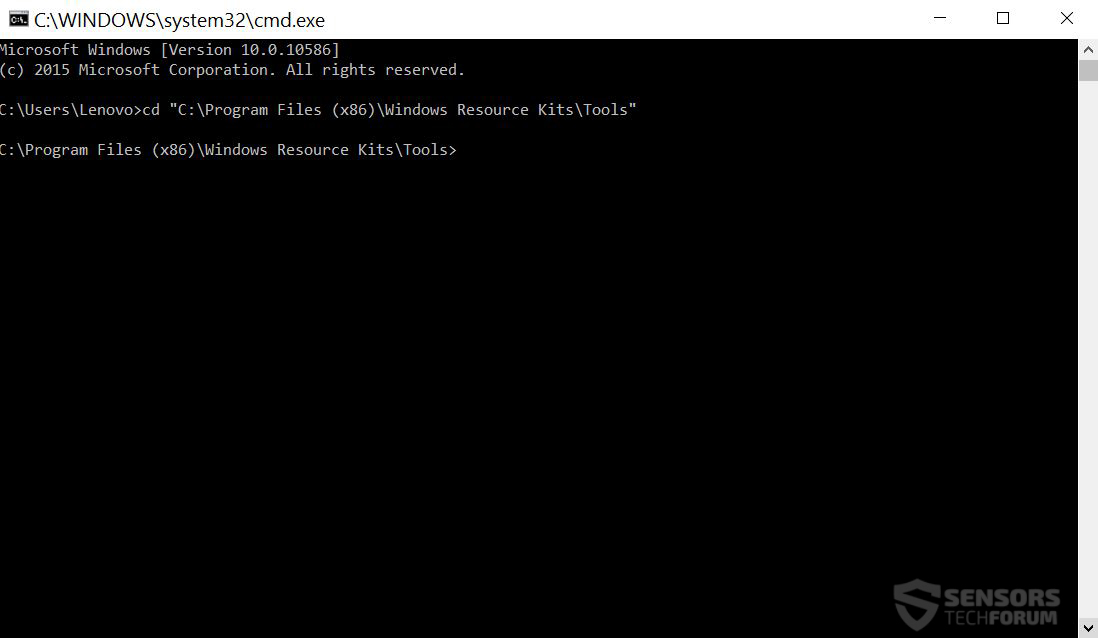
→ cd “C:\Program Files\Windows Resource Kits\Tools” or
cd “C:\Program Files (x86)\Windows Resource Kits\Tools”
For this situation it was (x86).Then, you should see the following:
Now type fix.bat and press Enter.
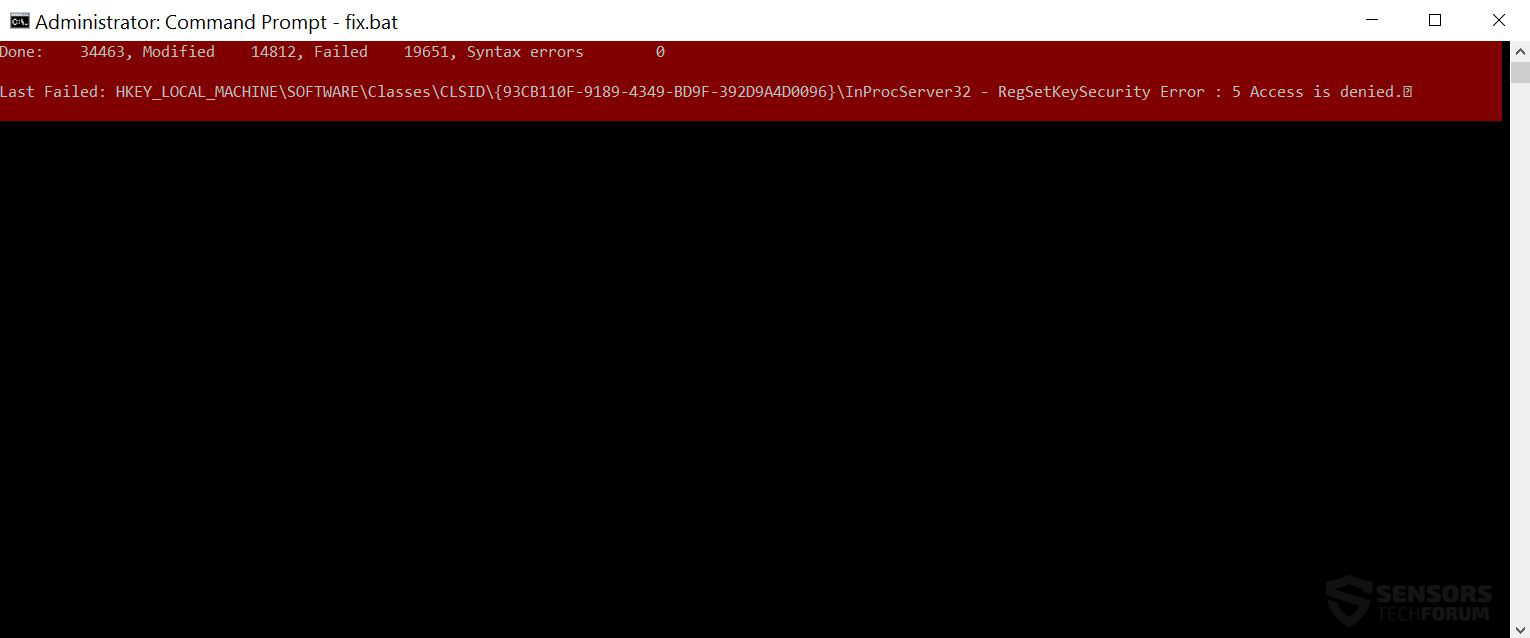
After the cleanup is complete, you should see a report saying how many registries have failed or contained syntax errors. All of your registry permissions should be restored back to normal.
Step 3: Clean up your web browsers and PC from PUPs (Potentially Unwanted Programs).
To follow this step, you will need to be sure that you have an adware-related virus on your computer that may have added plugins, extensions, add-ons, toolbars or changed different settings of your web browser. If this is your situation, then you most likely are dealing with a potentially unwanted program. You can remove those from your browser by following the steps bellow.
1.How to Uninstall malicious programs from Windows
Here is a method in few easy steps that should be able to uninstall most programs. No matter if you are using Windows 10, 8, 7, Vista or XP, those steps will get the job done. Dragging the program or its folder to the recycle bin can be a very bad decision. If you do that, bits and pieces of the program are left behind, and that can lead to unstable work of your PC, errors with the file type associations and other unpleasant activities. The proper way to get a program off your computer is to Uninstall it. To do that:
Select the program that you want to remove, and press “Uninstall” (fig.3).
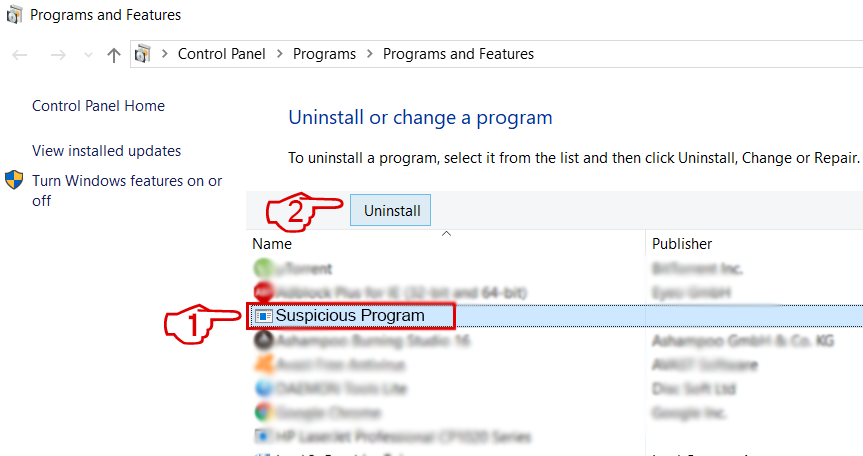
Follow the instructions above and you will successfully uninstall most programs.
Remove a virus by cleaning your Browsers and Registry.

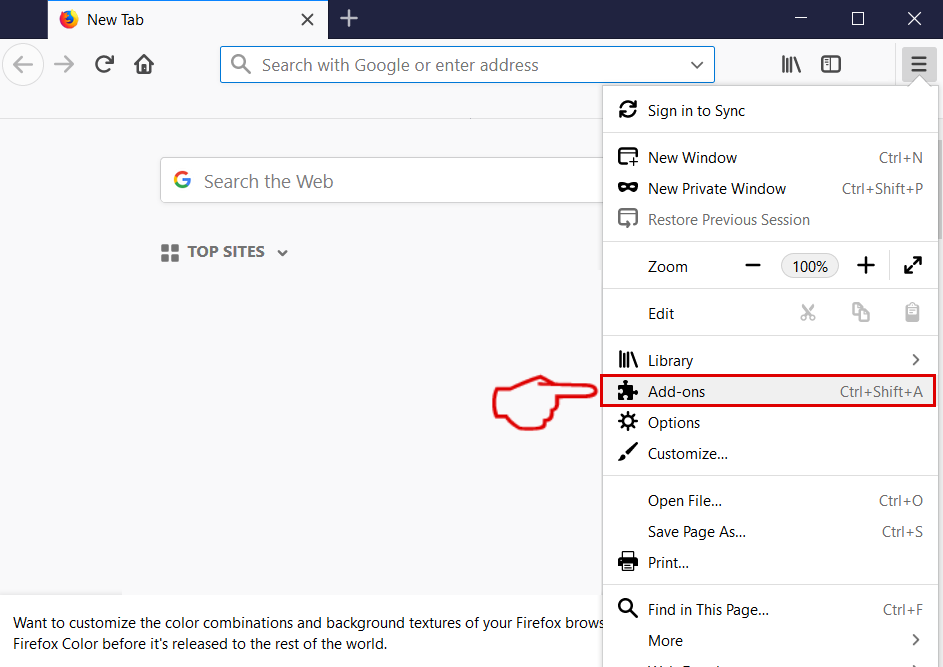
Select the “Add-ons” icon from the menu.
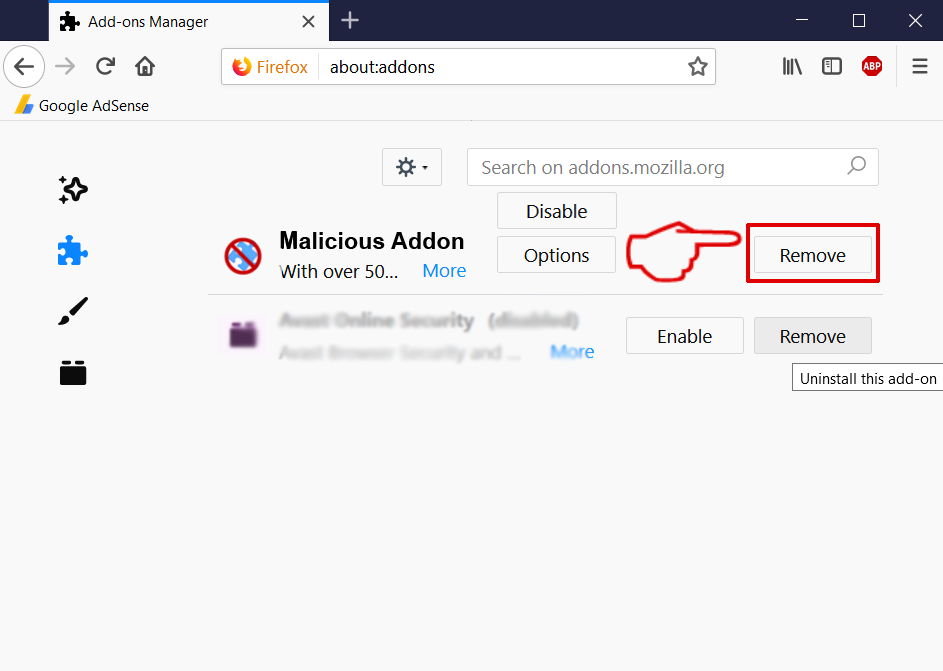
Select the unwanted extension and click “Remove“
After the extension is removed, restart Mozilla Firefox by closing it from the red “X” button at the top right corner and start it again.
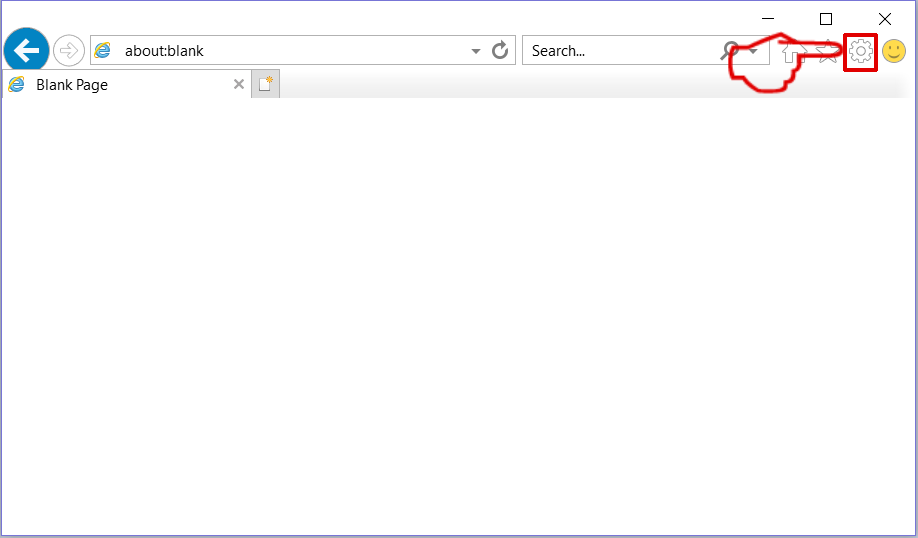
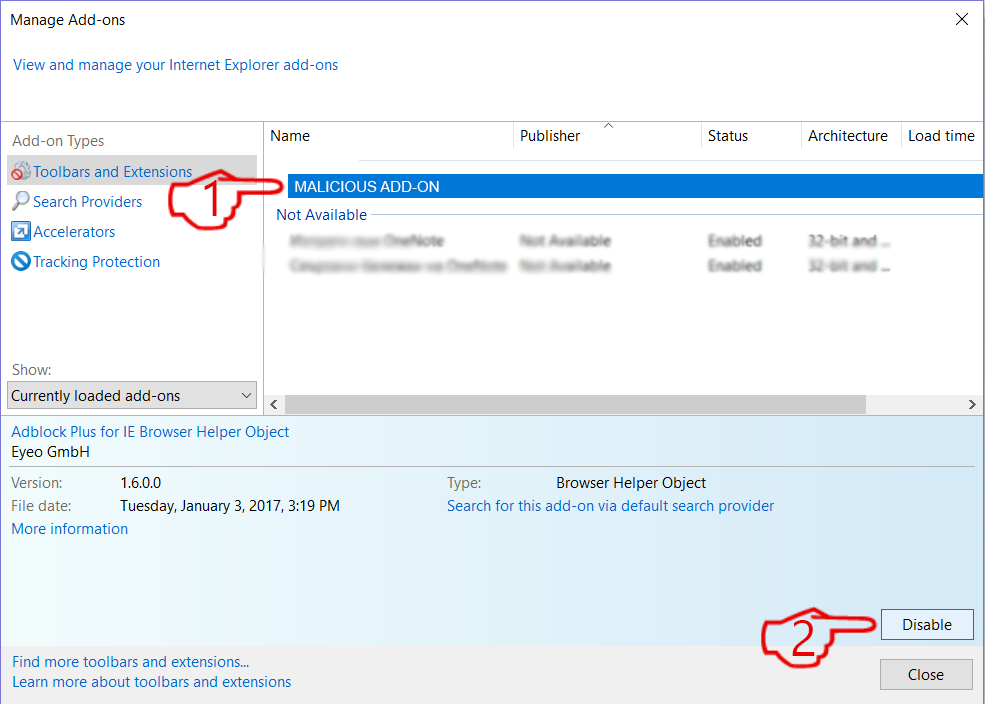
Select the extension you want to remove and then click ‘Disable’. A pop-up window will appear to inform you that you are about to disable the selected extension, and some more add-ons might be disabled as well. Leave all the boxes checked, and click ‘Disable’.
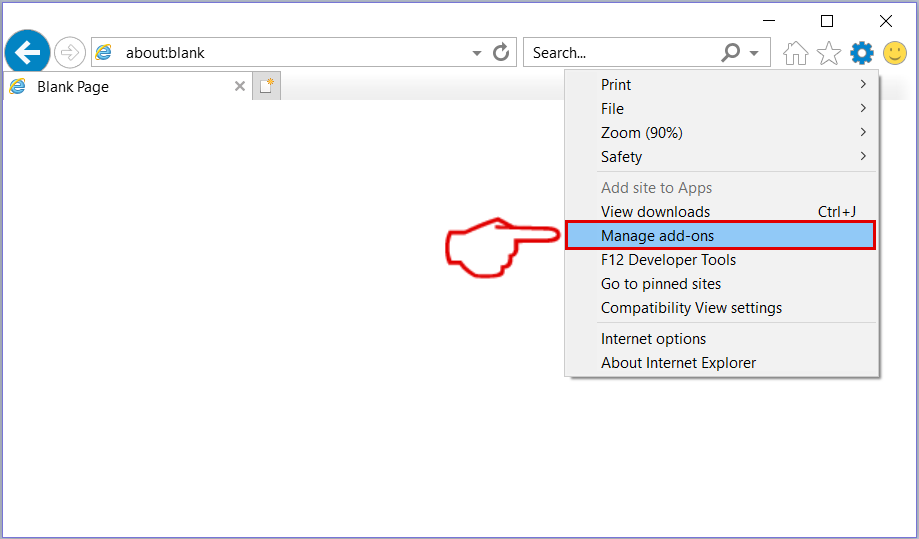
After the unwanted extension has been removed, restart Internet Explorer by closing it from the red ‘X’ button located at the top right corner and start it again.
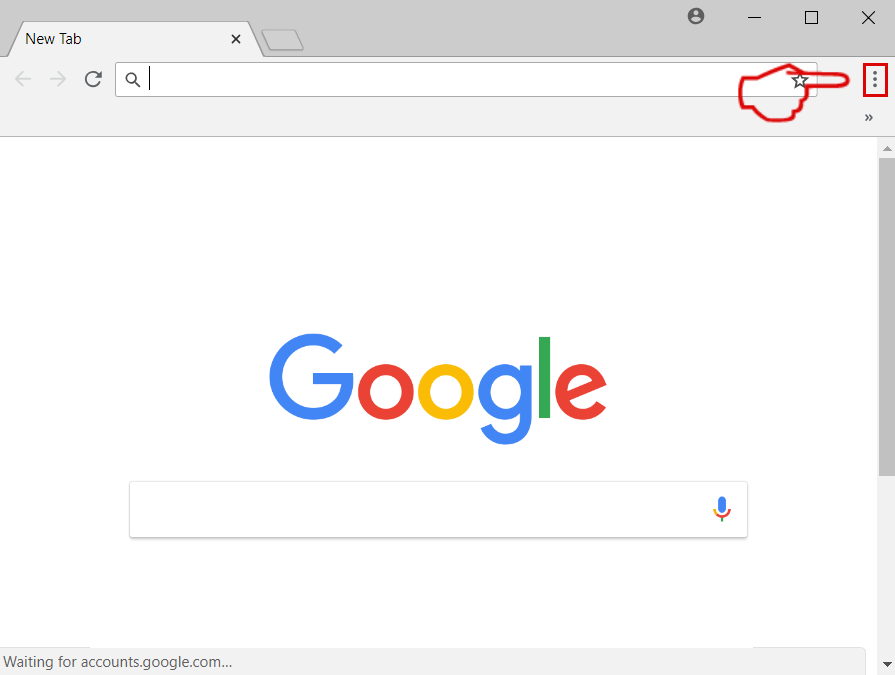
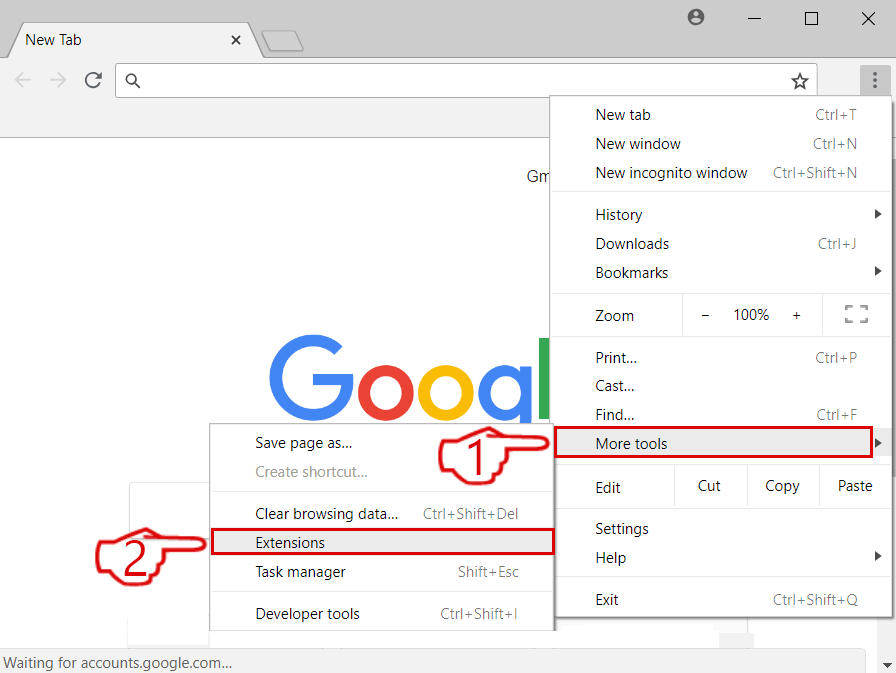
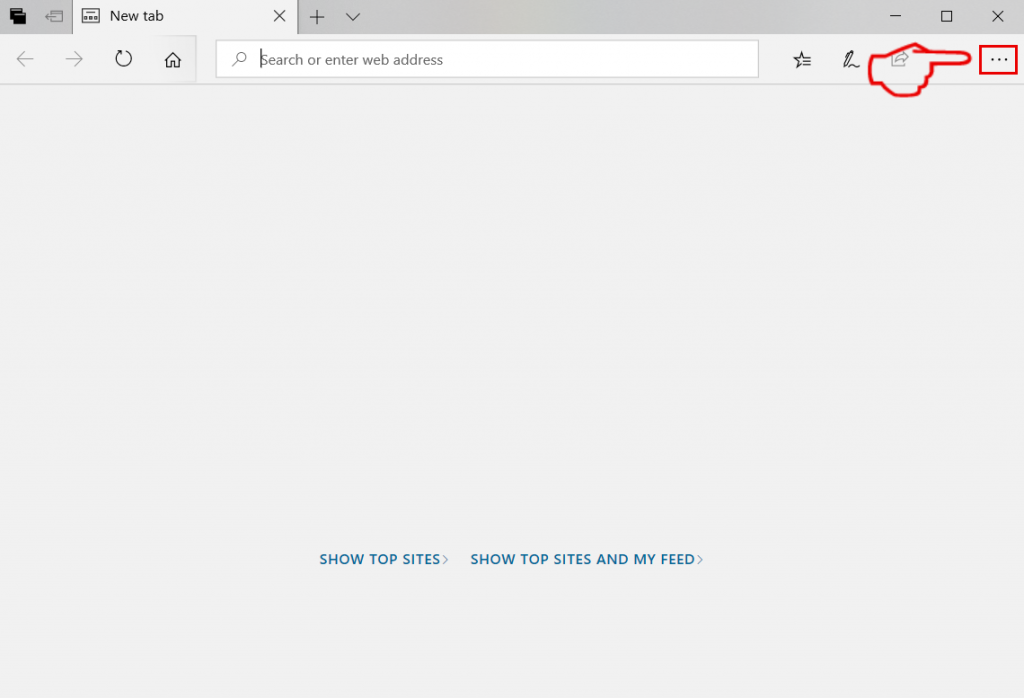
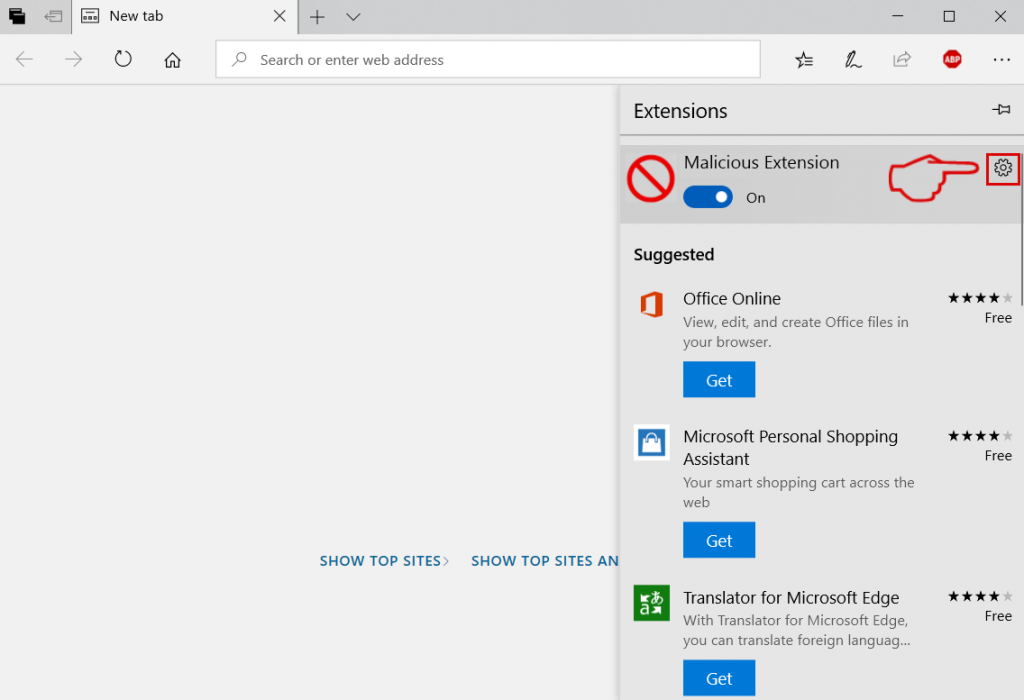
Open the drop menu by clicking on the icon at the top right corner.
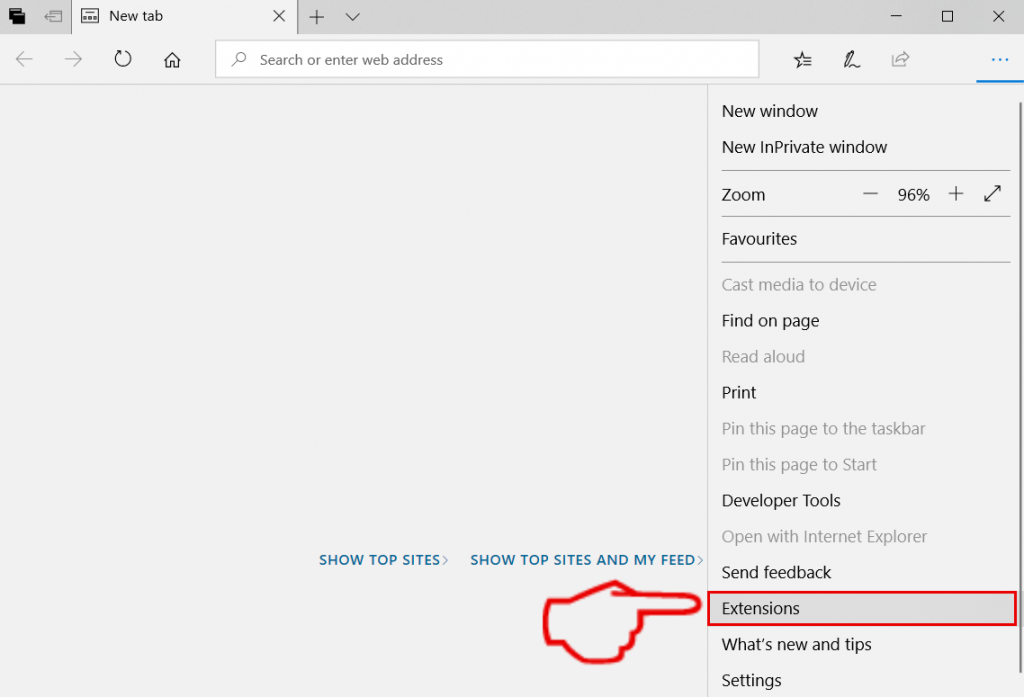
From the drop menu select “Extensions”.
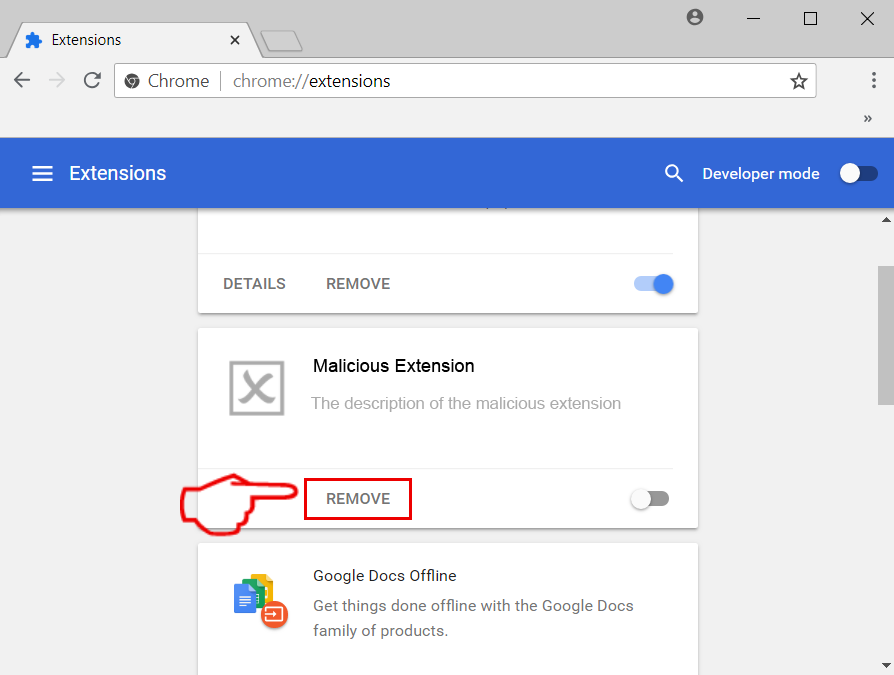
Choose the suspected malicious extension you want to remove and then click on the gear icon.
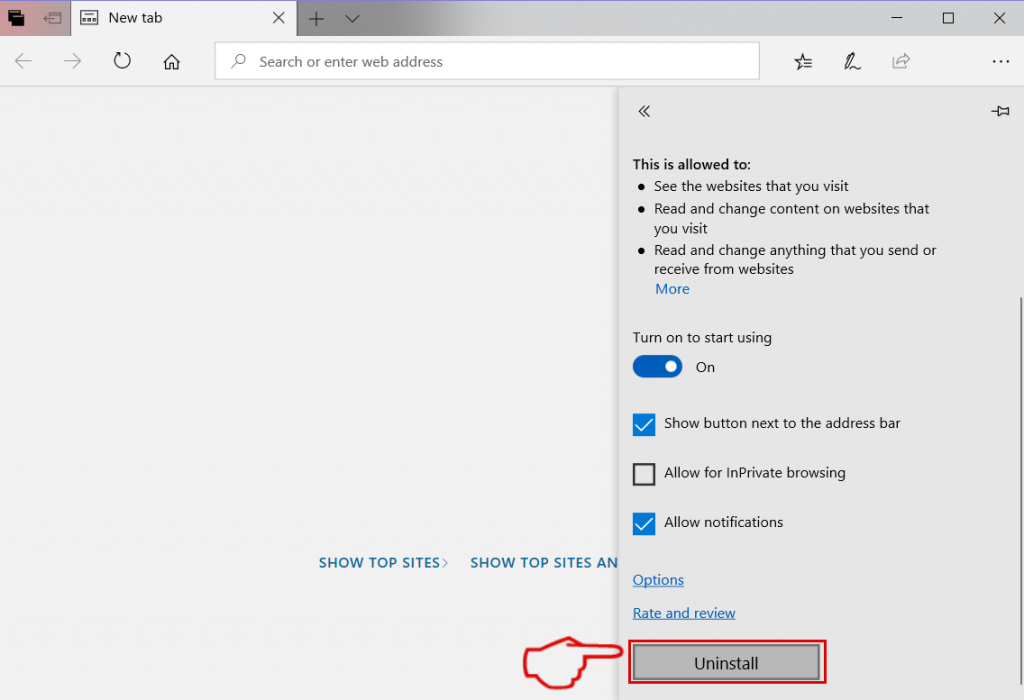
Remove the malicious extension by scrolling down and then clicking on Uninstall.
How to try and fix files, damaged by viruses?
We have done a lot of analysis on how you can try and get files back, when they are damaged by malware. First, you will need to know the type of virus that has damaged your files is. Most of those viruses can encrypt files and these types of viruses are called ransomware viruses. Below you can find information on most of the methods to try and restore files, encrypted by ransomware viruses. With such types of malware, it often comes down to how much luck you have. If you are lucky enough, you can use a third-party decryptor to get your files back. If not then you are not In luck and can use some of the alternative tools and methods below. The same tools can help out if a virus damaged your operating system completely: