Researcher Johannes Ullrich at InfoSec Handlers Diary Blog explains how DVR’s can be taken over and used as a cyber-weapon to gain access to other devices:
“Over two years ago, we reported about how exploited DVRs are used to attack other devices across the internet. Back then, like today, the vulnerability was an open telnet server with a trivial default password……
You can no longer turn it on via the web-based interface, but only by using the “physical” interface displayed to the user connected to the DVR via an attached monitor.”
The malware researcher also states a report on DDoS attacks performed by botnets all over the world primarily via DVR devices. In fact, there have been detected over 100 thousand devices which combined in botnets can cause a massive DDoS attack of over 1TBps (1 000 000MBps). Such attacks are possible via those IoT devices because they act as an opportunity for the hackers. Since such devices are passive and their security is often not monitored properly by organizations, they are a lucrative target.
Ullrich also displays a graph of what appears to be his research showing a massive increase in infections since the start of October:
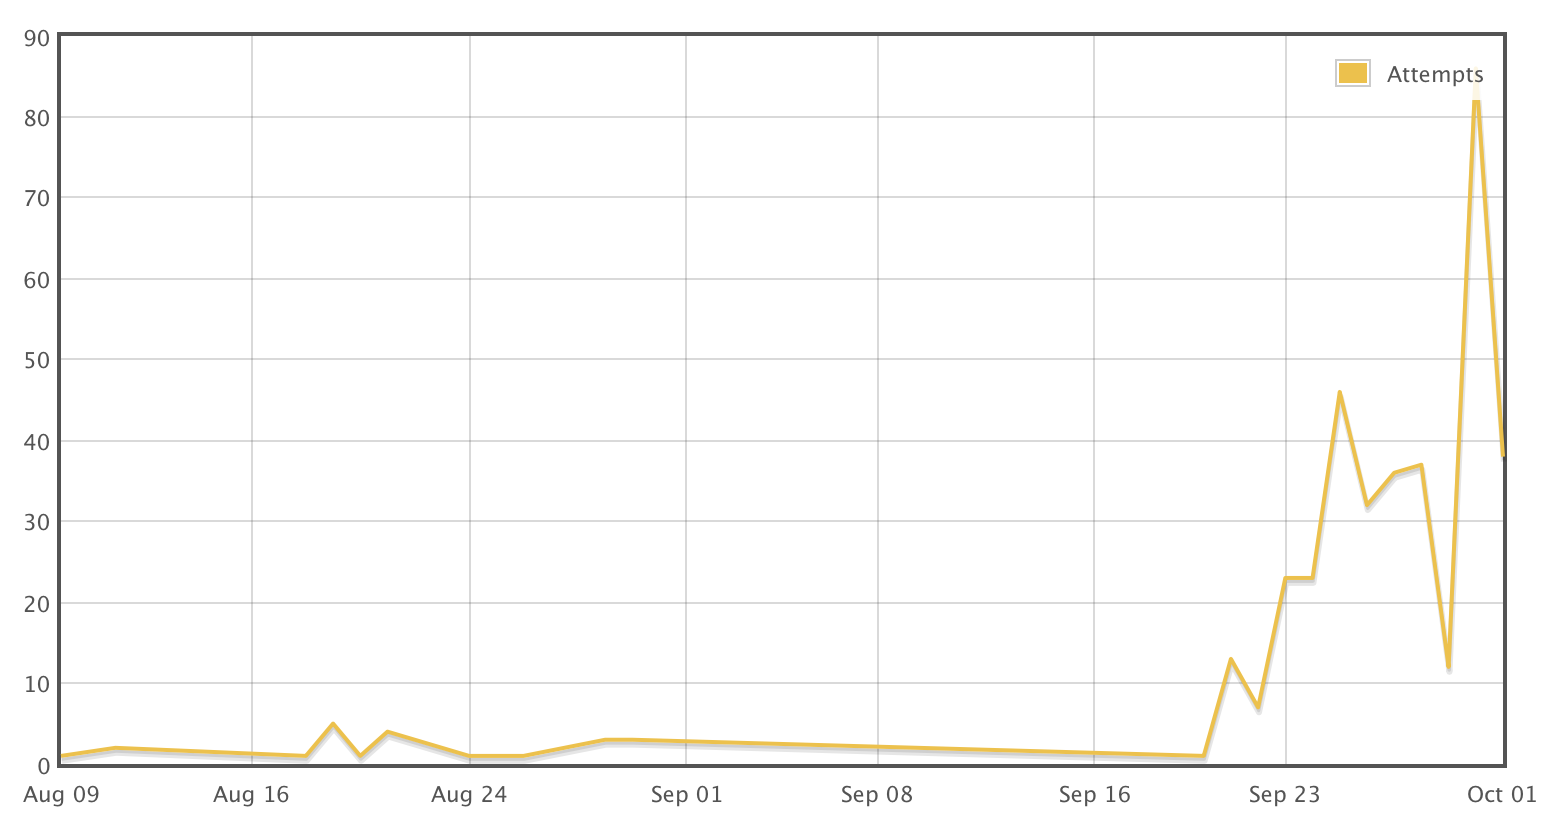
The researcher still feels convinced that many of the IoT devices nowadays are not updated properly and do not contain passwords that are strong enough. Yes, the password itself may be very complicated, but some DVR devices may contain weaker encryption allowing hackers to penetrate it with time.
Johannes also conducted an experiment. He set up an old DVR device after which he ran a network sniffer on it to follow the packets and monitor what happens with the network connection of the device.
The results were surprising – very soon after Ullrich has set up the IoT device and has connected it, connection attempts have begun to show up. The primary method of connecting to the DVR was via Telnet. The researcher also reports that there were so many attacks that the telnet server of the DVR device becomes unresponsive at times.
The researcher also reports several different attacks that were successful in getting the right password, unlike most of them.
The modern infection method according to Johannes unlike the previous exploit kits that download malware by exploiting scripts on bash or python languages the modern attacks were very small regarding lines of code and bytes.
These small binaries were reportedly acting as “recons” since they are believed to begin scanning for interconnected hosts that were vulnerable to infections and send reports to remote servers via unsecured ports. The malware researcher has concluded that he received several hacking attempts that resulted in success per one hour.


The Bottom Line for IoT Hacking
In case you have a network of smart IoT devices, whether they are DVR or anything else, you should analyze what passwords you have used on them and what is their encryption and strength according to Ullrich’s recommendations. And it is very much advisable to raise awareness of the danger these types of threats represent to anyone who is using IoT, especially the home or office network.


Ventsislav Krastev
Ventsislav has been covering the latest malware, software and newest tech developments at SensorsTechForum for 3 years now. He started out as a network administrator. Having graduated Marketing as well, Ventsislav also has passion for discovery of new shifts and innovations in cybersecurity that become game changers. After studying Value Chain Management and then Network Administration, he found his passion within cybersecrurity and is a strong believer in basic education of every user towards online safety.
Preparation before removing .
Before starting the actual removal process, we recommend that you do the following preparation steps.
- Make sure you have these instructions always open and in front of your eyes.
- Do a backup of all of your files, even if they could be damaged. You should back up your data with a cloud backup solution and insure your files against any type of loss, even from the most severe threats.
- Be patient as this could take a while.
Step 1: Boot Your PC In Safe Mode to isolate and remove


Step 2: Clean any registries, created by on your computer.
The usually targeted registries of Windows machines are the following:
- HKEY_LOCAL_MACHINE\Software\Microsoft\Windows\CurrentVersion\Run
- HKEY_CURRENT_USER\Software\Microsoft\Windows\CurrentVersion\Run
- HKEY_LOCAL_MACHINE\Software\Microsoft\Windows\CurrentVersion\RunOnce
- HKEY_CURRENT_USER\Software\Microsoft\Windows\CurrentVersion\RunOnce
You can access them by opening the Windows registry editor and deleting any values, created by there. This can happen by following the steps underneath:


Step 3: Find files created by


For Newer Windows Operating Systems
1: On your keyboard press + R and write explorer.exe in the Run text box and then click on the Ok button.
2: Click on your PC from the quick access bar. This is usually an icon with a monitor and its name is either “My Computer”, “My PC” or “This PC” or whatever you have named it.
3: Navigate to the search box in the top-right of your PC’s screen and type “fileextension:” and after which type the file extension. If you are looking for malicious executables, an example may be “fileextension:exe”. After doing that, leave a space and type the file name you believe the malware has created. Here is how it may appear if your file has been found:
N.B. We recommend to wait for the green loading bar in the navination box to fill up in case the PC is looking for the file and hasn’t found it yet.
For Older Windows Operating Systems
In older Windows OS’s the conventional approach should be the effective one:
1: Click on the Start Menu icon (usually on your bottom-left) and then choose the Search preference.
2: After the search window appears, choose More Advanced Options from the search assistant box. Another way is by clicking on All Files and Folders.
3: After that type the name of the file you are looking for and click on the Search button. This might take some time after which results will appear. If you have found the malicious file, you may copy or open its location by right-clicking on it.
Now you should be able to discover any file on Windows as long as it is on your hard drive and is not concealed via special software.
Before starting “Step 4”, please boot back into Normal mode, in case you are currently in Safe Mode.
This will enable you to install and use SpyHunter 5 successfully.
Step 4: Scan for with SpyHunter Anti-Malware Tool
Step 5 (Optional): Try to Restore Files Encrypted by .
Ransomware infections and aim to encrypt your files using an encryption algorithm which may be very difficult to decrypt. This is why we have suggested a data recovery method that may help you go around direct decryption and try to restore your files. Bear in mind that this method may not be 100% effective but may also help you a little or a lot in different situations.
For more “how-to” file recovery methods and steps, you can visit our instructive article on “How to Restore Files Encrypted by Ransomware (Without Decrypter)“.


Ventsislav Krastev
Ventsislav has been covering the latest malware, software and newest tech developments at SensorsTechForum for 3 years now. He started out as a network administrator. Having graduated Marketing as well, Ventsislav also has passion for discovery of new shifts and innovations in cybersecurity that become game changers. After studying Value Chain Management and then Network Administration, he found his passion within cybersecrurity and is a strong believer in basic education of every user towards online safety.
Preparation before removing .
Before starting the actual removal process, we recommend that you do the following preparation steps.
- Make sure you have these instructions always open and in front of your eyes.
- Do a backup of all of your files, even if they could be damaged. You should back up your data with a cloud backup solution and insure your files against any type of loss, even from the most severe threats.
- Be patient as this could take a while.
Step 1: Boot Your PC In Safe Mode to isolate and remove


Step 2: Clean any registries, created by on your computer.
The usually targeted registries of Windows machines are the following:
- HKEY_LOCAL_MACHINE\Software\Microsoft\Windows\CurrentVersion\Run
- HKEY_CURRENT_USER\Software\Microsoft\Windows\CurrentVersion\Run
- HKEY_LOCAL_MACHINE\Software\Microsoft\Windows\CurrentVersion\RunOnce
- HKEY_CURRENT_USER\Software\Microsoft\Windows\CurrentVersion\RunOnce
You can access them by opening the Windows registry editor and deleting any values, created by there. This can happen by following the steps underneath:


Step 3: Find files created by


For Newer Windows Operating Systems
1: On your keyboard press + R and write explorer.exe in the Run text box and then click on the Ok button.
2: Click on your PC from the quick access bar. This is usually an icon with a monitor and its name is either “My Computer”, “My PC” or “This PC” or whatever you have named it.
3: Navigate to the search box in the top-right of your PC’s screen and type “fileextension:” and after which type the file extension. If you are looking for malicious executables, an example may be “fileextension:exe”. After doing that, leave a space and type the file name you believe the malware has created. Here is how it may appear if your file has been found:
N.B. We recommend to wait for the green loading bar in the navination box to fill up in case the PC is looking for the file and hasn’t found it yet.
For Older Windows Operating Systems
In older Windows OS’s the conventional approach should be the effective one:
1: Click on the Start Menu icon (usually on your bottom-left) and then choose the Search preference.
2: After the search window appears, choose More Advanced Options from the search assistant box. Another way is by clicking on All Files and Folders.
3: After that type the name of the file you are looking for and click on the Search button. This might take some time after which results will appear. If you have found the malicious file, you may copy or open its location by right-clicking on it.
Now you should be able to discover any file on Windows as long as it is on your hard drive and is not concealed via special software.
Before starting “Step 4”, please boot back into Normal mode, in case you are currently in Safe Mode.
This will enable you to install and use SpyHunter 5 successfully.
Step 4: Scan for with SpyHunter Anti-Malware Tool


Ventsislav Krastev
Ventsislav has been covering the latest malware, software and newest tech developments at SensorsTechForum for 3 years now. He started out as a network administrator. Having graduated Marketing as well, Ventsislav also has passion for discovery of new shifts and innovations in cybersecurity that become game changers. After studying Value Chain Management and then Network Administration, he found his passion within cybersecrurity and is a strong believer in basic education of every user towards online safety.
Preparation before removing .
Before starting the actual removal process, we recommend that you do the following preparation steps.
- Make sure you have these instructions always open and in front of your eyes.
- Be patient as this could take a while.
Step 1: Uninstall and related software from Windows
Here is a method in few easy steps that should be able to uninstall most programs. No matter if you are using Windows 10, 8, 7, Vista or XP, those steps will get the job done. Dragging the program or its folder to the recycle bin can be a very bad decision. If you do that, bits and pieces of the program are left behind, and that can lead to unstable work of your PC, errors with the file type associations and other unpleasant activities. The proper way to get a program off your computer is to Uninstall it. To do that:


Step 2: Clean your Browsers from .


2. Select the “Add-ons” icon from the menu.
3. Select the unwanted extension and click “Remove“
4. After the extension is removed, restart Mozilla Firefox by closing it from the red “X” button at the top right corner and start it again.
2. Move the cursor over “Tools” and then from the extended menu choose “Extensions“
3. From the opened “Extensions” menu locate the unwanted extension and click on its “Remove” button.
4. After the extension is removed, restart Google Chrome by closing it from the red “X” button at the top right corner and start it again.
2. Click on the gear icon labeled ‘Tools’ to open the drop menu and select ‘Manage Add-ons’
3. In the ‘Manage Add-ons’ window.
4. Select the extension you want to remove and then click ‘Disable’. A pop-up window will appear to inform you that you are about to disable the selected extension, and some more add-ons might be disabled as well. Leave all the boxes checked, and click ‘Disable’.
5. After the unwanted extension has been removed, restart Internet Explorer by closing it from the red ‘X’ button located at the top right corner and start it again.
2. Open the drop menu by clicking on the icon at the top right corner.
3. From the drop menu select “Extensions”.
4. Choose the suspected malicious extension you want to remove and then click on the gear icon.
5. Remove the malicious extension by scrolling down and then clicking on Uninstall.
Step 3: Clean any registries, created by on your computer.
The usually targeted registries of Windows machines are the following:
- HKEY_LOCAL_MACHINE\Software\Microsoft\Windows\CurrentVersion\Run
- HKEY_CURRENT_USER\Software\Microsoft\Windows\CurrentVersion\Run
- HKEY_LOCAL_MACHINE\Software\Microsoft\Windows\CurrentVersion\RunOnce
- HKEY_CURRENT_USER\Software\Microsoft\Windows\CurrentVersion\RunOnce
You can access them by opening the Windows registry editor and deleting any values, created by there. This can happen by following the steps underneath:


Before starting “Step 4”, please boot back into Normal mode, in case you are currently in Safe Mode.
This will enable you to install and use SpyHunter 5 successfully.
Step 4: Scan for with SpyHunter Anti-Malware Tool


Ventsislav Krastev
Ventsislav has been covering the latest malware, software and newest tech developments at SensorsTechForum for 3 years now. He started out as a network administrator. Having graduated Marketing as well, Ventsislav also has passion for discovery of new shifts and innovations in cybersecurity that become game changers. After studying Value Chain Management and then Network Administration, he found his passion within cybersecrurity and is a strong believer in basic education of every user towards online safety.
Preparation Phase:
Before starting to follow the steps below, be advised that you should first do the following preparations:
- Backup your files in case the worst happens.
- Make sure to have a device with these instructions on standy.
- Arm yourself with patience.
Step 1: Uninstall and remove related files and objects
1. Hit the ⇧+⌘+U keys to open Utilities. Another way is to click on “Go” and then click “Utilities”, like the image below shows:
- Go to Finder.
- In the search bar type the name of the app that you want to remove.
- Above the search bar change the two drop down menus to “System Files” and “Are Included” so that you can see all of the files associated with the application you want to remove. Bear in mind that some of the files may not be related to the app so be very careful which files you delete.
- If all of the files are related, hold the ⌘+A buttons to select them and then drive them to “Trash”.
In case you cannot remove via Step 1 above:
In case you cannot find the virus files and objects in your Applications or other places we have shown above, you can manually look for them in the Libraries of your Mac. But before doing this, please read the disclaimer below:
You can repeat the same procedure with the following other Library directories:
→ ~/Library/LaunchAgents
/Library/LaunchDaemons
Tip: ~ is there on purpose, because it leads to more LaunchAgents.
Step 2: Remove – related extensions from your Mac’s browsers


Step 3: Scan for and remove files from your Mac
When you are facing problems on your Mac as a result of unwanted scripts and programs such as , the recommended way of eliminating the threat is by using an anti-malware program. Combo Cleaner offers advanced security features along with other modules that will improve your Mac’s security and protect it in the future.


Ventsislav Krastev
Ventsislav has been covering the latest malware, software and newest tech developments at SensorsTechForum for 3 years now. He started out as a network administrator. Having graduated Marketing as well, Ventsislav also has passion for discovery of new shifts and innovations in cybersecurity that become game changers. After studying Value Chain Management and then Network Administration, he found his passion within cybersecrurity and is a strong believer in basic education of every user towards online safety.