
Today is one of those days when your computing doesn’t work as fine as usual. After starting your Mac you have encountered an extremely disturbing pop-up message that alerts you the following – “Your startup disk is almost full”
You probably get that feeling that this is not cool. Don’t worry we prepared this guide to reveal all important details about this disturbing issue as well as several fixes that are proved to be efficient against it.
What Is a Startup Disk?
Let’s start by explaining the main term in this Mac error message. The startup disk is the hard drive that stores the operating system. Hence, it is the most important disk of all. So in the event that you encounter a pop-up that alerts “Your startup disk is almost full”, it basically means that your primary disk drive is running out of space which is very bad news.
What Does the “Startup Disk Full” Mac Error Mean?
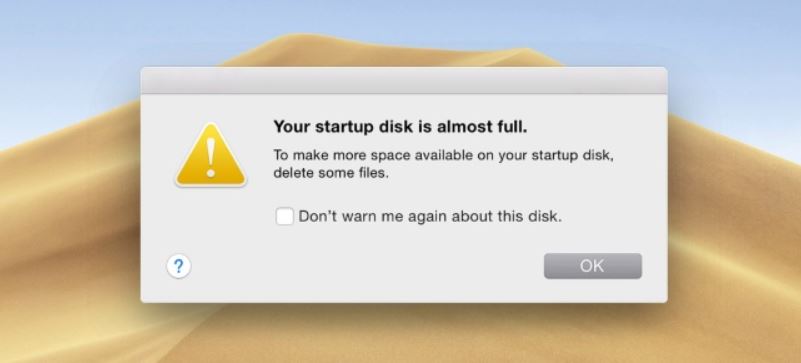
The meaning of this message should be understood literally. What does the full error message say when it pop-ups on Mac? Here is a copy of its text:
Your startup disk is almost full.
To make more space available on your startup disk, delete some files.
Don’t warn me again about this disk.
OK
The “Your startup disk is almost full” message means exactly what it says. Your startup disk is running out of storage and you should definitely not ignore this message. Otherwise, you may end up having even more serious issues that prevent you from using your Mac.
This error message often appears due to the fact that you are having too many files that occupy your Mac’s hard drive. This, in turn, brings the free disk space to a dangerously low level. As a result, you may not be able to start your computer or it may become sluggish due to lack of enough operative space for the operating system.
How Do I Fix and Remove “Your startup disk is almost full” Error on Mac?
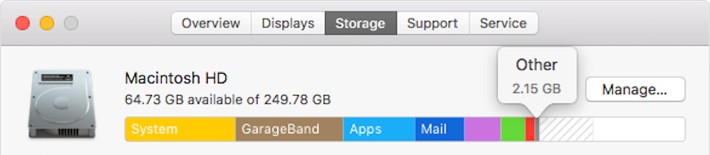
First, you need to discover what is taking up all the space on your startup disk drive. To see how your space is being used follow these steps:
- Click on the Apple Icon.
- Select About This Mac.

- Click Storage (or More Info).
The Storage tab will show you a graphical display of all main categories files that are stored on your drive as well as exact information about the memory size different categories took on the drive. This information may help you to determine where to start the disk cleanup process.
To remove “Your startup disk is almost full” error on Mac you should delete some files and increase the amount of free space available for your system. The options for you are the following:
- 1. Remove some files manually
2. Use a special app to find unneeded files and clean up startup disk
3. Upload some of the biggest files to the could or a backup disk and remove them from the startup disk
Remove “Startup disk is almost full” Manually
Oftentimes, the biggest space eaters are the files contained in the category “Other”. Files there are usually caches, archives, logs, disk images, plugins, cookies, extensions and so on.
The manual process will take some time. You should be very careful while completing the manual steps because, in the event that you inadvertently delete a file that is essential for the proper operation of your system, it may crash. If you don’t feel comfortable with the manual process of fixing “Your startup disk is almost full” error, then navigate to the automatic approach.
Delete Unnecessary Apps
Probably some of the apps you installed on your Mac are no longer of use to you. Go find these apps and delete them. We recommend that you perform a complete uninstall process instead of just moving the unused apps to the Trash. Surely, the second approach will save some space and time but the first guarantees that all storage used by these apps will be cleared.
Delete Old iOS Backups
If you have the practice to back up your iPhone or iPad using iTunes on your Mac, then you may have lots of old backups that are taking storage on your startup disk. To clean all old and unnecessary backups go to iTunes and navigate to preferences. You will see all the old backups that are stored on your machine. Select and delete all older backups you don’t need. Make sure to keep the most recent one as it is still essential to have reserve copies of all files and settings on Mac. One never knows what will come next.
Lots of nasty unwanted applications are lurking on the web. A recent example is the Calendar Mac/iPhone Virus Notification type of threats. They hijack users’ devices and flood Calendar apps with intrusive annoying notifications. Sometimes the only way to get rid of such annoying apps is to reset the whole system. In such an event you will definitely need a recent backup that will restore saved data in a matter of minutes.
Clean Up Your Downloads Folder
Which is your default Download folder? Find it and make sure to revise all files stored there. The Download folder contains all files which we download from the Internet. Here’s why it can become extremely large in size over time. Cleaning up all files you downloaded from various websites and never used afterward can return some critical space for your operating system.
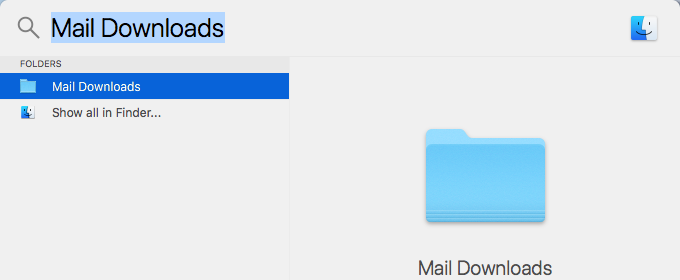
Get Rid of Mail Downloads
Do you know that whenever you view an email attachment, your macOS Mail app saves a copy of this attachment in a separate folder? Well, now is the time to find that folder and clean data stored in it to get rid of that nasty “Your startup disk is almost full” Mac error. Go to the Spotlight and search for Mail Downloads. You may be surprised how much data has been added there.
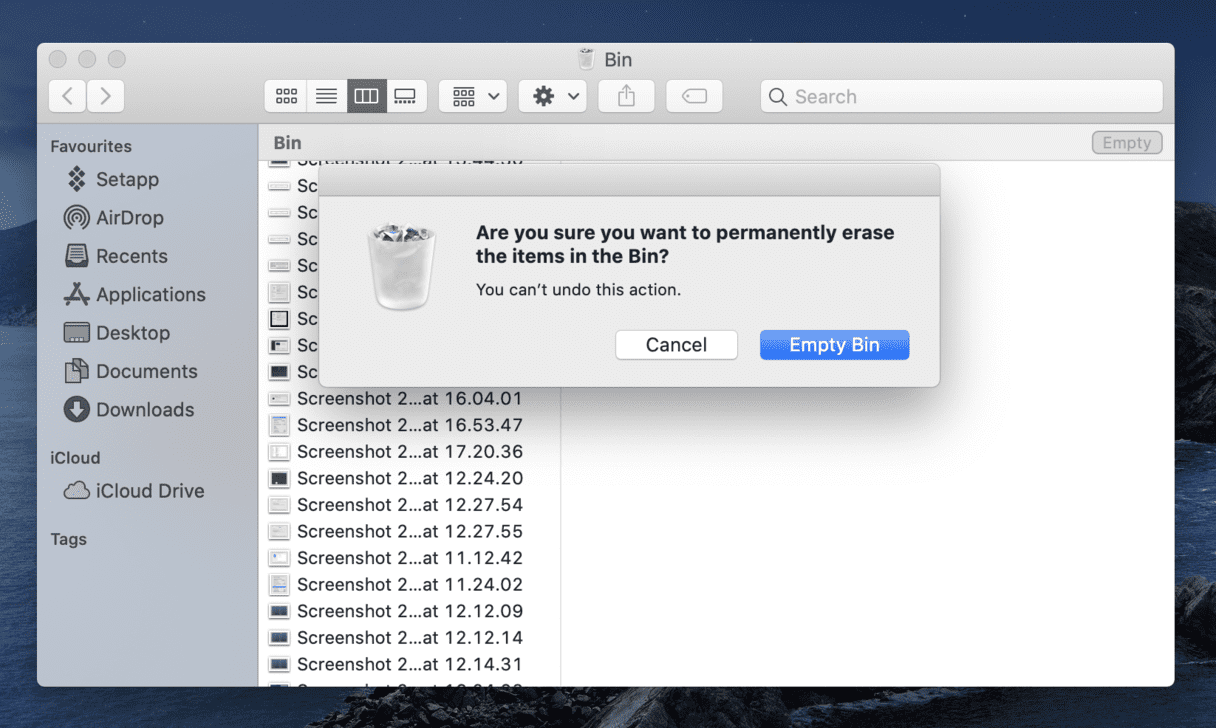
Empty Trash
Finally, it is time to open your Trash and clean everything you added there. Since it often takes lots of disk space you should regularly empty it. So, go clean your Trash now and free some space on the startup disk.
Remove “Startup disk is almost full” Automatically
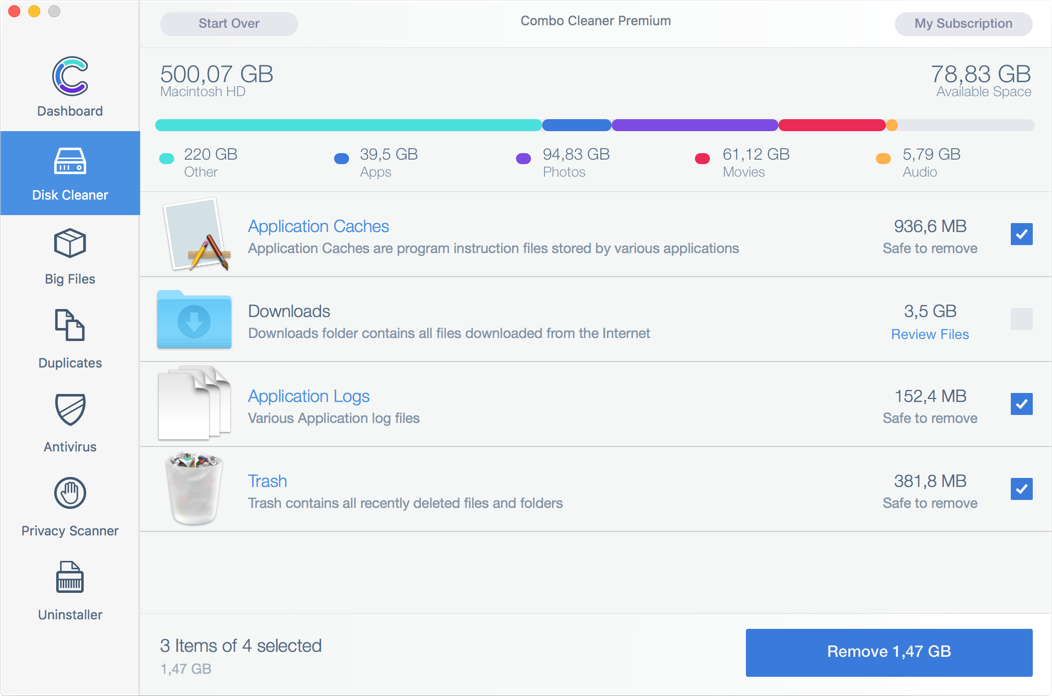
Checking various locations on your Mac including the home, Apps, Trash, Downloads, etc. for unnecessary files or apps is a time-consuming process for sure. The good news is that there is a much faster way to reduce the amount of storage on your startup disk. By using the help of an advanced anti-malware tool with an integrated Disk Cleaner feature you can perform a disk cleanup process just in a few minutes. With only one click you will clean application caches, downloads, application logs, trash, and other obsolete files and regain valuable disk space.
→ Combo Cleaner offers advanced security features along with other modules that will improve your Mac’s security and protect it from viruses in the future.
After you download and install the program, open it on your Mac and navigate to its Disk Cleaner tab. There you will find all the unnecessary items. Mark all different types of files you want to remove and click the Remove button to get rid of them.
With the help of the presented steps, you should fix the troublesome “Your startup disk is almost full” error message on Mac. If you don’t you risk that next time you power on your Mac, it won’t start at all.
Gergana Ivanova
Highly motivated writer with 5+ years of experience writing for ransomware, malware, adware, PUPs, and other cybersecurity-related issues. As a writer, I strive to create content that is based on thorough technical research. I find joy in the process of creating articles that are easy to understand, informative, and useful. Follow me on Twitter (@IRGergana) for the latest in the field of computer, mobile, and online security.
Follow Me:
Steps to Prepare Before Removal:
Before starting to follow the steps below, be advised that you should first do the following preparations:
- Backup your files in case the worst happens.
- Make sure to have a device with these instructions on standy.
- Arm yourself with patience.
- 1. Scan for Mac Malware
- 2. Uninstall Risky Apps
- 3. Clean Your Browsers
Step 1: Scan for and remove files from your Mac
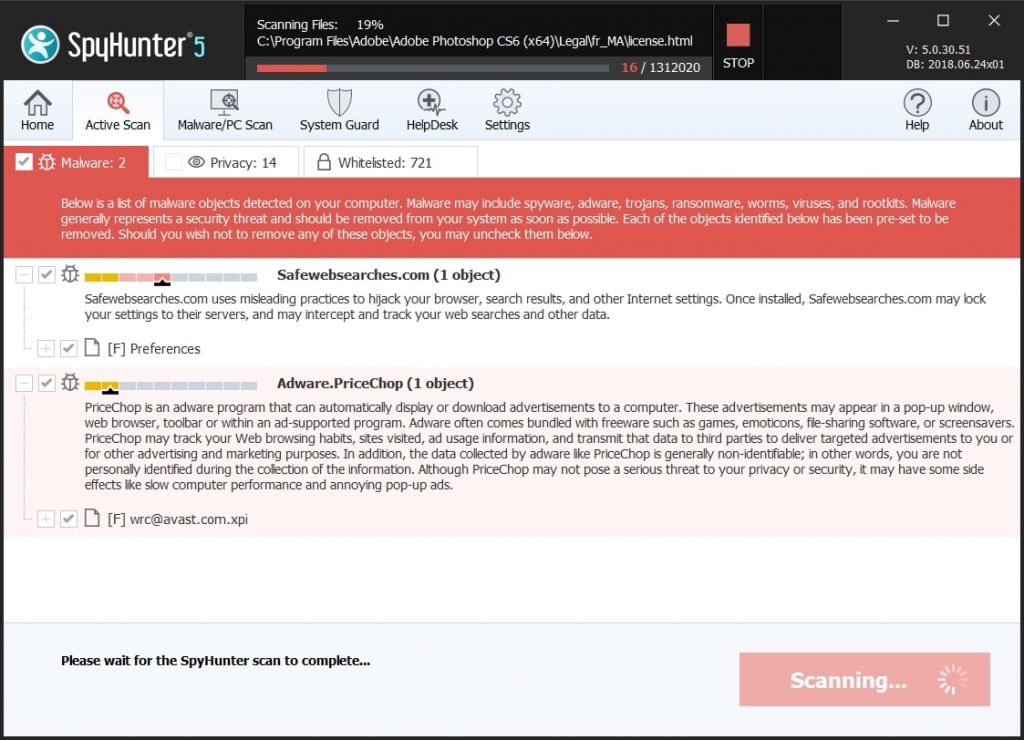
When you are facing problems on your Mac as a result of unwanted scripts and programs such as , the recommended way of eliminating the threat is by using an anti-malware program. SpyHunter for Mac offers advanced security features along with other modules that will improve your Mac’s security and protect it in the future.
Quick and Easy Mac Malware Video Removal Guide
Bonus Step: How to Make Your Mac Run Faster?
Mac machines maintain probably the fastest operating system out there. Still, Macs do become slow and sluggish sometimes. The video guide below examines all of the possible problems that may lead to your Mac being slower than usual as well as all of the steps that can help you to speed up your Mac.
Step 2: Uninstall and remove related files and objects
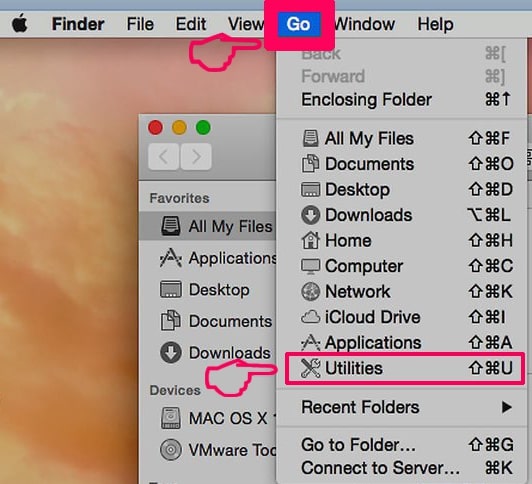
1. Hit the ⇧+⌘+U keys to open Utilities. Another way is to click on “Go” and then click “Utilities”, like the image below shows:
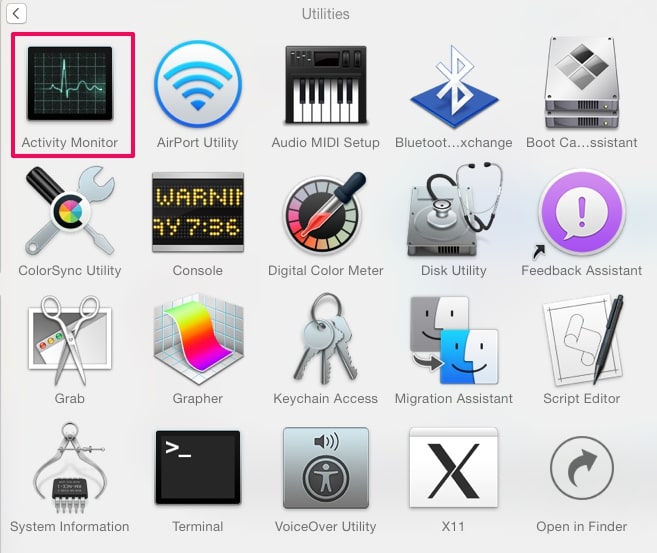
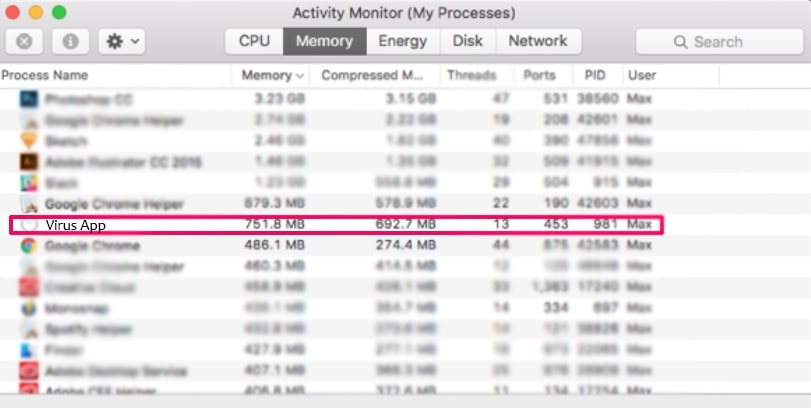
2. Find Activity Monitor and double-click it:
3. In the Activity Monitor look for any suspicious processes, belonging or related to :

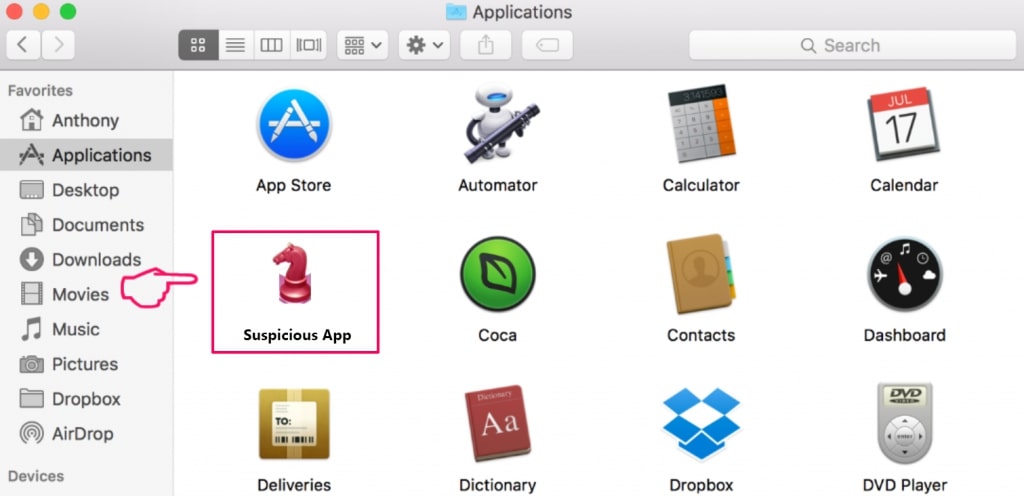
4. Click on the "Go" button again, but this time select Applications. Another way is with the ⇧+⌘+A buttons.
5. In the Applications menu, look for any suspicious app or an app with a name, similar or identical to . If you find it, right-click on the app and select “Move to Trash”.
6. Select Accounts, after which click on the Login Items preference. Your Mac will then show you a list of items that start automatically when you log in. Look for any suspicious apps identical or similar to . Check the app you want to stop from running automatically and then select on the Minus (“-“) icon to hide it.
7. Remove any leftover files that might be related to this threat manually by following the sub-steps below:
- Go to Finder.
- In the search bar type the name of the app that you want to remove.
- Above the search bar change the two drop down menus to “System Files” and “Are Included” so that you can see all of the files associated with the application you want to remove. Bear in mind that some of the files may not be related to the app so be very careful which files you delete.
- If all of the files are related, hold the ⌘+A buttons to select them and then drive them to “Trash”.
In case you cannot remove via Step 1 above:
In case you cannot find the virus files and objects in your Applications or other places we have shown above, you can manually look for them in the Libraries of your Mac. But before doing this, please read the disclaimer below:
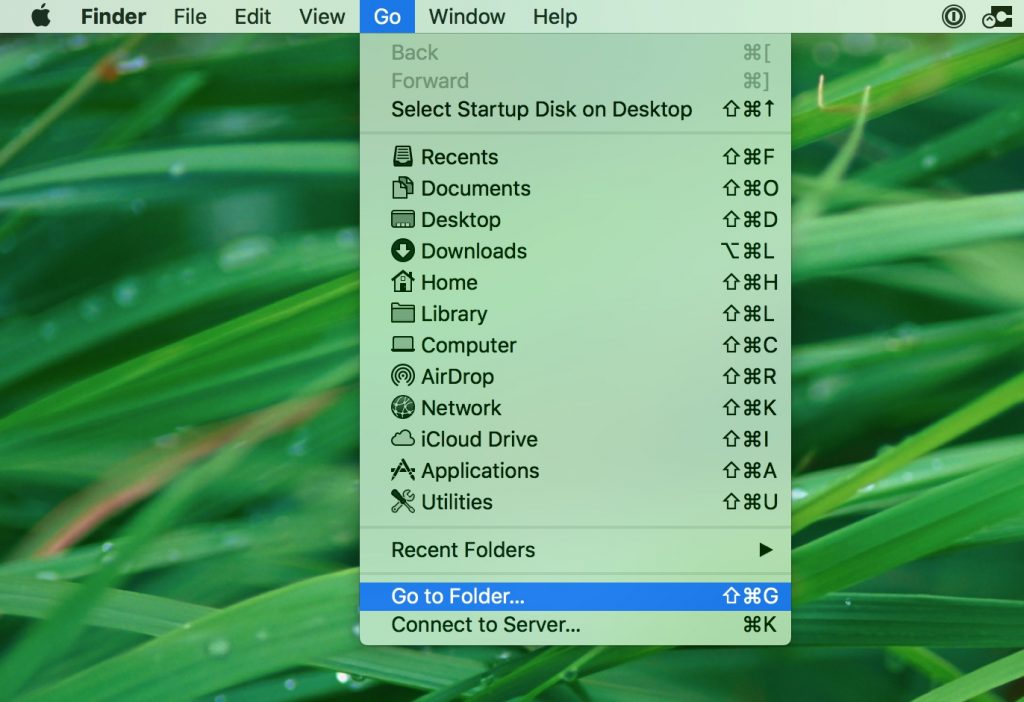
1. Click on "Go" and Then "Go to Folder" as shown underneath:
2. Type in "/Library/LauchAgents/" and click Ok:
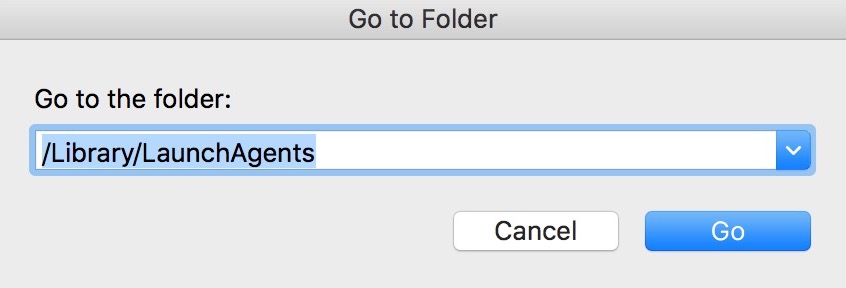
3. Delete all of the virus files that have similar or the same name as . If you believe there is no such file, do not delete anything.
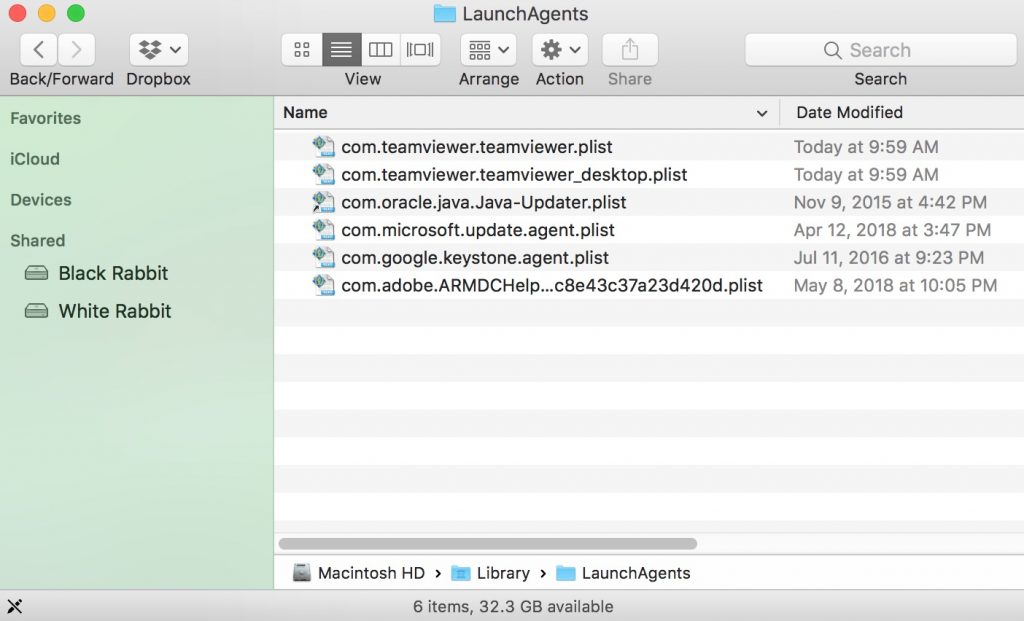
You can repeat the same procedure with the following other Library directories:
→ ~/Library/LaunchAgents
/Library/LaunchDaemons
Tip: ~ is there on purpose, because it leads to more LaunchAgents.
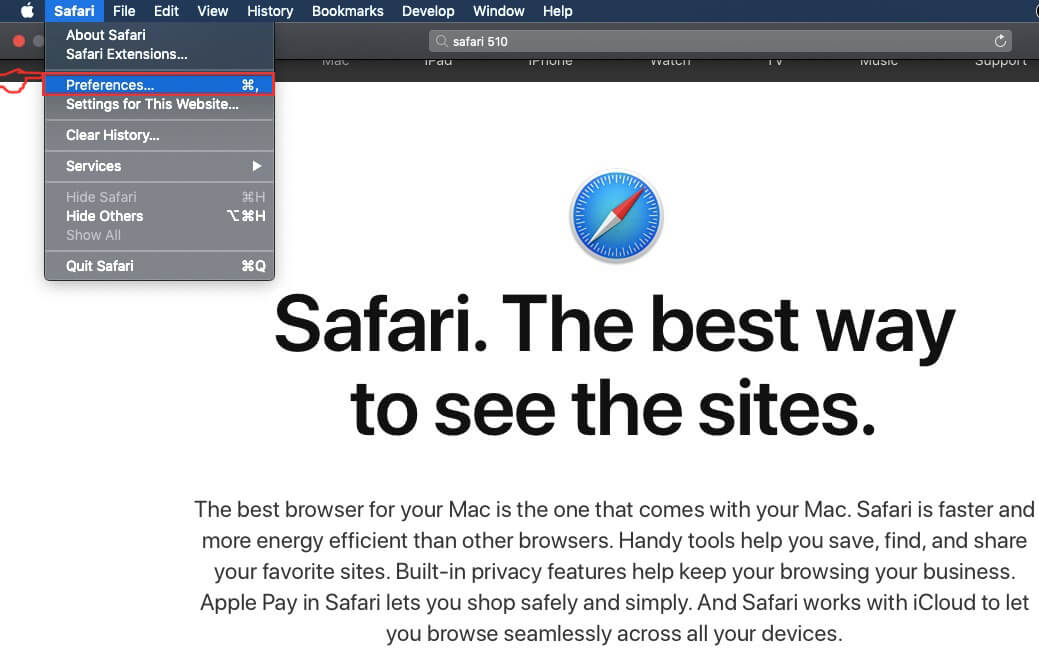
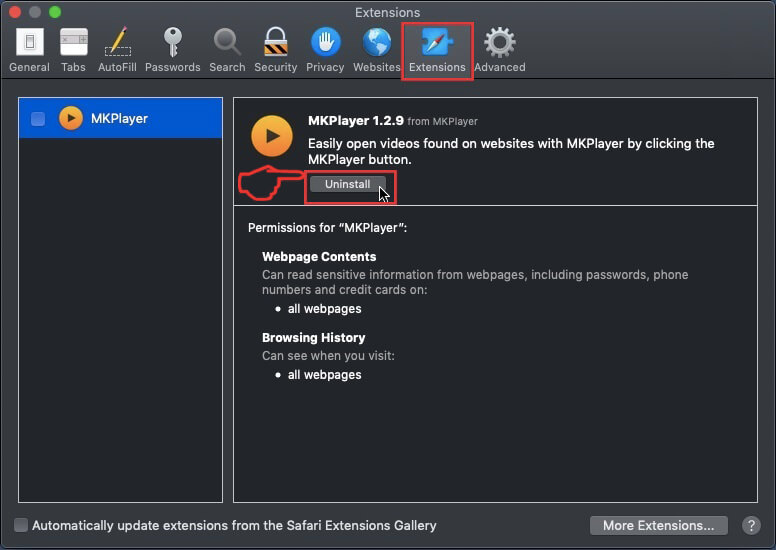
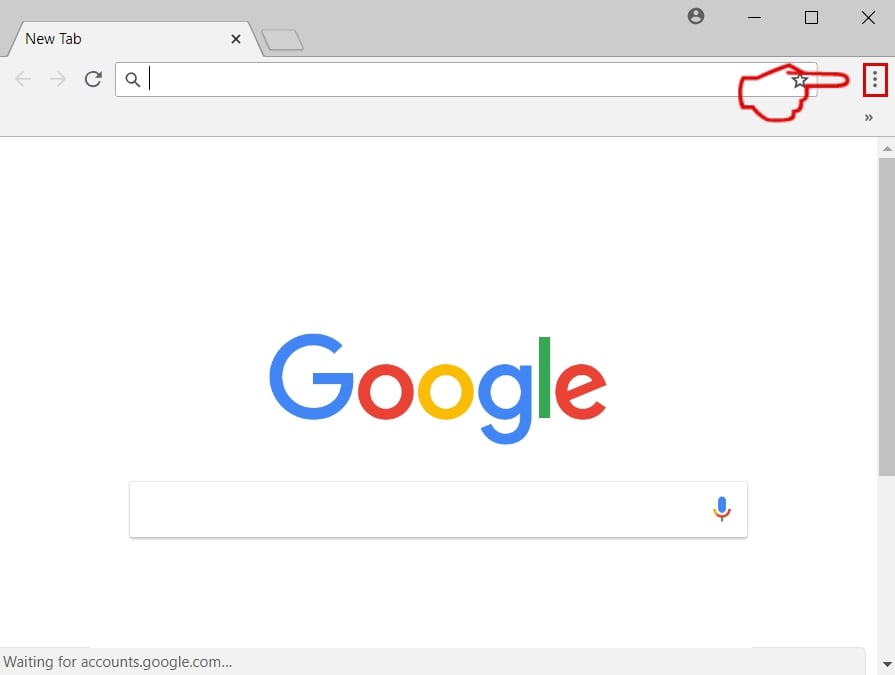
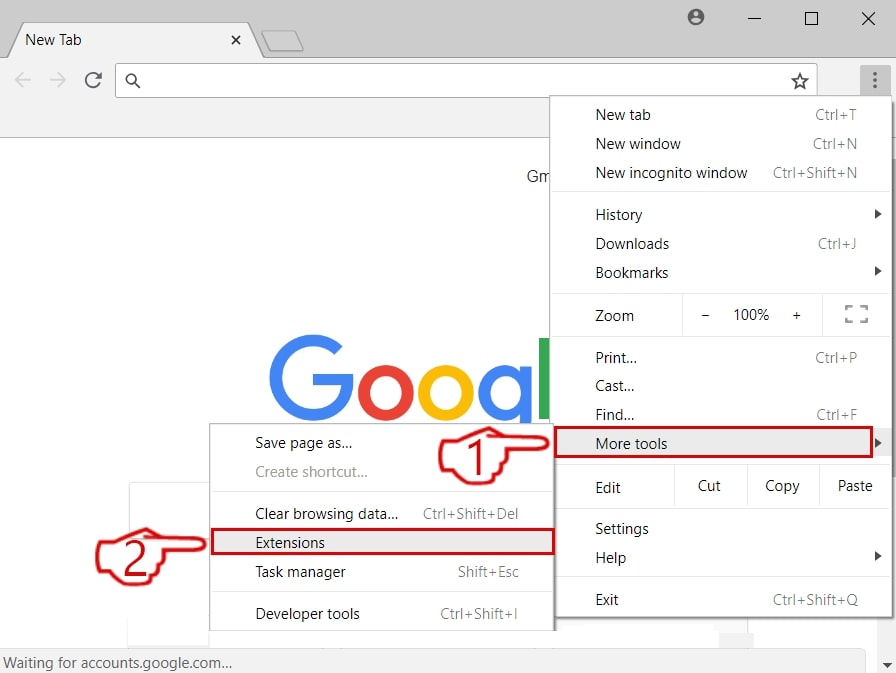
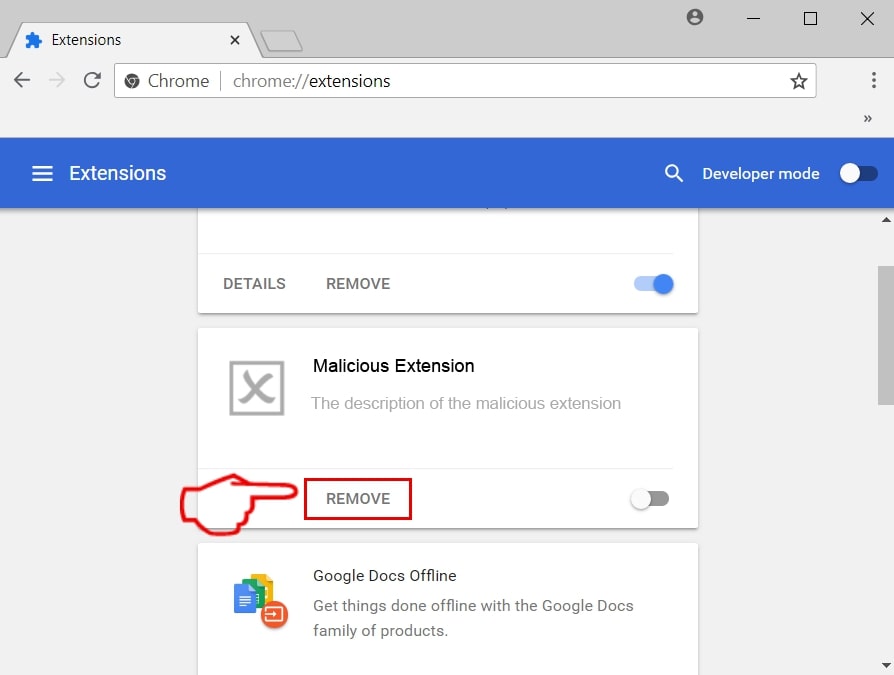
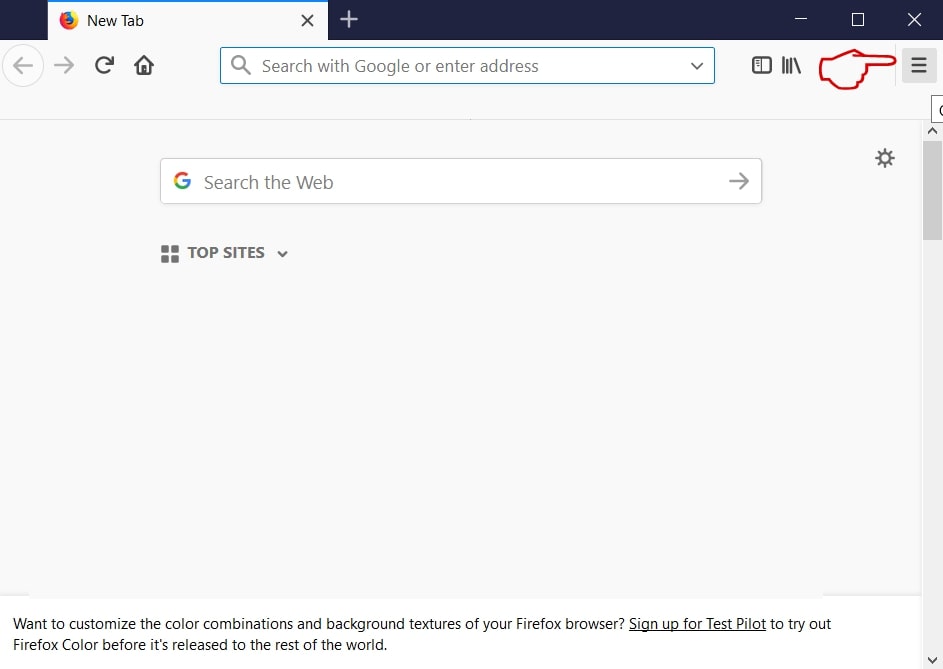
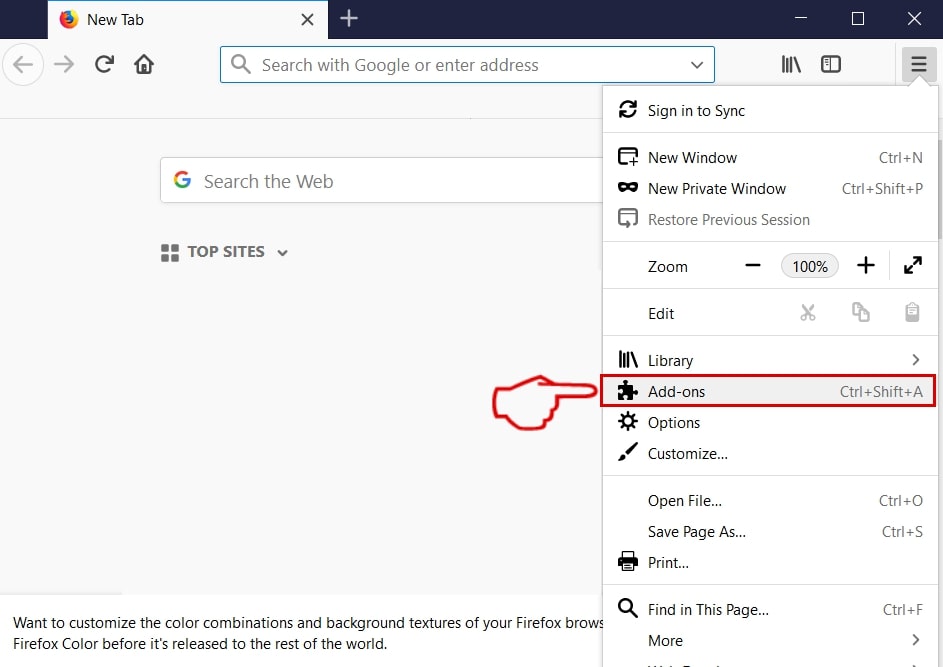
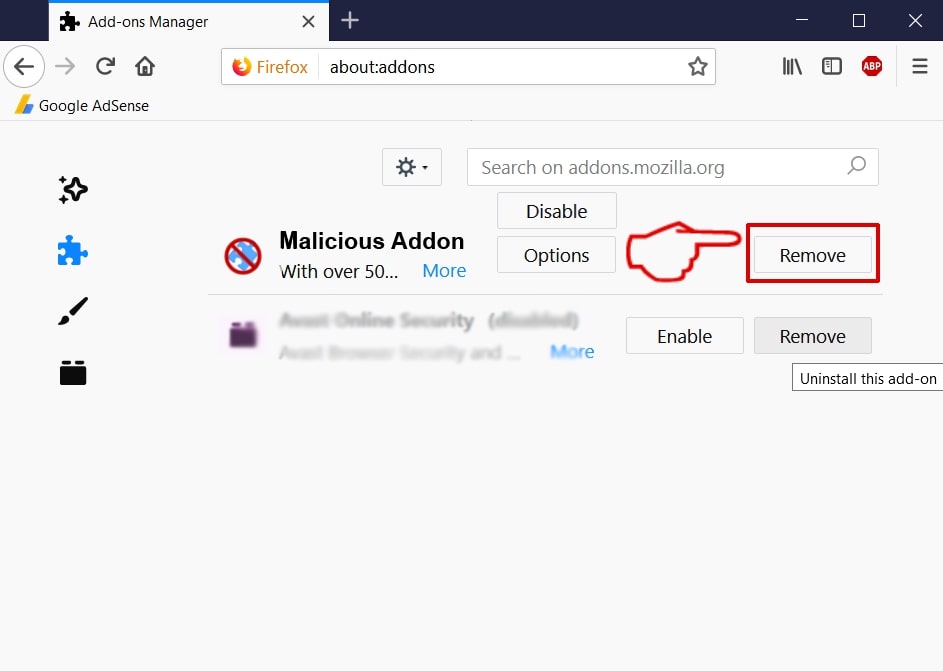
Step 3: Remove – related extensions from Safari / Chrome / Firefox

-FAQ
What is on your Mac?
The threat is probably a potentially unwanted app. There is also a chance it could be related to Mac malware. If so, such apps tend to slow your Mac down significantly and display advertisements. They could also use cookies and other trackers to obtain browsing information from the installed web browsers on your Mac.
Can Macs Get Viruses?
Yes. As much as any other device, Apple computers do get malware. Apple devices may not be a frequent target by malware authors, but rest assured that almost all of the Apple devices can become infected with a threat.
What Types of Mac Threats Are There?
According to most malware researchers and cyber-security experts, the types of threats that can currently infect your Mac can be rogue antivirus programs, adware or hijackers (PUPs), Trojan horses, ransomware and crypto-miner malware.
What To Do If I Have a Mac Virus, Like ?
Do not panic! You can easily get rid of most Mac threats by firstly isolating them and then removing them. One recommended way to do that is by using a reputable malware removal software that can take care of the removal automatically for you.
There are many Mac anti-malware apps out there that you can choose from. SpyHunter for Mac is one of the reccomended Mac anti-malware apps, that can scan for free and detect any viruses. This saves time for manual removal that you would otherwise have to do.
How to Secure My Data from ?
With few simple actions. First and foremost, it is imperative that you follow these steps:
Step 1: Find a safe computer and connect it to another network, not the one that your Mac was infected in.
Step 2: Change all of your passwords, starting from your e-mail passwords.
Step 3: Enable two-factor authentication for protection of your important accounts.
Step 4: Call your bank to change your credit card details (secret code, etc.) if you have saved your credit card for online shopping or have done online activiites with your card.
Step 5: Make sure to call your ISP (Internet provider or carrier) and ask them to change your IP address.
Step 6: Change your Wi-Fi password.
Step 7: (Optional): Make sure to scan all of the devices connected to your network for viruses and repeat these steps for them if they are affected.
Step 8: Install anti-malware software with real-time protection on every device you have.
Step 9: Try not to download software from sites you know nothing about and stay away from low-reputation websites in general.
If you follow these reccomendations, your network and Apple devices will become significantly more safe against any threats or information invasive software and be virus free and protected in the future too.
More tips you can find on our MacOS Virus section, where you can also ask any questions and comment about your Mac problems.
About the Research
The content we publish on SensorsTechForum.com, this how-to removal guide included, is the outcome of extensive research, hard work and our team’s devotion to help you remove the specific macOS issue.
How did we conduct the research on ?
Please note that our research is based on an independent investigation. We are in contact with independent security researchers, thanks to which we receive daily updates on the latest malware definitions, including the various types of Mac threats, especially adware and potentially unwanted apps (PUAs).
Furthermore, the research behind the threat is backed with VirusTotal.
To better understand the threat posed by Mac malware, please refer to the following articles which provide knowledgeable details.