 This article aims to show you how to optimize Windows and make it lighter on your computer to improve performance and boot up times.
There are many tutorials out there that offer different tools and different instructions out there for optimizing the world’s most notorious operating system – Windows. Many users are looking for those, since sometimes, some machines feel under-powered or are cramped up with software which makes multitasking difficult, because of slowing down of the system. This is what pushed us into researching the full capabilities of what can universally be done to all Windows versions since Windows 7 to improve the working process and make your life easier. Of course, there is some sacrifice to be made, but for a good reason – speed. Let’s Begin!

Optimizing A PC from Windows Settings
There are many general Windows settings that can be used to optimize your computer, and make it take up less memory from your system. But for this to happen, you need to know several things about your computer:
- Which applications are important for you and should be allowed to run in the background.
- Which graphic Windows features do you use and like (fonts, aero peek, etc.).
- What type of files can you remove from the System Drive (usually C: )
- Do you use automated services, such as automatic update, for example.
The first thing that can be done to improve Windows OS’s performance is to optimize it graphically. This action will significantly reduce the usage of both the CPU and the graphics processor of your computer. Here is how to do it:
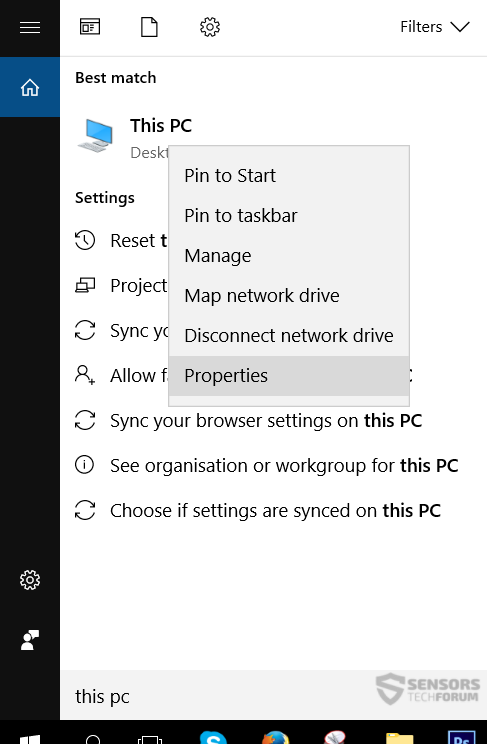
1) Go to My Computer (For newer Windows versions it is called “This PC”), right click it and then click on Properties:
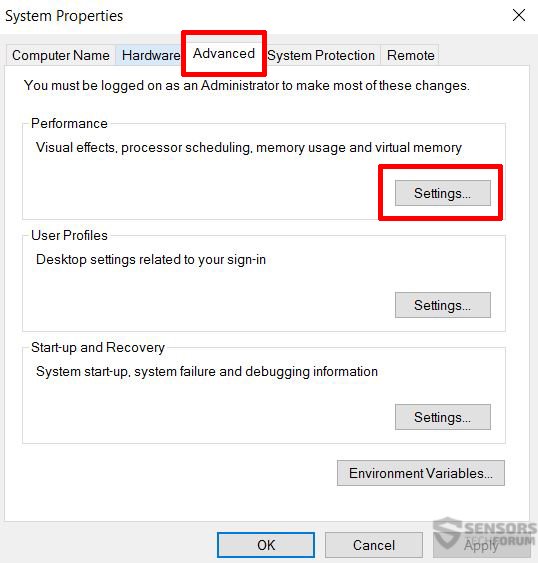
2) From there, you will locate a highlighted text with a shield icon next to it, named Change Settings. Use the picture below for reference and click on the text to open the System Propertiess menu:
3) From the System Properties menu, go over at the Advanced tab and locate the “Settings” button under the Performance box, after which click on it:
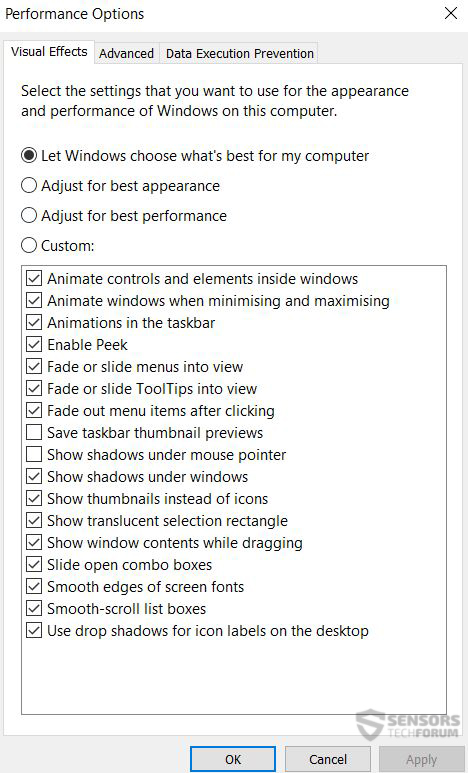
4) If you have done all of this correctly, you should see the screen below. From it you can select and deselect certain Windows performance features. There is also the option to adjust them for best performance or best quality. If you do not mind on how the text will appear or that the photos of your PC will be hidden within a folder, and you won’t be able to peek them before opening them, simply select “Adjust for best performance” which deselects all. If you like certain Windows features, you can go ahead and enable them one by one by ticking them from the menu. After you have made your selection, Apply and Ok everything and you are all set.

Speeding Up Loading Times By Turning off Background Services and Apps
Now you know how to optimize Windows’s graphic features. However, it is also time to think about the background applications that are taking up from your computer’s CPU, RAM and GPU. First, we will focus on the boot applications that run when you turn on your computer. Let’s begin!
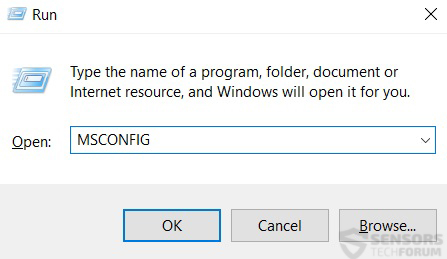
1) Press Windows Button + R key on your keyboard. This will open the Run box. In it type – MSCONFIG and click OK. Use the image below for reference.
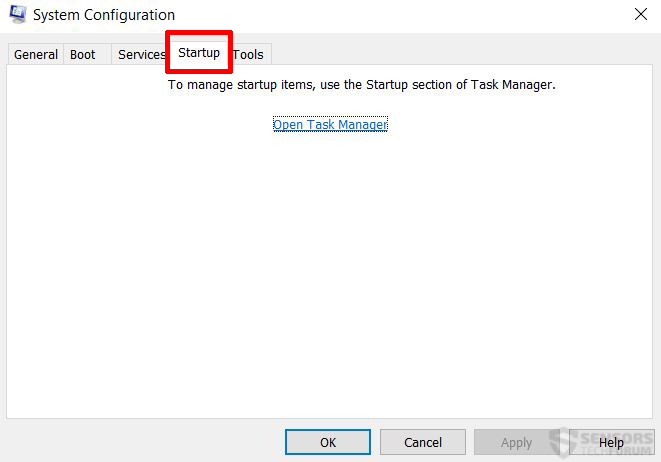
2) After having opened the System Configuration menu, you should click on the Startup Tab. For older Windows versions, you will see the tick boxes directly. For newer Windows versions, like 10, you will be asked to open the new version of Task Manager. Which also has a startup tab.
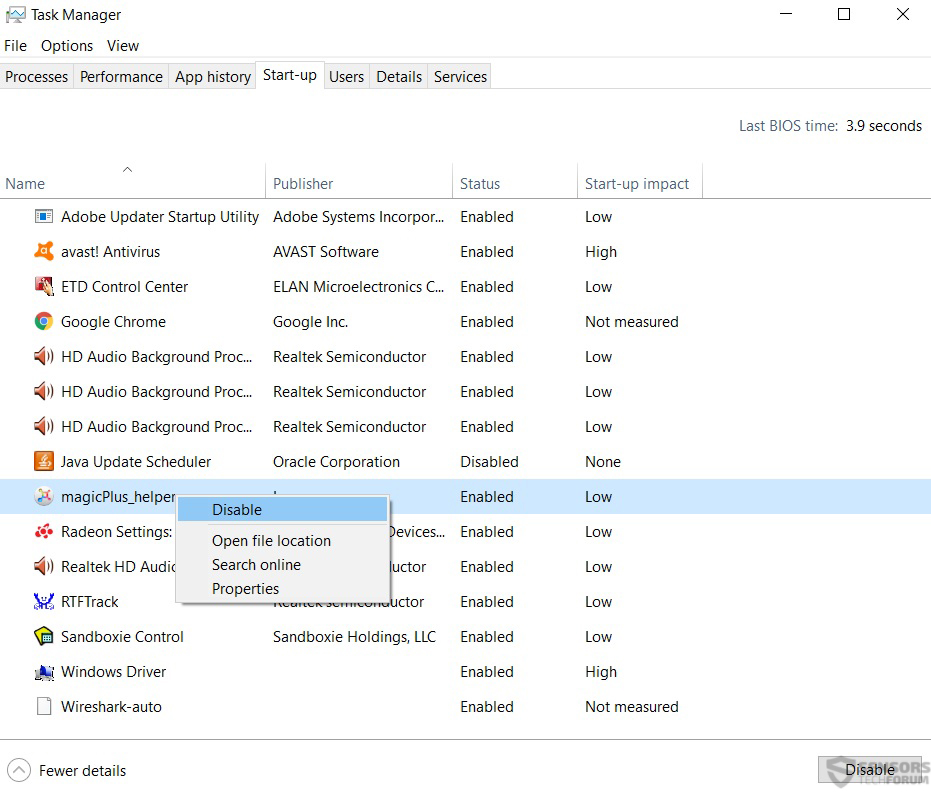
3) From there you will be able to disable all applications that you do not want to run when your PC starts. You can disable an app, by marking it with your mouse and clicking on the “Disable” button or simply right-clicking it and clicking Disable from the drop-down menu. It is important to disable only the applications that are not important for you. For example, the audio drivers are important, but some Apps that you barely use and do not want to see pop-ups from should be disabled to not run on startup.
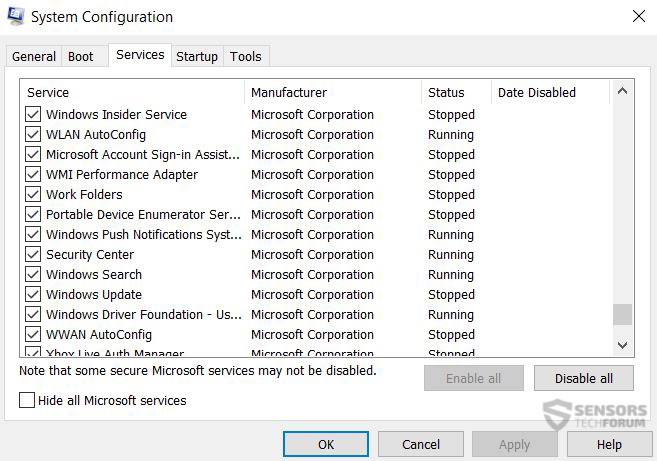
After you have disabled any programs you don’t want running on startup, it is time to go back to the System Configuration window. Type again “MSCONFIG” in the Run window and from the menu, this time, look for Services:
You can disable a service by simply unticking it. But, it is very important to proceed with caution, because if you disable the wrong service, you may break Windows and prevent it from running properly or at all (worst case). However, do not be scared, we have got you covered. Thanks to experts at the website OptimizingPC.com, here is a list of Windows services with their explanations below:
List of Windows Services That Can Be Disabled for Performance
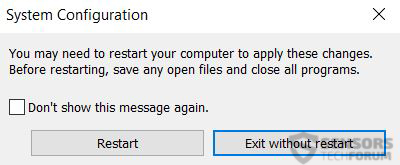
Read every service carefully and take your time, you don’t want to rush this. If you feel uncertain, back up your important data on a flash drive. After you have completed the disabling procedure, simply click on Apply and then OK. The system will ask you to restart your computer, but if you have work going on, you can exit without restarting as well and reset your PC later on:

Optimize How Your Disk Runs
In case you do not have the ability to purchase an SSD drive for your computer, to make it run smoother and faster, there is a way that you can improve your Hard Drive. This is achievable by running the Disk Cleanup and Disk Defragmenter options. These options are both available from the tutorial below. Here is how to run them.
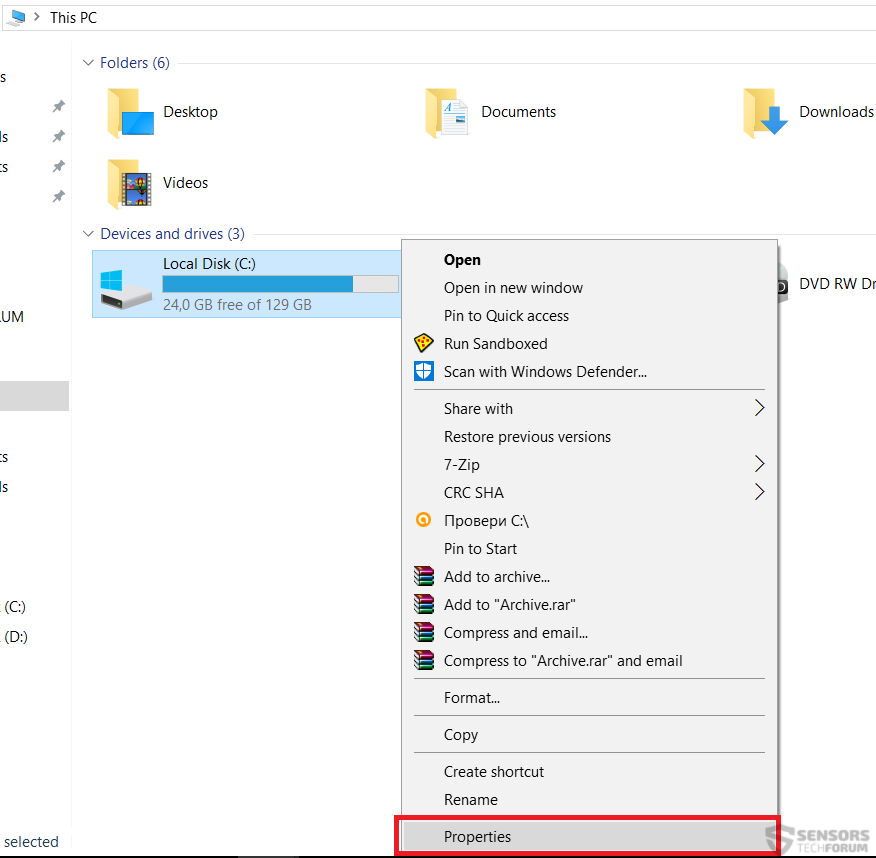
1) Go to “My Computer” or “This PC” and right click on your hard drive, after which click on Properties:
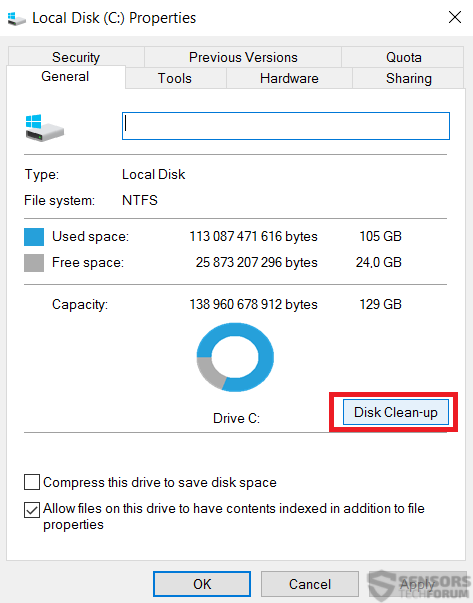
2) After this, go to the Disk Clean-Up by clicking on the button as shown below:
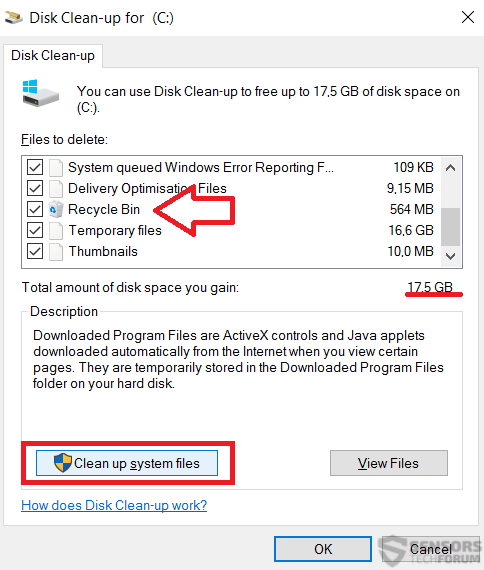
3) The disk clean up will load until It calculates how much unnecessary files you have on your computer. After this the menu below will be displayed to you. Before selecting all the tick boxes, make sure you have all your accounts and account passwords remembered on your computer. Then, you can tick them and proceed with the clean-up by clicking on the button in the red frame as shown in the picture below:
The clean up process may take some time, depending on how powerful your computer is.
After this has completed, it is time to Defragment your hard drive. In case you do not know what drive defragmentation is, be advised that it is basically a process which is similar to “arranging” the files and memory chunks of your drive to optimize them and make them run faster. This results in improved opening of applications and better performance during multitasking. It will also free up some of the RAM on your PC. Here is how to defragment your hard drive.
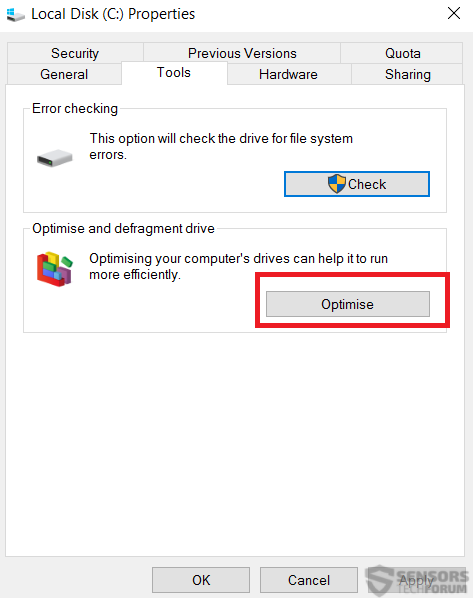
1) Click on “Properties” of your local disk with Windows in it and then go to the “Tools” tab, There, you will be able to locate Disk Defragmenter. To optimize your Disk, click on the button next to it as shown below:
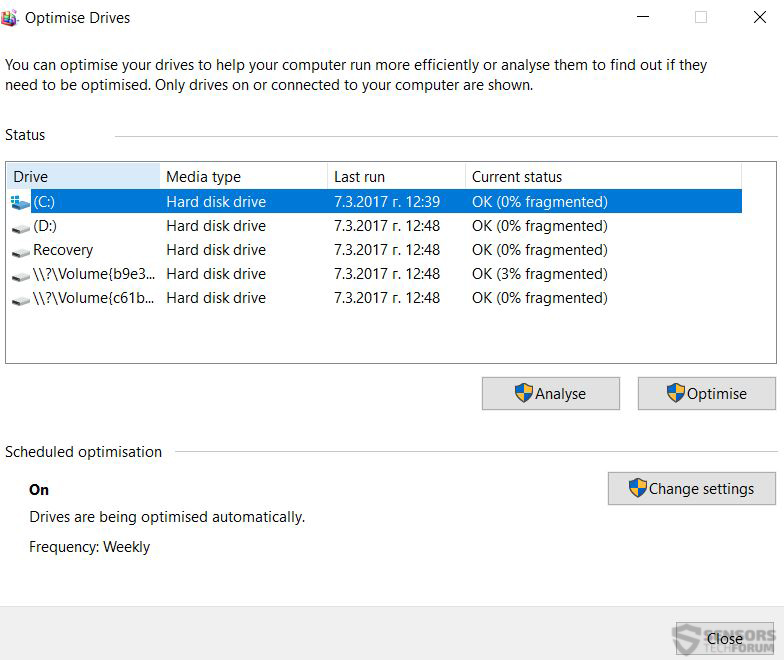
2) From the Window which will open, simply mark the drive you want optimized and click on the “Optimise” button. For older Windows versions it should be a “Defragment” button. Confirm any prompts and simply wait for the drive to be optimized. This is a bit more lengthy process, so we suggest you arm yourself with patience.

Uninstall Unwanted Programs to Speed Up Your PC and Clean Up Junk Files
How many programs you have on your computer, that you no longer use? How many junk files that you have no use of? This is the easy to learn but difficult part, because you have to manually uninstall programs and unwanted files from your computer to further free up it’s hard drive. Here is how to uninstall apps:
1) Open the Run window (Windows button +R) and In it type – APPWIZ.CPL
2) Select the programs you are not using by marking them with a single click and click on uninstall. Then go through the uninstall process.
Pic

Delete Unused Fonts to Improve Boot-Up Speed
Usually, Windows slows down the computer, not only by loading services on startup, but fonts as well. Since you may not necessarily use all of your system fonts, we recommend selecting those that are completely useless to you and deleting them to make your Windows machine start up much faster. To do this, follow the steps below.
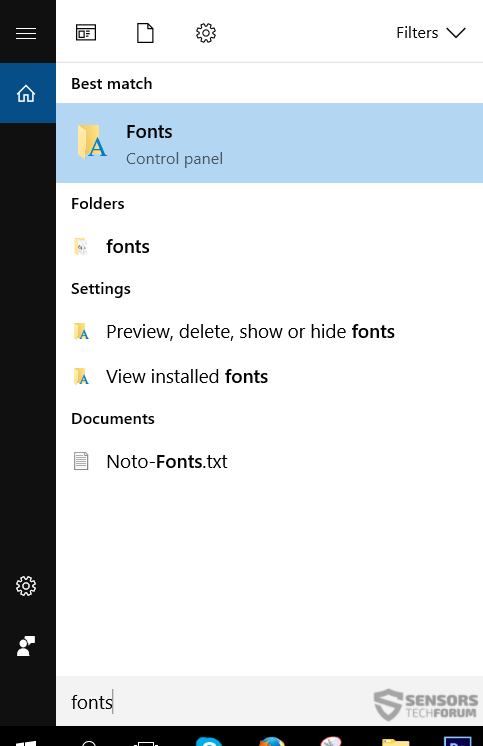
1) Go to the Search bar and type “fonts” after which open it. If it doesn’t show, you can locate the Fonts menu in Windows Control Panel:
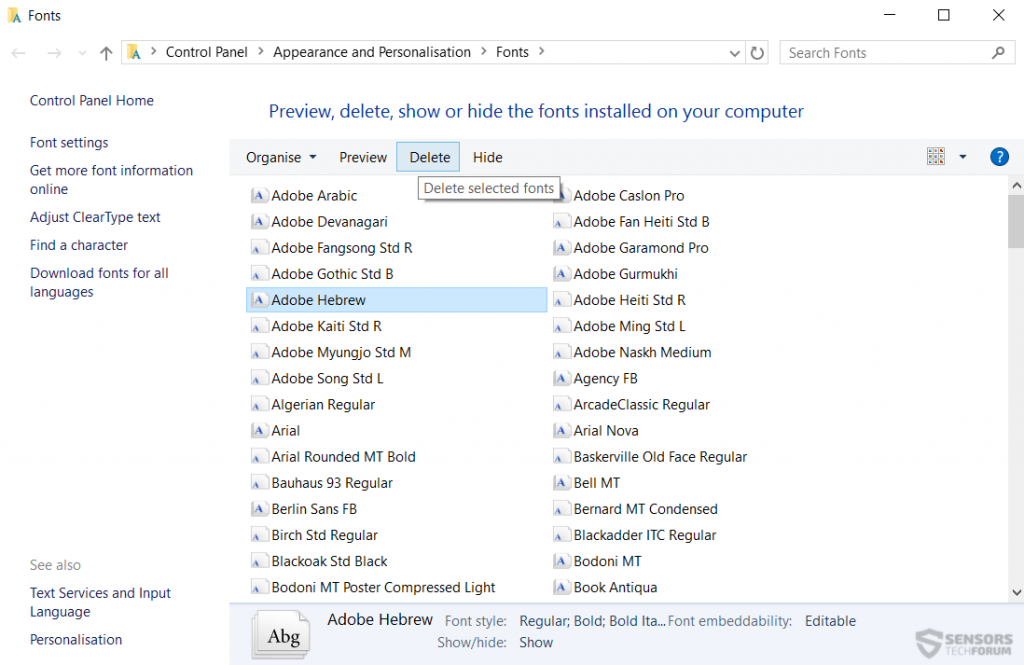
2) From the Fonts menu, you can select the fonts you are not necessarily using by single clicking on them and then delete them by clicking on the delete button. If you want to delete several fonts at once, simply hold the CTRL button and then while holding it, click on the fonts you will not be required to use soon.

Clean the Dirty Hardware of Your PC
Sometimes, Windows can also be optimized by cleaning out the hardware of it. But for this, you will require a screwdriver to unscrew all the screws and access the PC components and a towel or an anti-static paper which will help remove the dust from the components of your computer. Specific oil for PC’s can also be used to smooth the movement of the heat cooling fans which usually cool the CPU and the GPU if it is a powerful video processor.

How to Make and Keep Your PC Clean Fast and Automatic
Now that you have basically cleaned up your computer out of unnecessary files, registries and objects, it is time to focus on keeping it that way, because good maintenance is crucial to it’s longevity. The truth is that PC optimization has become an industry and now, there are many advanced applications which you can run regularly to simply perform all of those plus some extra processes on your computer to make it run significantly faster. Here are some programs which we like to recommend along with software reviews of what each and every program is capable of doing for your computer:
Glary Utilities Pro 5
WinZip System Utilities Suite
System Mechanic
CCleaner Pro by Piriform





Cleaning junk files will speed up the PC. Try Krojam Cleaner to clean junk files easily.