Many users on web forums have complained on web forums regarding an issue with Windows 10’s Taskbar. The specific issues with Taskbar are many, however there is one specific problem that keep occurring. It is not clear whether or not Windows has fixed the issue, so this is why we have decided to help you get your Windows 10 taskbar working again. Keep reading this article to learn how to fix this component of Windows 10 UI.


Windows 10 Taskbar Fix Instructions
In some situations, users of Windows 10, may experience issues with the Winodows System User Interface (UI). These issues are generally normal, because as long as there is code, there will always be bugs in a system. However, since they create a negative user experience, they need to be fixed. Such element of the user interface is the Windows 10 taskbar. Many complaints have gathered reporting it to freeze and become unresponsive and even if Windows Explorer is disabled from the Windows task manager, the issue may remain persistent. So this is why there are two main methods to stop this issue. Method number 1 is by shutting down Windows Explorer’s system process and reinabling it and method number 2 is to execute a Windows PowerShell command as an administrator that will reset it to default. We have provided both methods in here and if Method number 1 does not work for you, we urge you to try the second one. For maximum effectiveness, both methods can be tried consequently, starting with method number 2. So, here are the instructions:
Windows Taskbar Fix Number 1
In order to perform this fix, we need to reset Windows Explorer. This is achievable by following these steps:
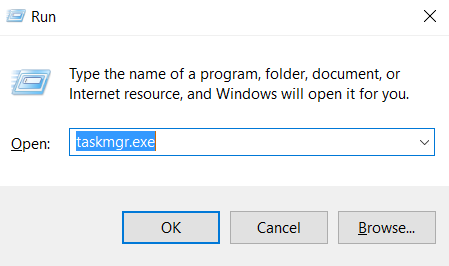
Step 1: Press the Windows Button + R in combination which will launch the Run window. In it, type taskmgr.exe and hit Enter or click Ok to open it.
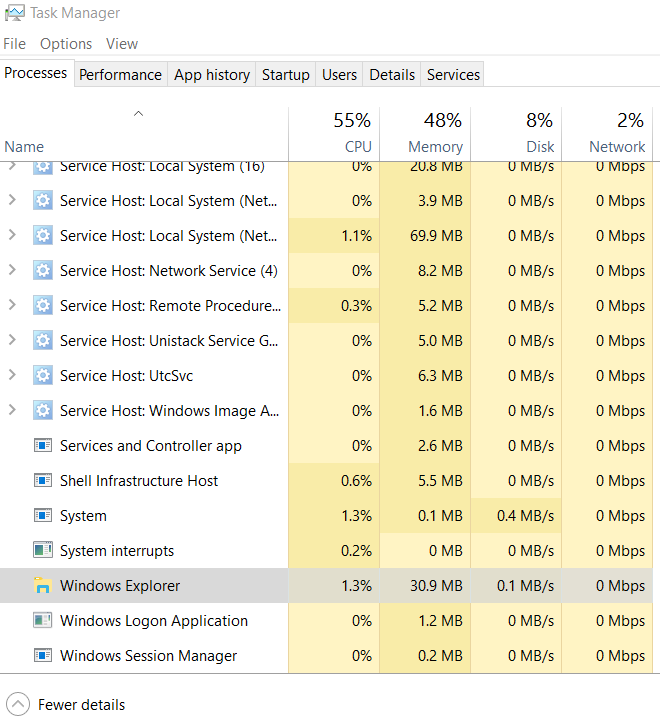
Step 2: For this step, you will need to navigate to the Processes or Details tabs. Let’s try Processes, since it is easier to spot. From this tab, locate Windows Explorer. You can find it faster if you just select a random process by single-clicking it with your mouse and then continuing to hit the “W” key until you get to the following screen:
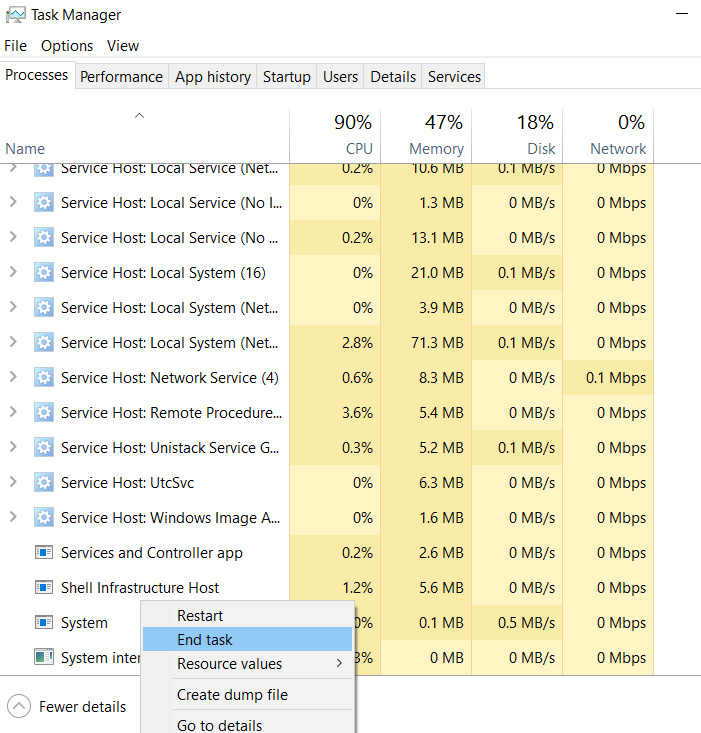
Step 3: Now end the process by right-clicking on it and clicking on End Task. After doing so your explorer will shut down, but do not panic.
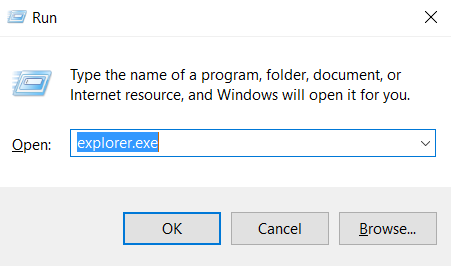
Step 4: The final step is to click on File>Run New Task in the Task Manager to open the Run Windows (Windows Key + R also works). Then type “explorer.exe” and hit OK:
Windows Taskbar Fix Number 2
The second solution is an administrative and permanent one. For it, you are going to need a simple command in Windows PowerShell.
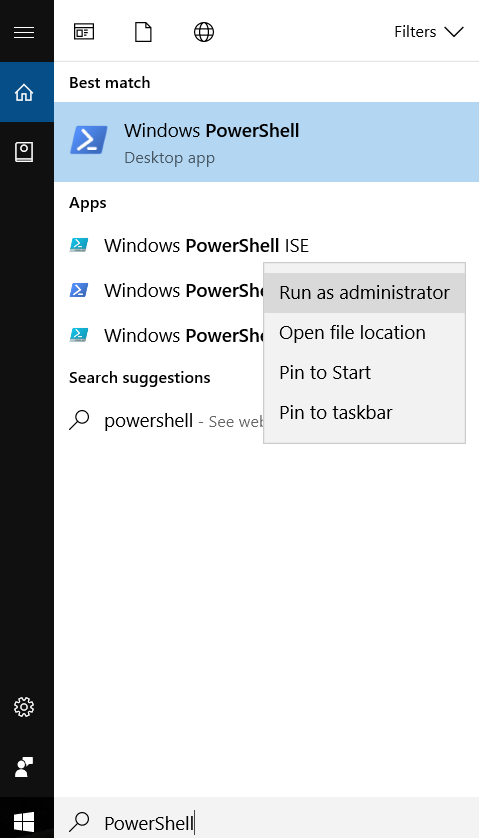
Step 1: Open Windows PowerShell by clicking on Windows Search bar on bottom left next to the start menu, typing “PowerShell” and running the first result as an administrator by Right-Clicking it and clicking “Run as Administrator”:
Step 2: After running it, simply paste the following script in PowerShell and hit Enter to insert it as a command.
→ Get-AppXPackage -AllUsers | Foreach {Add-AppxPackage -DisableDevelopmentMode -Register “$($_.InstallLocation)\AppXManifest.xml”}
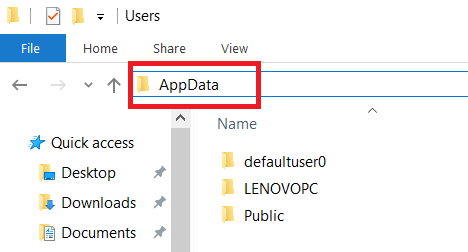
Step 3: After entering the PowerShell Command, make sure to go to the %UserName% directory and open the %Local% Folder. It has the following location:
C:/Users/{Your Username}/AppData/Local/
If the folder is hidden simply type “AppData” in the address bar above and hit enter, once you are in the %UserName% directory. There you will find the %Local% folder.
Step 4: In the Local folder, you should find a folder, named TileDataLayer. Simply delete it from your computer and this should fix the issue.


Conclusion and Tips
Bear in mind that constant freezes of the Taskbar may be caused not only by bugged code in Windows but by third-party programs as well as malware. Make sure to thoroughly check your computer for unwanted software using a software-specific anti-malware program which should be able to detect any malware if present on your PC.
See If Your System Has Been Affected by Malware or Unwanted Software


Ventsislav Krastev
Ventsislav has been covering the latest malware, software and newest tech developments at SensorsTechForum for 3 years now. He started out as a network administrator. Having graduated Marketing as well, Ventsislav also has passion for discovery of new shifts and innovations in cybersecurity that become game changers. After studying Value Chain Management and then Network Administration, he found his passion within cybersecrurity and is a strong believer in basic education of every user towards online safety.
Preparation before removing Malware or Unwanted Software.
Before starting the actual removal process, we recommend that you do the following preparation steps.
- Make sure you have these instructions always open and in front of your eyes.
- Do a backup of all of your files, even if they could be damaged. You should back up your data with a cloud backup solution and insure your files against any type of loss, even from the most severe threats.
- Be patient as this could take a while.
Step 1: Boot Your PC In Safe Mode to isolate and remove Malware or Unwanted Software


Step 2: Clean any registries, created by Malware or Unwanted Software on your computer.
The usually targeted registries of Windows machines are the following:
- HKEY_LOCAL_MACHINE\Software\Microsoft\Windows\CurrentVersion\Run
- HKEY_CURRENT_USER\Software\Microsoft\Windows\CurrentVersion\Run
- HKEY_LOCAL_MACHINE\Software\Microsoft\Windows\CurrentVersion\RunOnce
- HKEY_CURRENT_USER\Software\Microsoft\Windows\CurrentVersion\RunOnce
You can access them by opening the Windows registry editor and deleting any values, created by Malware or Unwanted Software there. This can happen by following the steps underneath:


Step 3: Find files created by Malware or Unwanted Software


For Newer Windows Operating Systems
1: On your keyboard press + R and write explorer.exe in the Run text box and then click on the Ok button.
2: Click on your PC from the quick access bar. This is usually an icon with a monitor and its name is either “My Computer”, “My PC” or “This PC” or whatever you have named it.
3: Navigate to the search box in the top-right of your PC’s screen and type “fileextension:” and after which type the file extension. If you are looking for malicious executables, an example may be “fileextension:exe”. After doing that, leave a space and type the file name you believe the malware has created. Here is how it may appear if your file has been found:
N.B. We recommend to wait for the green loading bar in the navination box to fill up in case the PC is looking for the file and hasn’t found it yet.
For Older Windows Operating Systems
In older Windows OS’s the conventional approach should be the effective one:
1: Click on the Start Menu icon (usually on your bottom-left) and then choose the Search preference.
2: After the search window appears, choose More Advanced Options from the search assistant box. Another way is by clicking on All Files and Folders.
3: After that type the name of the file you are looking for and click on the Search button. This might take some time after which results will appear. If you have found the malicious file, you may copy or open its location by right-clicking on it.
Now you should be able to discover any file on Windows as long as it is on your hard drive and is not concealed via special software.
Before starting “Step 4”, please boot back into Normal mode, in case you are currently in Safe Mode.
This will enable you to install and use SpyHunter 5 successfully.
Step 4: Scan for Malware or Unwanted Software with SpyHunter Anti-Malware Tool
Step 5 (Optional): Try to Restore Files Encrypted by Malware or Unwanted Software.
Ransomware infections and Malware or Unwanted Software aim to encrypt your files using an encryption algorithm which may be very difficult to decrypt. This is why we have suggested a data recovery method that may help you go around direct decryption and try to restore your files. Bear in mind that this method may not be 100% effective but may also help you a little or a lot in different situations.
For more “how-to” file recovery methods and steps, you can visit our instructive article on “How to Restore Files Encrypted by Ransomware (Without Decrypter)“.


Ventsislav Krastev
Ventsislav has been covering the latest malware, software and newest tech developments at SensorsTechForum for 3 years now. He started out as a network administrator. Having graduated Marketing as well, Ventsislav also has passion for discovery of new shifts and innovations in cybersecurity that become game changers. After studying Value Chain Management and then Network Administration, he found his passion within cybersecrurity and is a strong believer in basic education of every user towards online safety.
Preparation before removing Malware or Unwanted Software.
Before starting the actual removal process, we recommend that you do the following preparation steps.
- Make sure you have these instructions always open and in front of your eyes.
- Do a backup of all of your files, even if they could be damaged. You should back up your data with a cloud backup solution and insure your files against any type of loss, even from the most severe threats.
- Be patient as this could take a while.
Step 1: Boot Your PC In Safe Mode to isolate and remove Malware or Unwanted Software


Step 2: Clean any registries, created by Malware or Unwanted Software on your computer.
The usually targeted registries of Windows machines are the following:
- HKEY_LOCAL_MACHINE\Software\Microsoft\Windows\CurrentVersion\Run
- HKEY_CURRENT_USER\Software\Microsoft\Windows\CurrentVersion\Run
- HKEY_LOCAL_MACHINE\Software\Microsoft\Windows\CurrentVersion\RunOnce
- HKEY_CURRENT_USER\Software\Microsoft\Windows\CurrentVersion\RunOnce
You can access them by opening the Windows registry editor and deleting any values, created by Malware or Unwanted Software there. This can happen by following the steps underneath:


Step 3: Find files created by Malware or Unwanted Software


For Newer Windows Operating Systems
1: On your keyboard press + R and write explorer.exe in the Run text box and then click on the Ok button.
2: Click on your PC from the quick access bar. This is usually an icon with a monitor and its name is either “My Computer”, “My PC” or “This PC” or whatever you have named it.
3: Navigate to the search box in the top-right of your PC’s screen and type “fileextension:” and after which type the file extension. If you are looking for malicious executables, an example may be “fileextension:exe”. After doing that, leave a space and type the file name you believe the malware has created. Here is how it may appear if your file has been found:
N.B. We recommend to wait for the green loading bar in the navination box to fill up in case the PC is looking for the file and hasn’t found it yet.
For Older Windows Operating Systems
In older Windows OS’s the conventional approach should be the effective one:
1: Click on the Start Menu icon (usually on your bottom-left) and then choose the Search preference.
2: After the search window appears, choose More Advanced Options from the search assistant box. Another way is by clicking on All Files and Folders.
3: After that type the name of the file you are looking for and click on the Search button. This might take some time after which results will appear. If you have found the malicious file, you may copy or open its location by right-clicking on it.
Now you should be able to discover any file on Windows as long as it is on your hard drive and is not concealed via special software.
Before starting “Step 4”, please boot back into Normal mode, in case you are currently in Safe Mode.
This will enable you to install and use SpyHunter 5 successfully.
Step 4: Scan for Malware or Unwanted Software with SpyHunter Anti-Malware Tool


Ventsislav Krastev
Ventsislav has been covering the latest malware, software and newest tech developments at SensorsTechForum for 3 years now. He started out as a network administrator. Having graduated Marketing as well, Ventsislav also has passion for discovery of new shifts and innovations in cybersecurity that become game changers. After studying Value Chain Management and then Network Administration, he found his passion within cybersecrurity and is a strong believer in basic education of every user towards online safety.
Preparation before removing Malware or Unwanted Software.
Before starting the actual removal process, we recommend that you do the following preparation steps.
- Make sure you have these instructions always open and in front of your eyes.
- Be patient as this could take a while.
Step 1: Uninstall Malware or Unwanted Software and related software from Windows
Here is a method in few easy steps that should be able to uninstall most programs. No matter if you are using Windows 10, 8, 7, Vista or XP, those steps will get the job done. Dragging the program or its folder to the recycle bin can be a very bad decision. If you do that, bits and pieces of the program are left behind, and that can lead to unstable work of your PC, errors with the file type associations and other unpleasant activities. The proper way to get a program off your computer is to Uninstall it. To do that:


Step 2: Clean your Browsers from Malware or Unwanted Software.


2. Select the “Add-ons” icon from the menu.
3. Select the unwanted extension and click “Remove“
4. After the extension is removed, restart Mozilla Firefox by closing it from the red “X” button at the top right corner and start it again.
2. Move the cursor over “Tools” and then from the extended menu choose “Extensions“
3. From the opened “Extensions” menu locate the unwanted extension and click on its “Remove” button.
4. After the extension is removed, restart Google Chrome by closing it from the red “X” button at the top right corner and start it again.
2. Click on the gear icon labeled ‘Tools’ to open the drop menu and select ‘Manage Add-ons’
3. In the ‘Manage Add-ons’ window.
4. Select the extension you want to remove and then click ‘Disable’. A pop-up window will appear to inform you that you are about to disable the selected extension, and some more add-ons might be disabled as well. Leave all the boxes checked, and click ‘Disable’.
5. After the unwanted extension has been removed, restart Internet Explorer by closing it from the red ‘X’ button located at the top right corner and start it again.
2. Open the drop menu by clicking on the icon at the top right corner.
3. From the drop menu select “Extensions”.
4. Choose the suspected malicious extension you want to remove and then click on the gear icon.
5. Remove the malicious extension by scrolling down and then clicking on Uninstall.
Step 3: Clean any registries, created by Malware or Unwanted Software on your computer.
The usually targeted registries of Windows machines are the following:
- HKEY_LOCAL_MACHINE\Software\Microsoft\Windows\CurrentVersion\Run
- HKEY_CURRENT_USER\Software\Microsoft\Windows\CurrentVersion\Run
- HKEY_LOCAL_MACHINE\Software\Microsoft\Windows\CurrentVersion\RunOnce
- HKEY_CURRENT_USER\Software\Microsoft\Windows\CurrentVersion\RunOnce
You can access them by opening the Windows registry editor and deleting any values, created by Malware or Unwanted Software there. This can happen by following the steps underneath:


Before starting “Step 4”, please boot back into Normal mode, in case you are currently in Safe Mode.
This will enable you to install and use SpyHunter 5 successfully.
Step 4: Scan for Malware or Unwanted Software with SpyHunter Anti-Malware Tool


Ventsislav Krastev
Ventsislav has been covering the latest malware, software and newest tech developments at SensorsTechForum for 3 years now. He started out as a network administrator. Having graduated Marketing as well, Ventsislav also has passion for discovery of new shifts and innovations in cybersecurity that become game changers. After studying Value Chain Management and then Network Administration, he found his passion within cybersecrurity and is a strong believer in basic education of every user towards online safety.
Preparation Phase:
Before starting to follow the steps below, be advised that you should first do the following preparations:
- Backup your files in case the worst happens.
- Make sure to have a device with these instructions on standy.
- Arm yourself with patience.
Step 1: Uninstall Malware or Unwanted Software and remove related files and objects
1. Hit the ⇧+⌘+U keys to open Utilities. Another way is to click on “Go” and then click “Utilities”, like the image below shows:
- Go to Finder.
- In the search bar type the name of the app that you want to remove.
- Above the search bar change the two drop down menus to “System Files” and “Are Included” so that you can see all of the files associated with the application you want to remove. Bear in mind that some of the files may not be related to the app so be very careful which files you delete.
- If all of the files are related, hold the ⌘+A buttons to select them and then drive them to “Trash”.
In case you cannot remove Malware or Unwanted Software via Step 1 above:
In case you cannot find the virus files and objects in your Applications or other places we have shown above, you can manually look for them in the Libraries of your Mac. But before doing this, please read the disclaimer below:
You can repeat the same procedure with the following other Library directories:
→ ~/Library/LaunchAgents
/Library/LaunchDaemons
Tip: ~ is there on purpose, because it leads to more LaunchAgents.
Step 2: Remove Malware or Unwanted Software – related extensions from Safari / Chrome / Firefox


Step 3: Scan for and remove Malware or Unwanted Software files from your Mac
When you are facing problems on your Mac as a result of unwanted scripts and programs such as Malware or Unwanted Software, the recommended way of eliminating the threat is by using an anti-malware program. Combo Cleaner offers advanced security features along with other modules that will improve your Mac’s security and protect it in the future.


Ventsislav Krastev
Ventsislav has been covering the latest malware, software and newest tech developments at SensorsTechForum for 3 years now. He started out as a network administrator. Having graduated Marketing as well, Ventsislav also has passion for discovery of new shifts and innovations in cybersecurity that become game changers. After studying Value Chain Management and then Network Administration, he found his passion within cybersecrurity and is a strong believer in basic education of every user towards online safety.