 News broke out that a malicious hacking tools have been used in attacks that were targeted specifically at high-value computers belonging to individuals and organizations of the financial sector in Ukraine. The malware discovered in those attacks is the same malware which ESET researchers managed to discover at the H2 of 2016 belonging to a new hacking group, known as TeleBots. At the moment it is not well known whether or not these hackers simply used the code of the malware developed by the BlackEnergy group or if they are the group themselves, just under a different name.

How The Attacks Are Conducted
The typical phishing e-mail attacks were used when it came down to those attacks. They were also related to Microsoft Excel documents which were attached to those e-mails. To make the users open those e-mails, the attackers perform social engineering (lying) in the e-mails that make them believe the e-mail sent to them is from an organization or a person they are familiar with. As soon as the victim opens the malicious attachment, he or she may see a document with concealed information that prompts to “Enable Content”, like the picture below displays:
As soon as this content is enabled, the user may activate a malicious macro that may cause the infection.
Researchers at ESET have analyzed those malicious macros and have identified that it injects a malicious process that is named “explorer.exe”. This process is executed, and it has been identified to be a trojan that downloads anything the attacker tells it to. More to it, researchers have also identified the malware to be written in the Rust language.

A Python-coded Backdoor Is Downloaded
As soon as an infection related to this downloader is conducted, a backdoor is downloaded, known as the TeleBot Backdoor. This virus uses obfuscation to infect and keep communication with the crooks to receive their “orders”. To communicate with the hackers after an infection has been caused, TeleBot uses advanced techniques to send and receive commands. One of those techniques is Telegram Messenger via which the attackers can input commands based on which the Trojan corresponds.
One of the features of the malware is that it can steal passwords. It contains a module which can be used to collect any saved passwords on the infected device. One of the tools, CredRaptor can attack web browsers, like Chrome, Firefox, Opera and others.
Another module, named plainpwd could be used by the TeleBot team to perform dumps from the system memory. These dumps may contain critical Windows credentials information.
There is also the usually used keylogger to obtain different passwords via collecting information from the typed keystrokes of the victim.
But this is not all. The hackers may also use network sniffers to collect different passwords from the hacked computer as well. Those tools, when viewed separately are nothing significant if you know how to protect yourself, but used in combination can surely steal a great deal of information.
Another information-stealing tool, called LDAP query tool by Eset researchers is reported to collect and send information about the computers that are an infection in a hidden domain; that is specifically made for the victim.

The KillDisk Feature
This feature is the most dangerous one in the TeleBots malware. Similar to ransomware viruses, like GoldenEye it attacks the master boot record and it also overwrites some specific files that allow it to create new files with the same name of the files it attacks. This feature allows it to destroy whole operating systems and delete information on computers, making the computers themselves no longer useful.

The Bottom Line
As a conclusion, whether they are TeleBots or black energy group, the crooks behind this malware have put a lot of effort to defend it from researchers and to even make the above picture of “fsociety” from Mr. Robot display in code.
- Step 1
- Step 2
- Step 3
- Step 4
- Step 5
Step 1: Scan for KillDisk with SpyHunter Anti-Malware Tool
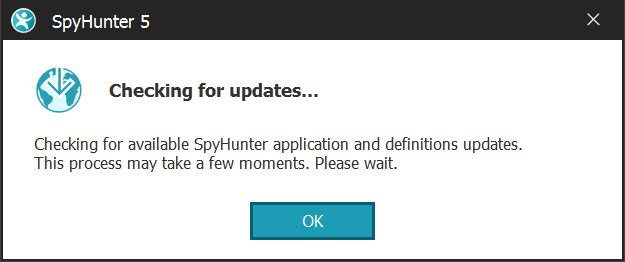
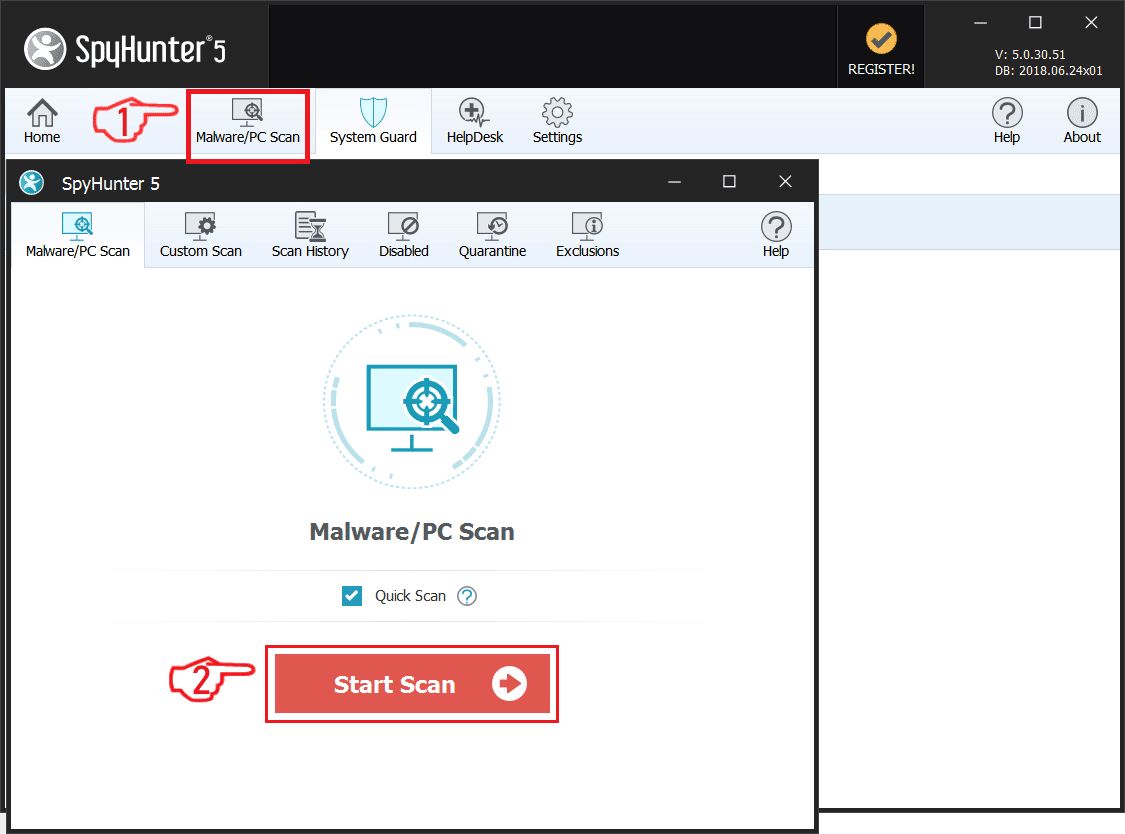
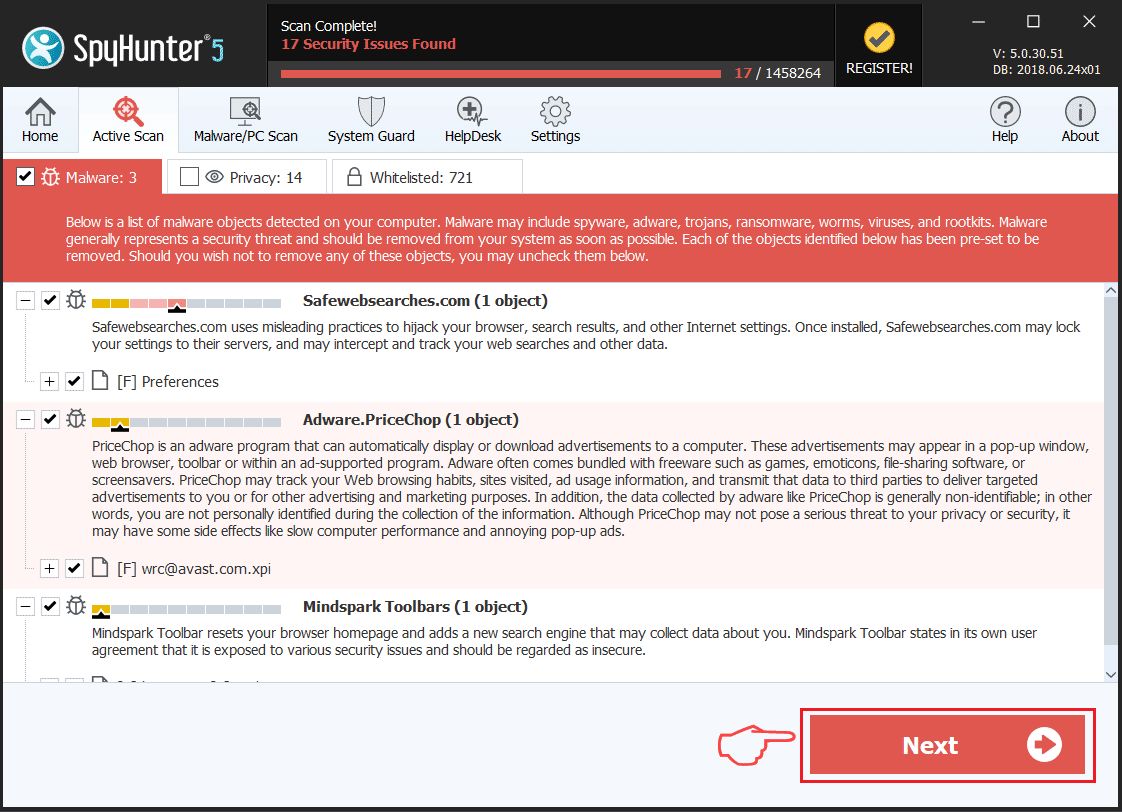
Ransomware Automatic Removal - Video Guide
Step 2: Uninstall KillDisk and related malware from Windows
Here is a method in few easy steps that should be able to uninstall most programs. No matter if you are using Windows 10, 8, 7, Vista or XP, those steps will get the job done. Dragging the program or its folder to the recycle bin can be a very bad decision. If you do that, bits and pieces of the program are left behind, and that can lead to unstable work of your PC, errors with the file type associations and other unpleasant activities. The proper way to get a program off your computer is to Uninstall it. To do that:

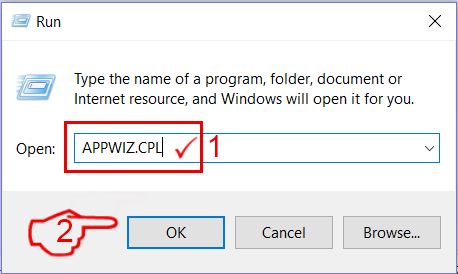
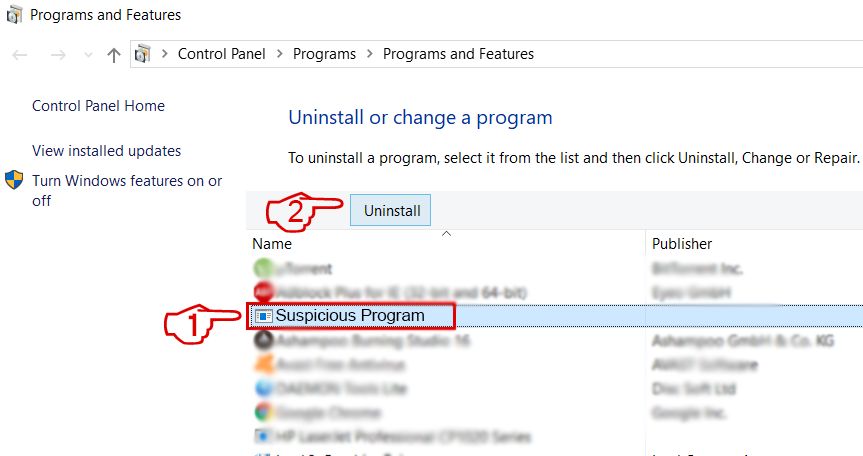 Follow the instructions above and you will successfully delete most unwanted and malicious programs.
Step 3: Clean any registries, created by KillDisk on your computer.
The usually targeted registries of Windows machines are the following:
- HKEY_LOCAL_MACHINE\Software\Microsoft\Windows\CurrentVersion\Run
- HKEY_CURRENT_USER\Software\Microsoft\Windows\CurrentVersion\Run
- HKEY_LOCAL_MACHINE\Software\Microsoft\Windows\CurrentVersion\RunOnce
- HKEY_CURRENT_USER\Software\Microsoft\Windows\CurrentVersion\RunOnce
You can access them by opening the Windows registry editor and deleting any values, created by KillDisk there. This can happen by following the steps underneath:
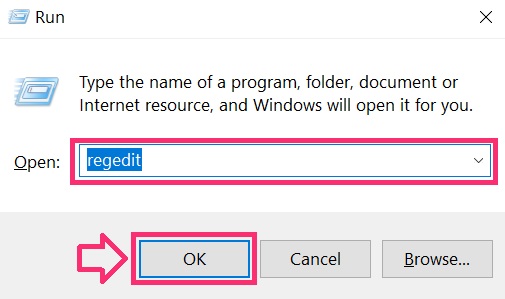

 Tip: To find a virus-created value, you can right-click on it and click "Modify" to see which file it is set to run. If this is the virus file location, remove the value.
Before starting "Step 4", please boot back into Normal mode, in case you are currently in Safe Mode.
This will enable you to install and use SpyHunter 5 successfully.
Step 4: Boot Your PC In Safe Mode to isolate and remove KillDisk

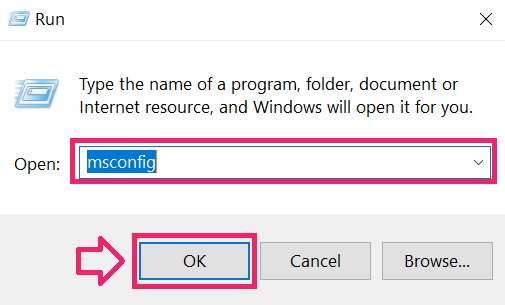
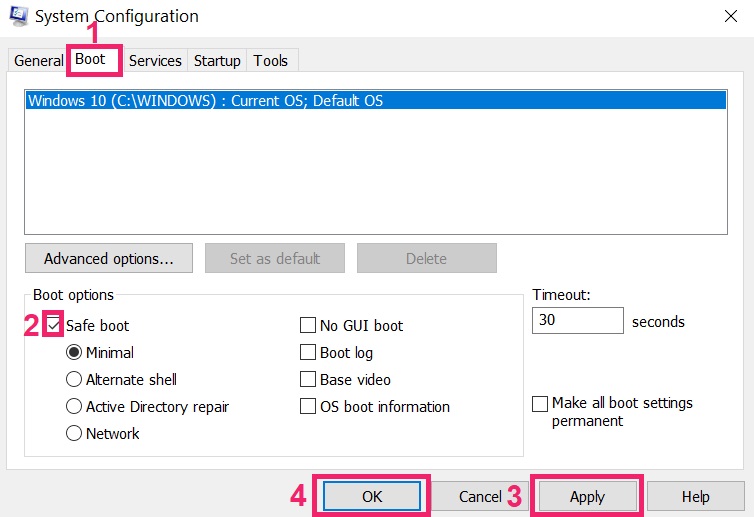
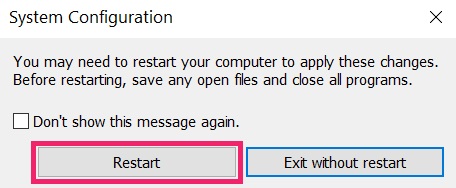
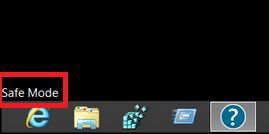
Step 5: Try to Restore Files Encrypted by KillDisk.
Method 1: Use STOP Decrypter by Emsisoft.
Not all variants of this ransomware can be decrypted for free, but we have added the decryptor used by researchers that is often updated with the variants which become eventually decrypted. You can try and decrypt your files using the instructions below, but if they do not work, then unfortunately your variant of the ransomware virus is not decryptable.
Follow the instructions below to use the Emsisoft decrypter and decrypt your files for free. You can download the Emsisoft decryption tool linked here and then follow the steps provided below:
1 Right-click on the decrypter and click on Run as Administrator as shown below:
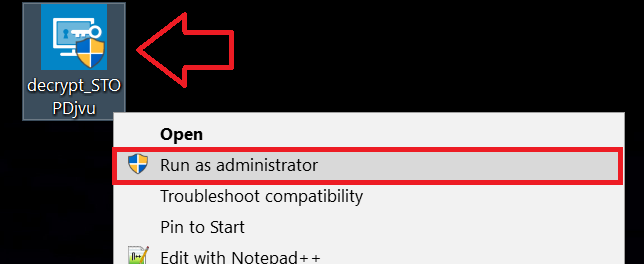
2. Agree with the license terms:
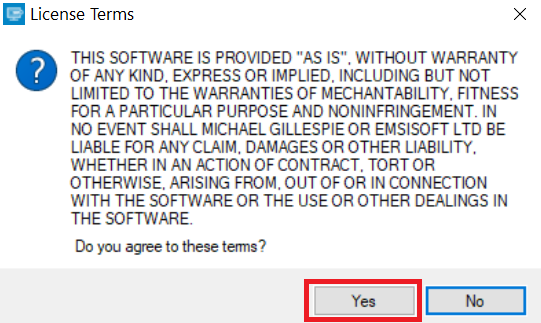
3. Click on "Add Folder" and then add the folders where you want files decrypted as shown underneath:
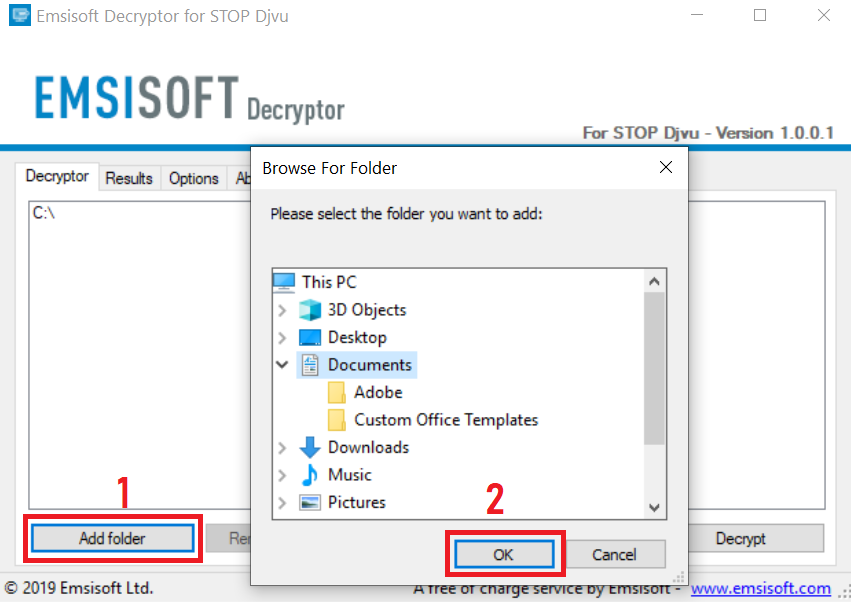
4. Click on "Decrypt" and wait for your files to be decoded.
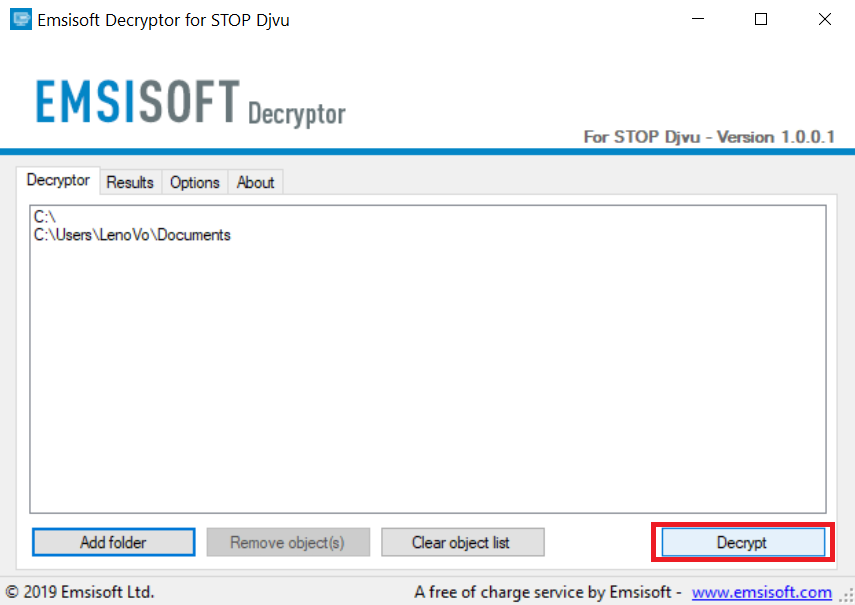
Note: Credit for the decryptor goes to Emsisoft researchers who have made the breakthrough with this virus.
Method 2: Use data recovery software
Ransomware infections and KillDisk aim to encrypt your files using an encryption algorithm which may be very difficult to decrypt. This is why we have suggested a data recovery method that may help you go around direct decryption and try to restore your files. Bear in mind that this method may not be 100% effective but may also help you a little or a lot in different situations.
Simply click on the link and on the website menus on the top, choose Data Recovery - Data Recovery Wizard for Windows or Mac (depending on your OS), and then download and run the tool.
KillDisk-FAQ
What is KillDisk Ransomware?
KillDisk is a ransomware infection - the malicious software that enters your computer silently and blocks either access to the computer itself or encrypt your files.
Many ransomware viruses use sophisticated encryption algorithms to make your files inaccessible. The goal of ransomware infections is to demand that you pay a ransom payment to get access to your files back.
What Does KillDisk Ransomware Do?
Ransomware in general is a malicious software that is designed to block access to your computer or files until a ransom is paid.
Ransomware viruses can also damage your system, corrupt data and delete files, resulting in the permanent loss of important files.
How Does KillDisk Infect?
Via several ways.KillDisk Ransomware infects computers by being sent via phishing emails, containing virus attachment. This attachment is usually masked as an important document, like an invoice, bank document or even a plane ticket and it looks very convincing to users.
Another way you may become a victim of KillDisk is if you download a fake installer, crack or patch from a low reputation website or if you click on a virus link. Many users report getting a ransomware infection by downloading torrents.
How to Open .KillDisk files?
You can't without a decryptor. At this point, the .KillDisk files are encrypted. You can only open them once they are decrypted using a specific decryption key for the particular algorithm.
What to Do If a Decryptor Does Not Work?
Do not panic, and backup the files. If a decryptor did not decrypt your .KillDisk files successfully, then do not despair, because this virus is still new.
Can I Restore ".KillDisk" Files?
Yes, sometimes files can be restored. We have suggested several file recovery methods that could work if you want to restore .KillDisk files.
These methods are in no way 100% guaranteed that you will be able to get your files back. But if you have a backup, your chances of success are much greater.
How To Get Rid of KillDisk Virus?
The safest way and the most efficient one for the removal of this ransomware infection is the use a professional anti-malware program.
It will scan for and locate KillDisk ransomware and then remove it without causing any additional harm to your important .KillDisk files.
Can I Report Ransomware to Authorities?
In case your computer got infected with a ransomware infection, you can report it to the local Police departments. It can help authorities worldwide track and determine the perpetrators behind the virus that has infected your computer.
Below, we have prepared a list with government websites, where you can file a report in case you are a victim of a cybercrime:
Cyber-security authorities, responsible for handling ransomware attack reports in different regions all over the world:
Germany - Offizielles Portal der deutschen Polizei
United States - IC3 Internet Crime Complaint Centre
United Kingdom - Action Fraud Police
France - Ministère de l'Intérieur
Italy - Polizia Di Stato
Spain - Policía Nacional
Netherlands - Politie
Poland - Policja
Portugal - Polícia Judiciária
Greece - Cyber Crime Unit (Hellenic Police)
India - Mumbai Police - CyberCrime Investigation Cell
Australia - Australian High Tech Crime Center
Reports may be responded to in different timeframes, depending on your local authorities.
Can You Stop Ransomware from Encrypting Your Files?
Yes, you can prevent ransomware. The best way to do this is to ensure your computer system is updated with the latest security patches, use a reputable anti-malware program and firewall, backup your important files frequently, and avoid clicking on malicious links or downloading unknown files.
Can KillDisk Ransomware Steal Your Data?
Yes, in most cases ransomware will steal your information. It is a form of malware that steals data from a user's computer, encrypts it, and then demands a ransom in order to decrypt it.
In many cases, the malware authors or attackers will threaten to delete the data or publish it online unless the ransom is paid.
Can Ransomware Infect WiFi?
Yes, ransomware can infect WiFi networks, as malicious actors can use it to gain control of the network, steal confidential data, and lock out users. If a ransomware attack is successful, it could lead to a loss of service and/or data, and in some cases, financial losses.
Should I Pay Ransomware?
No, you should not pay ransomware extortionists. Paying them only encourages criminals and does not guarantee that the files or data will be restored. The better approach is to have a secure backup of important data and be vigilant about security in the first place.
What Happens If I Don't Pay Ransom?
If you don't pay the ransom, the hackers may still have access to your computer, data, or files and may continue to threaten to expose or delete them, or even use them to commit cybercrimes. In some cases, they may even continue to demand additional ransom payments.
Can a Ransomware Attack Be Detected?
Yes, ransomware can be detected. Anti-malware software and other advanced security tools can detect ransomware and alert the user when it is present on a machine.
It is important to stay up-to-date on the latest security measures and to keep security software updated to ensure ransomware can be detected and prevented.
Do Ransomware Criminals Get Caught?
Yes, ransomware criminals do get caught. Law enforcement agencies, such as the FBI, Interpol and others have been successful in tracking down and prosecuting ransomware criminals in the US and other countries. As ransomware threats continue to increase, so does the enforcement activity.
About the KillDisk Research
The content we publish on SensorsTechForum.com, this KillDisk how-to removal guide included, is the outcome of extensive research, hard work and our team’s devotion to help you remove the specific malware and restore your encrypted files.
How did we conduct the research on this ransomware?
Our research is based on an independent investigation. We are in contact with independent security researchers, and as such, we receive daily updates on the latest malware and ransomware definitions.
Furthermore, the research behind the KillDisk ransomware threat is backed with VirusTotal and the NoMoreRansom project.
To better understand the ransomware threat, please refer to the following articles which provide knowledgeable details.
As a site that has been dedicated to providing free removal instructions for ransomware and malware since 2014, SensorsTechForum’s recommendation is to only pay attention to trustworthy sources.
How to recognize trustworthy sources:
- Always check "About Us" web page.
- Profile of the content creator.
- Make sure that real people are behind the site and not fake names and profiles.
- Verify Facebook, LinkedIn and Twitter personal profiles.


