
Your Mac used to fly. Now it crawls. That spinning beach ball shows up more than your actual apps, and you’re wondering if it’s finally time to buy a new machine.
Quick answer: Most slow Macs don’t need replacing. The fix is usually a combination of clearing cached junk, managing startup programs, and freeing up storage space. Below, I’ll walk through 12 methods to speed up your Mac, starting with the easiest fixes and moving to more involved solutions. Each method includes exact steps for macOS Sequoia.
Last reviewed: February 2026. Instructions verified for macOS Sequoia 15.
Jump to: Activity Monitor | Startup Programs | Visual Effects | Storage | Browser Cache | Desktop Cleanup | RAM Check | Malware Scan | Restart | Updates | Reinstall macOS | Hardware Upgrades | FAQ

Why Your Mac Slows Down
Before jumping into fixes, it helps to understand what’s actually happening. Macs slow down for a handful of predictable reasons:
- Too many apps running at once, eating up memory and CPU cycles
- Low storage space (macOS needs breathing room to manage memory and temporary files)
- Accumulated cache and temporary files from months or years of use
- Startup programs launching automatically and hogging resources in the background
- Visual effects that look nice but tax the system
- Outdated software that hasn’t been optimized for your current macOS version
- Malware or adware running processes you don’t know about
The good news: most of these are fixable without spending money. Let’s start with the diagnostic step.
Method 1: Use Activity Monitor to Find the Problem
Activity Monitor is your Mac’s built-in diagnostic tool. It shows exactly which apps and processes are consuming your CPU, memory, disk, and network resources. This is where you start, because there’s no point optimizing random things when one misbehaving app might be causing all your problems.
How to open Activity Monitor:
Press Command + Space to open Spotlight, type “Activity Monitor,” and hit Enter. Alternatively, go to Applications → Utilities → Activity Monitor.
What to look for:
CPU tab: Click the “% CPU” column header to sort by usage. Anything consistently using more than 100% is a problem. If you see a process you don’t recognize eating up resources, search for its name online before killing it. Some processes like “kernel_task” and “WindowServer” are essential system processes. Don’t close them.
Memory tab: Look at the “Memory Pressure” graph at the bottom. Green means you’re fine. Yellow means you’re pushing limits. Red means your Mac is struggling and using disk space as virtual memory, which slows everything down.
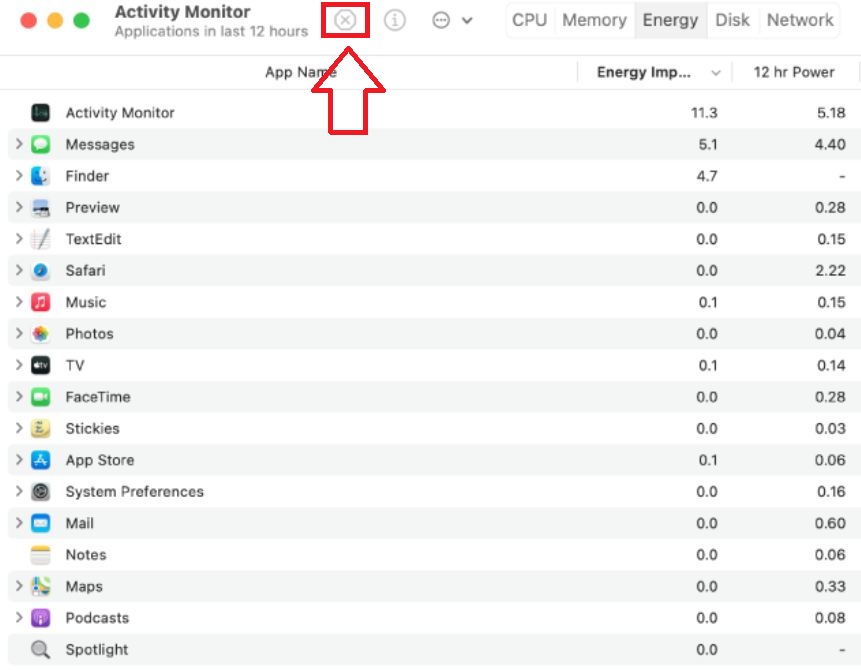
To close a problematic app: Select the process, click the X button in the top-left corner, then choose “Quit” (or “Force Quit” if it’s unresponsive).
When this helps: When one specific app is misbehaving. Common culprits include Chrome with too many tabs, Slack, Zoom, and Adobe apps.
When this won’t help: If memory pressure stays red even after closing apps, you may have a hardware limitation (not enough RAM) rather than a software problem.
Method 2: Disable Startup Programs
Every app that launches at login consumes resources before you even start working. Some apps sneak themselves into startup without asking. Over time, you end up with a dozen programs running in the background that you never actually use.
How to manage startup programs in macOS Sequoia:
- Click the Apple menu → System Settings
- Select General in the sidebar
- Click Login Items & Extensions
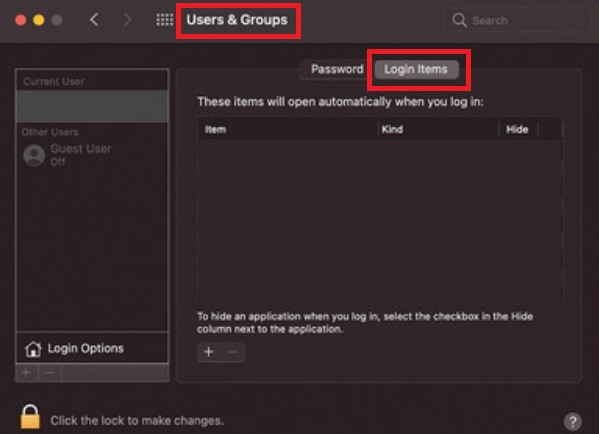
You’ll see two sections:
Open at Login: Apps that visibly launch when you log in. Select any you don’t need and click the minus (-) button to remove them.
Allow in the Background: Hidden helper apps and agents that run without you seeing them. Toggle off any you don’t need, but be careful here. Some background items are necessary for apps to function properly (like cloud sync services or VPNs).
Common items safe to disable:
- Spotify (unless you want it open immediately)
- Microsoft Teams or Slack (launch manually when needed)
- Adobe Creative Cloud (if you don’t use Adobe apps daily)
- iTunes Helper (rarely necessary)
When this helps: Slow boot times and a generally sluggish Mac right after logging in.
Method 3: Reduce Visual Effects
macOS Sequoia’s animations look smooth, but they consume GPU and CPU resources. On older Macs or those with limited memory, turning these off can make the system feel noticeably snappier.
How to reduce visual effects:
- Apple menu → System Settings
- Click Accessibility in the sidebar
- Select Display
- Toggle on Reduce Motion
- Toggle on Reduce Transparency

What these settings do:
- Reduce Motion replaces sliding animations with simple cross-fades
- Reduce Transparency makes semi-transparent elements solid, reducing the rendering work
Additional Dock optimization:
- Go to System Settings → Desktop and Dock
- Drag the Magnification slider to the left (or disable it)
- Set “Minimize windows using” to Scale effect instead of Genie effect
- Turn off “Animate opening applications”
When this helps: Older Macs, Macs with integrated graphics, or any Mac where animations seem choppy.
Method 4: Free Up Storage Space
macOS needs free space to function properly. It uses disk space for virtual memory, temporary files, and system operations. When your drive gets too full, everything slows down.
Rule of thumb: Keep at least 10-20% of your drive free. On a 256GB drive, that means maintaining at least 25-50GB of free space.
How to check and manage storage:
- Apple menu → System Settings
- Click General in the sidebar
- Select Storage

The storage view shows what’s taking up space. Click on each category to see details. macOS also provides recommendations like:
- Store in iCloud: Moves files to cloud storage (requires iCloud subscription for significant storage)
- Optimize Storage: Automatically removes watched TV shows and movies
- Empty Trash Automatically: Deletes items older than 30 days
Quick wins for freeing space:
- Empty Trash: Right-click the Trash icon in Dock → Empty Trash
- Clear Downloads folder: Open Finder → Downloads, delete old installers and files you’ve already used
- Delete old iOS backups: In Storage settings, scroll to Backups → Manage Backups
- Remove unused apps: Go to Applications folder, drag unused apps to Trash
When this helps: When your storage bar shows mostly full (especially if under 10% free), or when you get “Your disk is almost full” warnings.
Method 5: Clear Browser Cache and Cookies
Browsers store cached data to make websites load faster. Over time, this cache grows to several gigabytes and can actually slow things down. Clearing it forces your browser to fetch fresh data.
Safari:
- Open Safari
- Go to Safari → Settings (or press Command + ,)
- Click the Advanced tab
- Check “Show features for web developers” (this was renamed in recent macOS versions)
- Close Settings
- Go to Develop → Empty Caches
Keyboard shortcut: Option + Command + E (after enabling the Develop menu)
Chrome:
- Click the three-dot menu in the top right
- Go to More Tools → Clear Browsing Data
- Set time range to “All time”
- Check “Cached images and files” (and optionally “Cookies and other site data”)
- Click Clear data
Keyboard shortcut: Command + Shift + Delete
Firefox:
- Click the hamburger menu (three lines)
- Go to Settings → Privacy & Security
- Scroll to “Cookies and Site Data”
- Click Clear Data
- Make sure “Cached Web Content” is checked
- Click Clear
Keyboard shortcut: Command + Shift + Delete
Note: Clearing cookies will log you out of websites. If you only want to clear cache, uncheck the cookies option.
When this helps: When browsers feel sluggish, pages load slowly, or you’re experiencing weird website behavior.
Method 6: Clean Up Your Desktop
Every file on your Desktop takes up memory. macOS renders a preview for each icon, and this adds up. A Desktop covered in screenshots, downloads, and random files genuinely slows your Mac down.
Quick cleanup:
- Move files to appropriate folders (Documents, Downloads, etc.)
- Delete files you no longer need
- For files you need to keep visible, enable Stacks
How to enable Stacks:
Right-click anywhere on your Desktop and select Use Stacks. This automatically groups files by type (images, documents, etc.), reducing the number of visible icons that macOS needs to render.
When this helps: If your Desktop has dozens (or hundreds) of files scattered across it.
Method 7: Check Your RAM Situation
This is where you need to be realistic about your Mac’s hardware limitations.
How to check RAM usage:
- Open Activity Monitor (Command + Space, type “Activity Monitor”)
- Click the Memory tab
- Look at Memory Pressure at the bottom
Interpreting the results:
- Green: You have enough RAM. Your slowdown is caused by something else.
- Yellow: You’re pushing limits. Close some apps or consider your usage patterns.
- Red: You’re out of RAM. macOS is using disk space as virtual memory (swap), which is slow.
Important reality check for Apple Silicon Macs:
If you have an M1, M2, M3, or M4 Mac (any Mac made since late 2020), you cannot upgrade the RAM. The memory is built into the chip itself. This is different from older Intel Macs where RAM was a separate component.
If your Apple Silicon Mac consistently runs out of memory, your options are:
- Use fewer apps simultaneously
- Close browser tabs (each tab uses RAM)
- Quit apps when not actively using them (Command + Q, not just closing the window)
- Consider this when buying your next Mac (get 16GB minimum, 32GB for heavy use)
For older Intel Macs:
Some Intel Macs (particularly older MacBook Pros and iMacs) can be upgraded. Check your specific model on sites like Crucial.com or OWC to see if RAM upgrades are possible and what the maximum supported RAM is.
When this helps: When Memory Pressure is consistently yellow or red, and closing apps provides relief.
Method 8: Scan for Malware and Adware
Yes, Macs can get malware. It’s less common than on Windows, but adware and potentially unwanted programs (PUPs) do exist. They run in the background, display ads, redirect browsers, and consume system resources.
Signs of possible malware:
- Browser homepage changed without your permission
- Unexpected pop-up ads
- New browser extensions you didn’t install
- Unknown processes using high CPU in Activity Monitor
- Mac running hot and slow for no apparent reason
What to do:
Check for suspicious apps: Go to Applications folder and look for apps you don’t remember installing. Look especially for apps with generic names like “Mac Cleaner,” “System Optimizer,” or anything that promises to “speed up” your Mac (ironically, these are often the problem).
Check browser extensions:
- Safari: Safari → Settings → Extensions
- Chrome: chrome://extensions/
- Firefox: about:addons
Remove any extensions you don’t recognize or didn’t intentionally install.
Run a malware scan: Apple’s built-in XProtect provides basic protection, but for a thorough scan, consider running Malwarebytes for Mac (free version available). It can detect adware and PUPs that slip past basic protection.
When this helps: When you notice unusual behavior, unexpected processes, or browser changes you didn’t make.
Method 9: Just Restart Your Mac
It sounds too simple, but restarting fixes a lot of issues. Many people put their Mac to sleep instead of shutting it down, and it can go weeks or months without a proper restart.
Restarting clears temporary files, resets memory, kills stuck processes, and reloads system components. After a macOS update, several background indexing tasks run for hours or days. A restart can help settle things down.
How to restart:
Apple menu → Restart
Or, if your Mac is completely unresponsive, press and hold the power button for 10 seconds to force a shutdown, then press it again to turn it back on.
When this helps: If your Mac has been running for days or weeks, or after installing updates, or when things just feel “off” without a specific cause.
Method 10: Update macOS and Apps
Outdated software can cause performance issues. Apple releases updates that include performance improvements and bug fixes. App developers update their software to work better with newer macOS versions.
Check for macOS updates:
- Apple menu → System Settings
- Click General
- Click Software Update
Update App Store apps:
- Open the App Store
- Click Updates in the sidebar
- Click Update All (or update apps individually)
Update non-App Store apps:
Most apps have a built-in update check. Look for “Check for Updates” in the app’s menu bar (usually under the app name menu or Help menu).
Caution: If your Mac is older and running fine on its current macOS version, think twice before updating to the latest macOS. Newer versions may require more resources. Sometimes staying on an older, well-optimized version is the right choice for older hardware.
When this helps: When specific apps are crashing or behaving strangely, or when you’re running a version of macOS with known performance bugs.
Method 11: Reinstall macOS (Last Resort)
If nothing else works, a clean macOS installation removes years of accumulated cruft and gives you a fresh start. This is the nuclear option. Only do this after trying everything else.
Before reinstalling:
- Back up everything using Time Machine or manually copying files to an external drive
- Make a list of apps you’ll need to reinstall
- Save any license keys or passwords you’ll need
- Sign out of iCloud, iMessage, and any apps that use machine-specific licensing
Two approaches:
Reinstall over existing installation: This reinstalls macOS while keeping your files and apps. It can fix system-level issues without losing data. Boot into Recovery Mode (hold Command + R on Intel Macs, or hold the power button on Apple Silicon Macs until you see “Loading startup options”), then select “Reinstall macOS.”
Clean install: This erases everything and starts fresh. You’ll need to erase your drive first (using Disk Utility in Recovery Mode), then install macOS. This gives you the cleanest slate but requires you to restore files and reinstall apps afterward.
When this helps: When your Mac is severely sluggish after trying all other methods, or when you suspect deep-level corruption or junk accumulated over years.
Method 12: Consider Hardware Upgrades
Sometimes your Mac’s hardware is simply the bottleneck. Here’s the reality check:
What CAN be upgraded (on some models):
Storage (SSD): Some older Macs (particularly pre-2016 MacBook Pros and older iMacs) allow SSD upgrades or replacements. Swapping an old HDD for an SSD dramatically improves speed. However, most recent Macs have soldered storage that cannot be upgraded.
RAM (Intel Macs only): Some older iMacs and MacBook Pros allow RAM upgrades. Check your specific model at sites like OWC (macsales.com) or Crucial to see what’s possible.
What CANNOT be upgraded:
Any Apple Silicon Mac (M1/M2/M3/M4): RAM and storage are integrated into the chip or soldered to the board. No post-purchase upgrades are possible.
Most Macs from 2016 onward: Apple moved to soldered components, making upgrades impossible on most recent models.
When it’s time for a new Mac:
If your Mac is more than 5-7 years old, has maxed-out non-upgradeable specs, and still feels slow after trying all optimization methods, it may genuinely be time for a replacement. Apple Silicon Macs (M1 and later) offer dramatically better performance and efficiency compared to older Intel models.
Bonus Tips
A few quick wins that didn’t need their own sections:
- Close unused tabs: Each browser tab uses RAM. 50 open tabs = significant memory usage.
- Quit apps properly: Clicking the red X just closes the window. Press Command + Q to fully quit apps you’re not using.
- Reduce Spotlight indexing: If Spotlight constantly indexes, go to System Settings → Spotlight → Privacy and add folders you don’t need searched.
- Keep your Mac cool: Overheating causes throttling. Make sure vents aren’t blocked and consider a laptop stand for better airflow.
- Disable FileVault if not needed: FileVault encryption adds security but can slow older Macs. Find it in System Settings → Privacy & Security → FileVault. Only disable if you don’t need full-disk encryption.
- Be patient after updates: After major macOS updates, background processes like Spotlight indexing and Photo analysis run for hours or days. Give your Mac time to settle.
Frequently Asked Questions
Why is my Mac slow even though Activity Monitor shows low usage?
Check your storage space. If your drive is nearly full (less than 10% free), macOS struggles with memory management and temporary files, causing slowdowns even when CPU and RAM usage look normal. Free up space and see if that helps.
Can I upgrade the RAM on my M1/M2/M3 Mac?
No. Apple Silicon Macs have unified memory built into the chip itself. It cannot be upgraded after purchase. When buying a new Mac, choose your RAM configuration carefully since you’re stuck with it for the life of the machine. 16GB is the minimum I’d recommend for longevity.
How often should I restart my Mac?
There’s no hard rule, but restarting once a week is reasonable. If you notice your Mac getting sluggish, a restart is worth trying before digging into more complex solutions. It clears temporary files and resets processes that may have gotten stuck.
Will clearing the cache delete my saved passwords?
Clearing browser cache alone (cached images and files) won’t delete passwords. However, if you also clear cookies and site data, you’ll be logged out of websites. Passwords saved in your browser’s password manager or iCloud Keychain will still exist, but you’ll need to log in again to sites that used cookie-based sessions.
Does restarting my Mac actually make it faster?
Yes, often significantly. Restarting clears temporary files, frees up RAM, kills stuck background processes, and resets system components. If your Mac has been running for weeks without a restart, you’ll likely notice an immediate improvement. It’s the first thing to try before more complex fixes.
Final Thoughts
Most slow Macs don’t need replacing. Start with the free, easy fixes: restart, clear cache, manage startup items, free up storage. Use Activity Monitor to identify specific bottlenecks. Turn off visual effects if you have an older machine.
If nothing works and your Mac is several years old with non-upgradeable specs, that’s when you consider replacement. Apple Silicon Macs offer impressive performance, even at the base configurations.
The key is systematic troubleshooting. Don’t just try random fixes. Diagnose the actual problem first, then apply the appropriate solution.
Ventsislav Krastev
Ventsislav is a cybersecurity expert at SensorsTechForum since 2015. He has been researching, covering, helping victims with the latest malware infections plus testing and reviewing software and the newest tech developments. Having graduated Marketing as well, Ventsislav also has passion for learning new shifts and innovations in cybersecurity that become game changers. After studying Value Chain Management, Network Administration and Computer Administration of System Applications, he found his true calling within the cybersecrurity industry and is a strong believer in the education of every user towards online safety and security.
Follow Me:

Just applied these suggestions to my 13′ MacBook Air and there’s a huuge difference!! After I optimized the visual elements, I noticed a great impact on the speed. Thank you for the good work!
I can’t turn on my macbook.. I need to hold the power button like more than 7 seconds and then it starts to load very slow. I tried almost everything, even erased my mac, but the sutiation is still the same. If you can help I would really appreciate it.
Hi Juan,
Thanks for your comment. Sounds like it’s an issue that’s not related to the operating system. It’s rather something wrong with the hardware that is slowing down your Mac. I’d recommend that you bring the device to an Apple store and ask specialists to check it out.
Hi there.. I recently got a MacBook Air, and I did some configuration on it myself.. however, my screen started getting stuck since yesterday.. any idea why this might be happening?
Thank you for your step 5 5.Close programs that are running and you are not using them often.
This is what fixed my problem in 70%, the other 30% is the age of my MAC Pro, still great machine since 2012
The speed of my Mac has slowed down significantly and I’m trying to figure out how to speed it up. Just to mention that my Mac is more than three years old (not under AppleCare) and I cannot use their services for the maintenance
nice write-up, thanks! glad to say that the steps work!
Mange tak!